Register Vendor
Introduction/Purpose
The Register Vendor module is the definitive master database for all suppliers, service providers, and partners from whom your company procures goods or services. This includes suppliers of oil and white products, logistics companies, clearing agents, and providers of general services or expenses.
This function is a critical first step in the procure-to-pay lifecycle. Creating a detailed and accurate vendor profile is essential for issuing Purchase Orders, processing supplier invoices, managing payments, and ensuring financial and tax compliance. A well-maintained vendor master streamlines procurement operations and provides a single source of truth for all supplier information.
How To Navigate
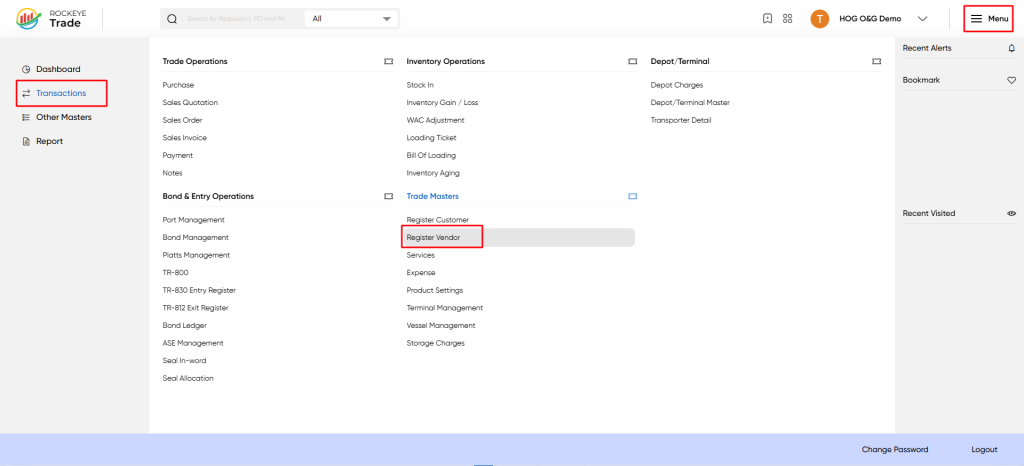
- Click on the "Menu" icon located in the top right corner of the Rockeye Trade interface.
- From the left-hand navigation pane, select "Transactions."
- Under the "Trade Masters" section, click on "Register Vendor."
Listing
Upon accessing the Register Vendor module, you will be presented with a list of all existing vendor records. This screen provides an overview of your supplier base.
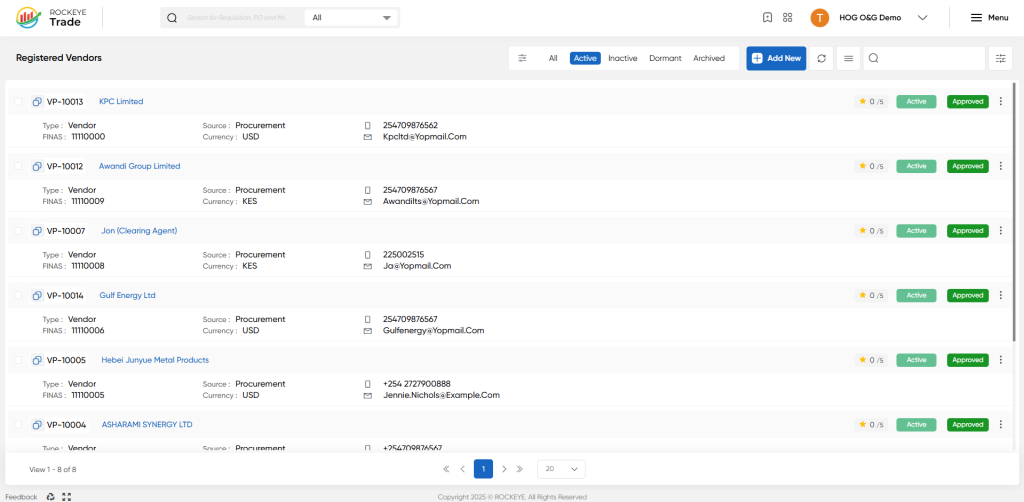
- Header Bar: Contains the module title ("Registered Vendors"), status filters ("All", "Active", "Inactive", "Dormant", "Archived"), an "+ Add New" button, and action icons for search, filter, and more options.
- Data Cards/List: The main area displaying a list of vendor entries in a card-like or simplified list format, showing key details.
- Pagination Controls: Located at the bottom, allowing navigation through multiple pages of entries if the list is extensive.
Each vendor card/entry in the list view displays key summary information:
- VP-XXXX (Code): A unique identifier for the vendor (e.g., VP-10013, VP-10012). This is typically a hyperlink to open the detailed vendor record.
- Vendor Name: The official name of the vendor (e.g., KPC Limited, Awandi Group Limited).
- Type: The category of vendor (e.g., Vendor, Jon (Clearing Agent)).
- Source: The origin or type of vendor record (e.g., Procurement).
- FNAS: An internal financial or accounting system reference number (e.g., T1110009).
- Currency: The primary operating or billing currency for the vendor (e.g., USD, KES).
- Contact Information: May include an icon for phone number and email address, along with the actual data (e.g., +2547098765)
- Rating: A star rating (0/5 in the example) for vendor performance or evaluation.
- Status: Indicates the current operational status of the vendor record (e.g., "Active," "Approved").
How To Add New Vendor
To add a new vendor to the system:
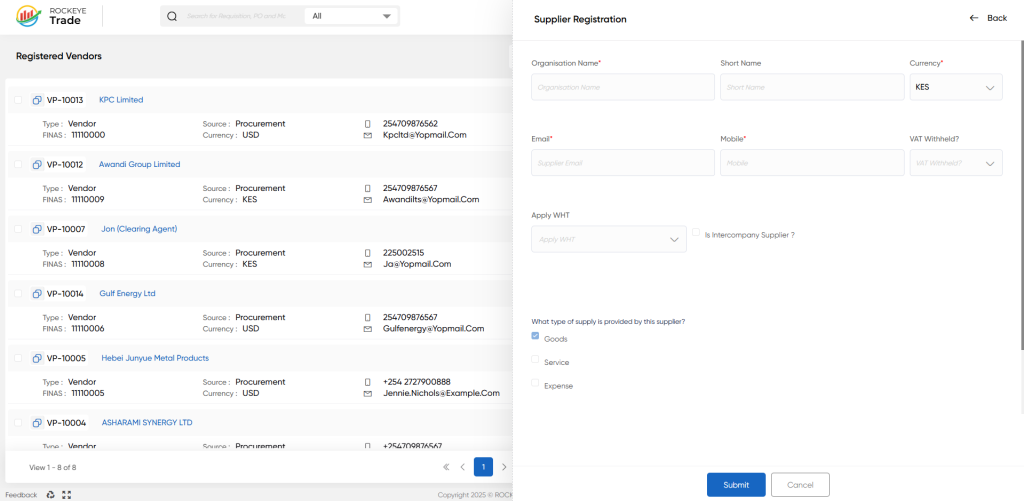
- From the Registered Vendors list view, click the "+ Add New" button located in the top right corner of the screen.
- A side panel will open, displaying the "Supplier Registration" form.
- Fill in the required fields:
- Organization Name *: Enter the complete legal name of the vendor company.
- Short Name: A shortened or abbreviated name for internal use.
- Currency *: Select the primary currency in which you conduct transactions with this vendor.
- Email *: Enter the primary email address for communication with the vendor.
- Mobile *: Enter the primary mobile contact number for the vendor.
- VAT Withheld?: Indicate whether Value Added Tax is withheld when paying this vendor.
- Apply WHT: Indicate whether Withholding Tax (WHT) should be applied to payments made to this vendor.
- Is Intercompany Supplier?: Check this box if the vendor is an entity within the same corporate group.
- What type of supply is provided by this supplier?: Select all relevant categories that describe the goods or services this vendor provides. This helps in categorizing vendors and matching them to procurement needs.
- Goods: For physical commodities like raw materials, oil products, or spare parts.
- Service: For non-physical services such as transportation, maintenance, inspection, or clearing agent services.
- Expense: For general operating expenses.
- Once all required information is entered, click the "Submit" button to save the new vendor record.
- If you wish to abandon the entry, click "Cancel" (or "Discard" as seen in other modules).
Refrence Video Link

