Seal In-Word
Introduction/Purpose
The Seal In-ward module is a specialized inventory function used to record the receipt of new physical security seals from a supplier. In the oil and gas industry, security seals are critical components used to secure truck compartments, valves, and storage facilities to prevent tampering and theft.
This screen allows you to create a digital record of every batch of seals purchased, including their unique number ranges, supplier details, and cost. By accurately logging seals as they come in, you build a reliable inventory that can then be used in the Seal Allocation process to assign specific seals to specific assets or deliveries. This ensures a complete audit trail for the entire chain of custody.
How To Navigate
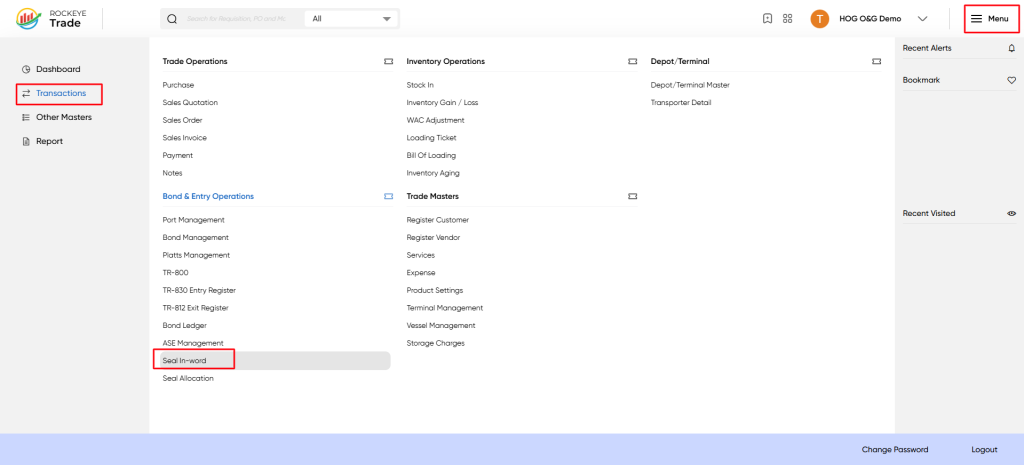
- From the main dashboard, click the Menu icon in the top-right corner to open the main navigation panel.
- In the navigation panel, click on the Transactions module.
- Under the Bond & Entry Operations section, select Seal In-ward.
Listing
Upon accessing the Seal In-Word module, you will be presented with a list of all existing seal receipt batches. This screen provides an overview of seals that have been received into your inventory.
- Header Bar: Contains the module title ("Seal In-Word") along with an "+ Add New" button and action icons for search, filter, and more options.
- Data Table: The main area displaying a list of all seal receipt batches with key details in columnar format.
- Pagination Controls: Located at the bottom, allowing navigation through multiple pages of entries if the list is extensive.
The data table presents the following columns, providing essential details for each seal batch entry:
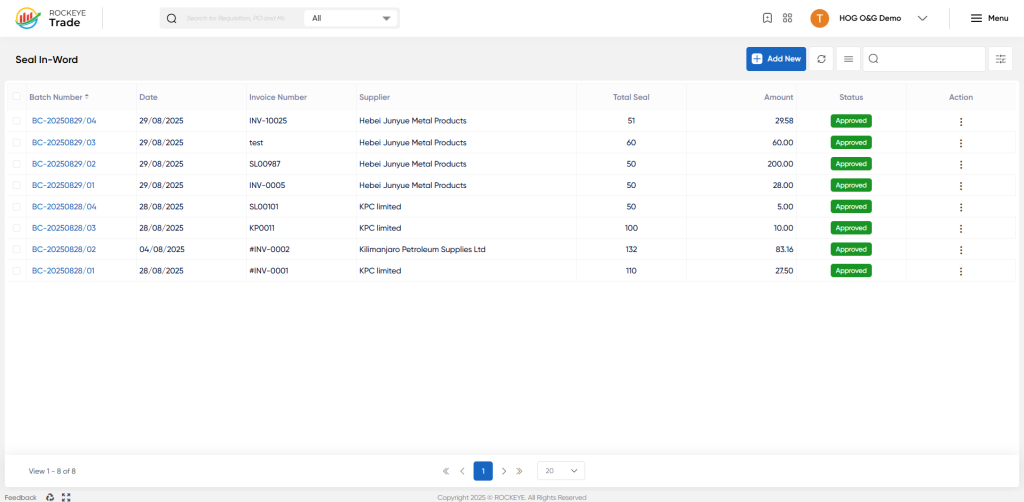
- Batch Number *: A unique identifier assigned to each batch of seals received (e.g., BC-20230829/04). This is typically a hyperlink to view or edit the detailed record.
- Date: The date on which the batch of seals was received into inventory.
- Invoice Number: The reference number of the supplier's invoice for this batch of seals.
- Supplier: The name of the company that supplied the seals (e.g., Hebei Junyue Metal Products, KPC Limited).
- Total Seal: The total quantity of individual seals recorded in this batch.
- Amount: The total cost (value) of all seals in this batch.
- Status: Indicates the current state of the seal receipt record (e.g., "Approved," "Draft," "Pending Approval").
- Action: An ellipsis (...) icon, typically providing options to View, Edit, or Delete the seal batch entry (subject to user permissions and status).
How To Add Seal In-Word
- Navigate to the Seal In-ward screen.
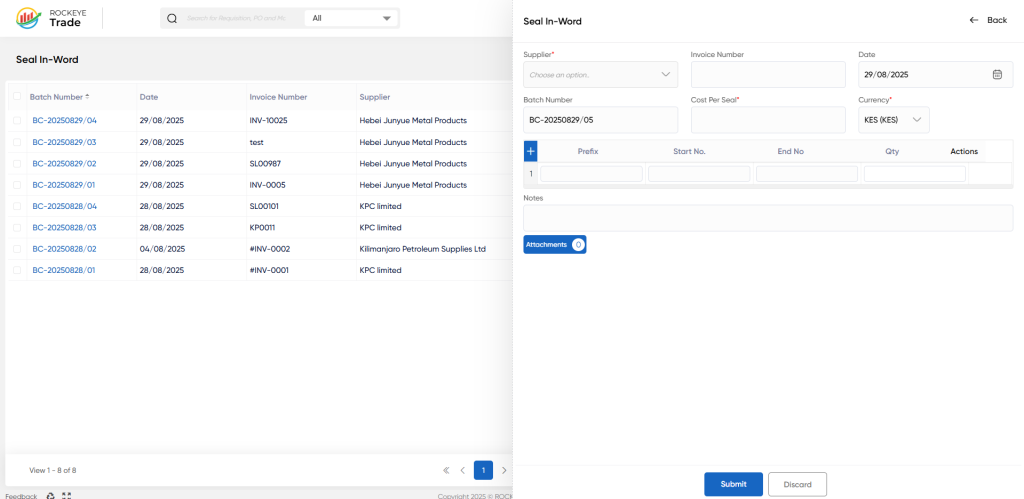
- Click the + Add New button in the toolbar to open the entry form.
- Fill in the required information:Header Information:
- Supplier: Select the seal supplier from the dropdown list.
- Invoice Number: Enter the corresponding invoice number from the supplier.
- Date: Select the date of receipt.
- Batch Number: This may be auto-generated or can be entered manually.
- Cost Per Seal: Enter the unit cost for a single seal.
- Currency: Select the currency of the purchase (e.g., KES).
- Seal Serial Number Ranges Configuration (Crucial for Traceability):
- This section allows you to record the serial numbers of the seals received, often in consecutive ranges.
- By default, one row for serial number entry is provided. Click the "+" icon to add more rows if you received seals in multiple ranges.
- Prefix: If the serial numbers have a common prefix (e.g., "KRA", "ABC"), enter it here.
- Start No: Enter the starting serial number of a consecutive range of seals.
- End No: Enter the ending serial number of that same consecutive range.
- Qty: The system will likely auto-calculate this based on "Start No" and "End No," or you may enter it manually. This represents the quantity of seals in this specific range.
- The "Actions" column (Bin icon) allows you to remove a specific serial number range line if needed.
- Notes: Add any additional remarks or details regarding the seal receipt.
- Attachments: Use the "Attachments" button to upload relevant documents, such as the supplier's invoice or delivery note.
- Once all required information is entered, click the "Submit" button to save the new Seal In-Word entry.
- If you wish to abandon the entry, click "Discard."
Refrence Video Link

