Register Customer
Introduction/Purpose
The Register Customer module is the central master database for all clients, business partners, and companies to whom you sell oil, white products, or other commodities. This is a foundational module where you create and maintain a comprehensive profile for each customer, capturing everything from basic contact details to critical financial, tax, and banking information.
Maintaining an accurate and complete customer master is vital for the entire trade cycle. The information entered here is used in all subsequent sales transactions, including Sales Quotations, Sales Orders, Invoicing, and Payment tracking. A properly registered customer ensures smooth operations, correct billing, and effective financial reporting.
How To Navigate
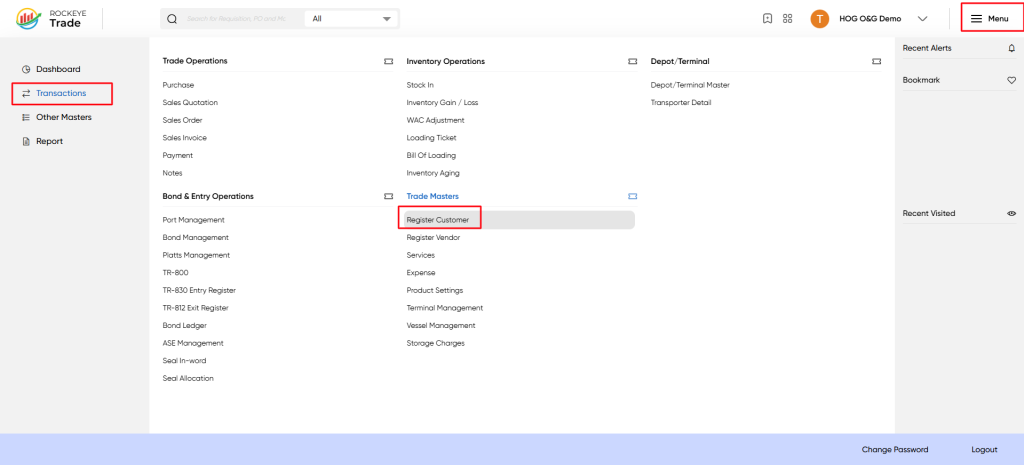
- Click on the "Menu" icon located in the top right corner of the Rockeye Trade interface.
- From the left-hand navigation pane, select Transactions.
- Under the "Trade Masters" section, click on Register Customer.
Listing
Upon accessing the Register Customer module, you will be presented with a list of all existing customer records. This screen provides an overview of your customer base.
- Header Bar: Contains the module title ("Customer"), status filters ("All", "Active", "Inactive"), an "+ Add New" button, and action icons for search, filter, and more options.
- Data Cards/List: The main area displaying a list of customer entries in a card-like or simplified list format, showing key details.
- Pagination Controls: Located at the bottom, allowing navigation through multiple pages of entries if the list is extensive.
Each customer card/entry in the list view displays key summary information:
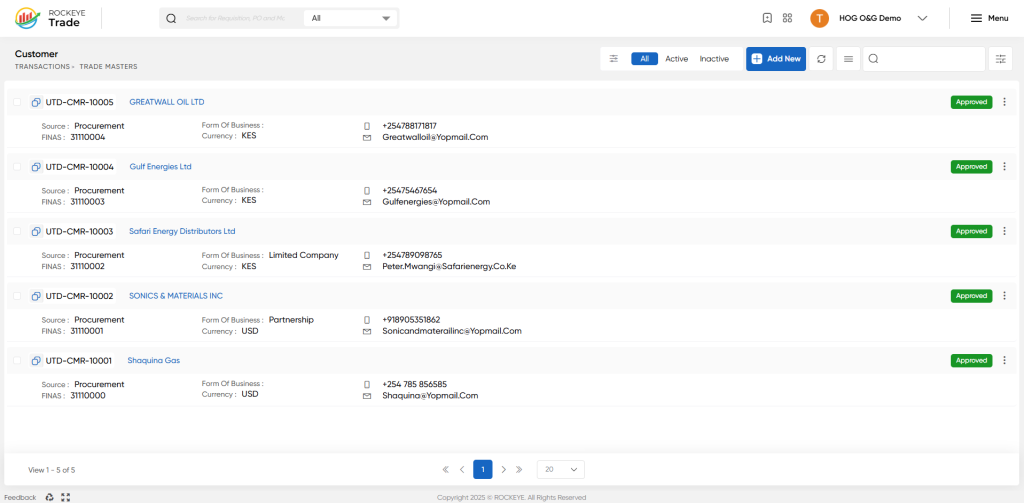
- UTD-CMR-XXXX (Code): A unique identifier for the customer (e.g., UTD-CMR-10005). This is typically a hyperlink to open the detailed customer record.
- Customer Name: The official name of the customer (e.g., GREATWALL OIL LTD, Gulf Energies Ltd).
- Source: The origin or type of customer (e.g., Procurement).
- FNAS: An internal financial or accounting system reference number (e.g., 3110004).
- Form Of Business: The legal structure of the customer's business (e.g., Limited Company, Partnership).
- Currency: The primary operating or billing currency for the customer (e.g., KES, USD).
- Contact Information: May include an icon for phone number and email address, along with the actual data.
- Status: Indicates the current status of the customer record (e.g., "Approved").
How to Add Customer
To add a new customer to the system:
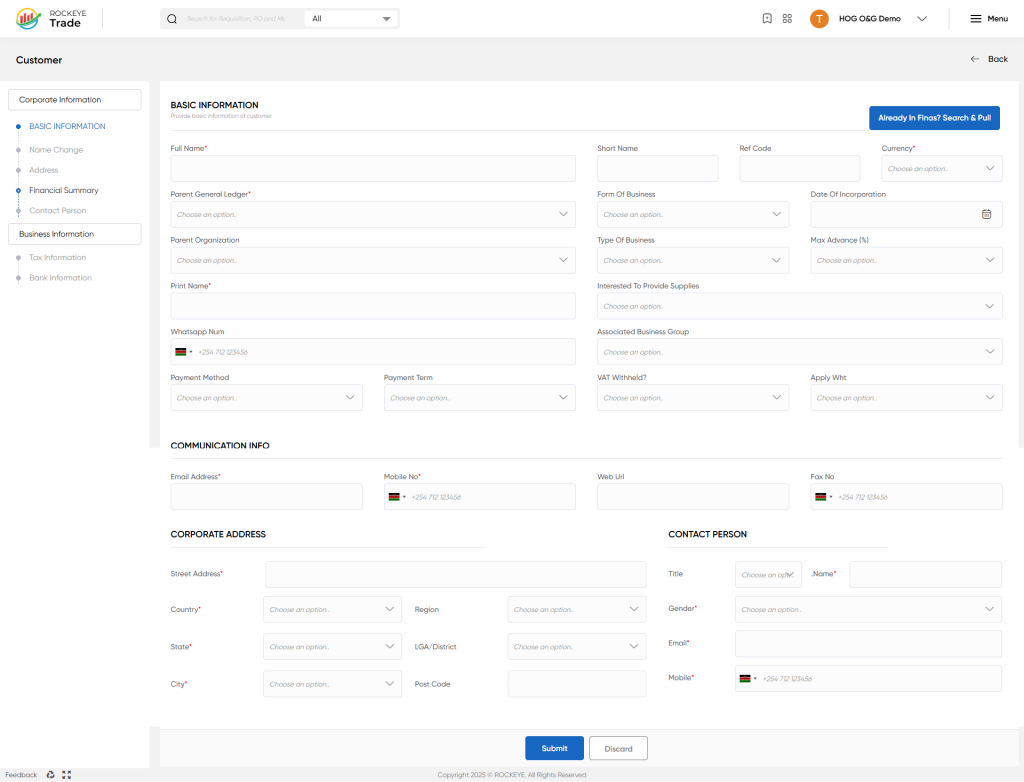
- From the Customer list view, click the "+ Add New" button located in the top right corner of the screen.
- A detailed "Customer" form will open, designed for comprehensive data entry. This form is typically structured with a left-hand navigation pane to organize different categories of information.
- Left-Hand Navigation Tabs (Corporate Information):
- BASIC INFORMATION (Currently Selected): This is the default tab where you enter core details.
- Name Change: To record historical changes to the customer's name.
- Address: To manage multiple addresses (physical, mailing, billing).
- Financial Summary: For credit limits, payment terms, and financial health.
- Contact Person: To add and manage multiple contact individuals within the customer organization.
- Business Information: For details about their industry, business type, etc.
- Tax Information: For VAT/TIN numbers and tax registration details.
- Bank Information: To record bank accounts for payments.
- Fill in the fields under "BASIC INFORMATION":
- Full Name *: Enter the complete legal name of the customer.
- Short Name: A shortened or abbreviated name for internal use.
- Ref Code: An internal reference code for the customer.
- Currency *: Select the primary currency for transactions with this customer.
- Parent General Ledger *: Link to the appropriate General Ledger account.
- Form Of Business: Select the legal form of the customer's business (e.g., Sole Proprietorship, Partnership, Limited Company).
- Date Of Incorporation: The date the customer business was legally formed.
- Parent Organization: If this customer is part of a larger group, select the parent entity.
- Type Of Business: Categorize the customer's business (e.g., Retail, Wholesale, Manufacturing).
- Max Advance (%): Define the maximum advance payment percentage allowed.
- Print Name: The name to appear on printed documents.
- Interested To Provide Supplies: (Likely irrelevant for customer, could be for vendor or dual role customer/vendor).
- Whatsapp Num: WhatsApp contact number.
- Associated Business Group: Link to an internal business group.
- Payment Method: Select preferred payment method.
- Payment Term: Define credit terms (e.g., Net 30, Due on Receipt).
- VAT Withheld?: Indicate if VAT is withheld.
- Apply Wht: Indicate if Withholding Tax applies.
- Fill in "COMMUNICATION INFO":
- Email Address *: Primary email address for communication.
- Mobile No *: Primary mobile contact number.
- Web URL: Customer's website address.
- Fax No: Fax number, if applicable.
- Fill in "CORPORATE ADDRESS":
- Street Address *: Street and building details.
- Country *: Select the country from the dropdown.
- Region: Select the region.
- State *: Select the state/province.
- LGA/District: Select the local government area/district.
- City *: Enter the city.
- Post Code: Enter the postal code.
- Fill in "CONTACT PERSON" (for a primary contact):
- Title: Mr./Ms./Dr.
- Name *: Name of the contact person.
- Gender: Male/Female.
- Email *: Email of the contact person.
- Mobile *: Mobile number of the contact person.
- Navigate to other tabs (e.g., "Address", "Financial Summary", "Tax Information", "Bank Information") on the left-hand side to input more detailed information as required.
- Once all required information is entered across all relevant tabs, click the "Submit" button at the bottom of the form to save the new customer record.
- If you wish to abandon the entry, click "Discard."
Refrence Video Link

