Seal Allocation
The Seal Allocation module is the operational link between your bulk seal inventory and its day-to-day use. After seals are received and registered through the Seal In-ward screen, this module is used to formally issue or "allocate" specific ranges of those seals to a designated person (e.g., a Depot Manager, Supervisor) at a specific location (e.g., a Depot or Terminal).
This process is fundamental for maintaining a strict chain of custody and accountability. By creating an allocation record, you establish a clear audit trail showing who is responsible for which seals and where they are located. This is essential for security, loss prevention, and operational integrity in the oil and gas supply chain.
How To Naviagte
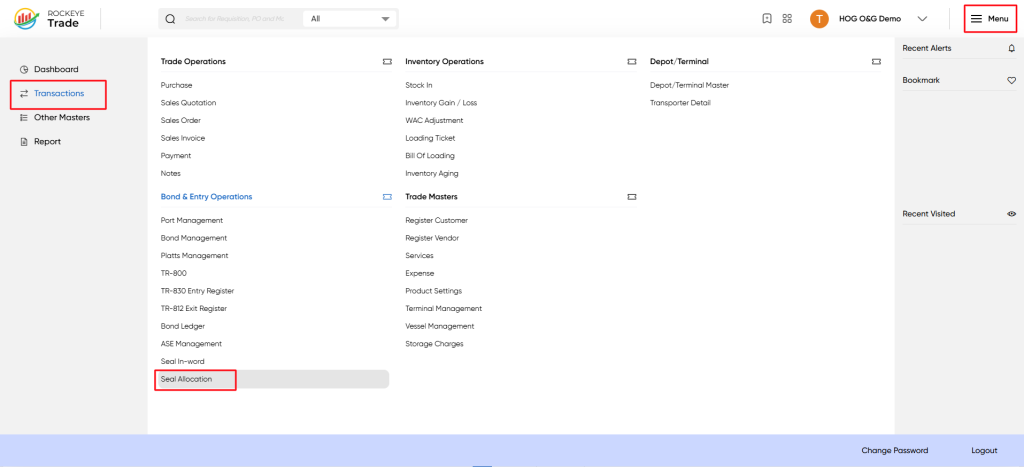
- Click on the "Menu" icon located in the top right corner of the Rockeye Trade interface.
- From the left-hand navigation pane, select "Transactions."
- Under the "Bond & Entry Operations" section, click on "Seal Allocation."
Listing
Upon accessing the Seal Allocation module, you will be presented with a list of all existing seal allocation records. This screen provides an overview of how seals have been distributed across your operations.
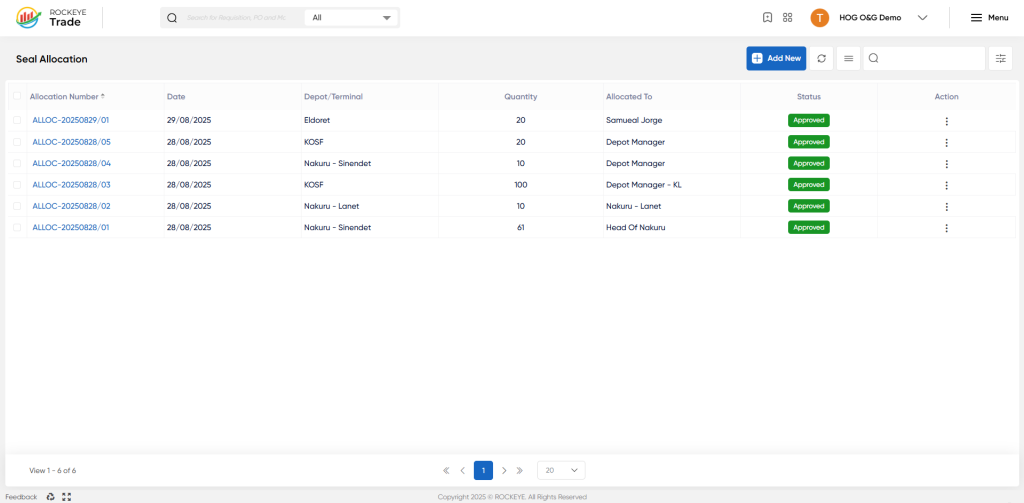
- Header Bar: Contains the module title ("Seal Allocation") along with an "+ Add New" button and action icons for search, filter, and more options.
- Data Table: The main area displaying a list of all seal allocation entries with key details in columnar format.
- Pagination Controls: Located at the bottom, allowing navigation through multiple pages of entries if the list is extensive.
The data table presents the following columns, providing essential details for each seal allocation entry:
- Allocation Number *: A unique alphanumeric identifier assigned to each seal allocation record (e.g., ALLOC-20230829/01). This is typically a hyperlink to view or edit the detailed record.
- Date: The date on which the seals were allocated.
- Depot/Terminal: The specific depot or terminal to which the seals were allocated (e.g., Eldoret, KOSF, Nakuru - Sinendet).
- Quantity: The total number of individual seals allocated in this record.
- Allocated To: The name of the individual or role responsible for the allocated seals (e.g., Samuel Jorge, Depot Manager, Head Of Nakuru).
- Status: Indicates the current state of the allocation record (e.g., "Approved," "Draft," "Pending Approval").
- Action: An ellipsis (...) icon, typically providing options to View, Edit, or Delete the allocation entry (subject to user permissions and status).
How To Add Seal Allocation
To record a new distribution of security seals:
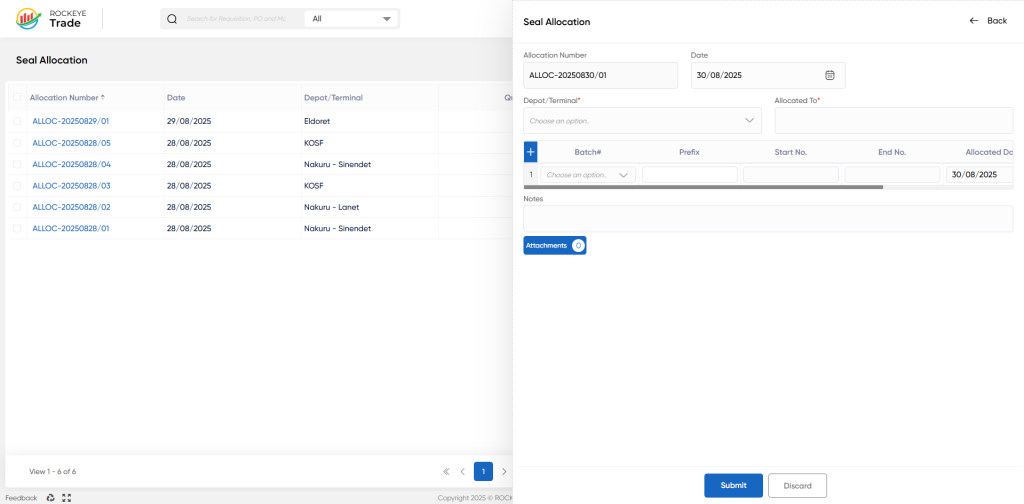
- From the Seal Allocation list view, click the "+ Add New" button located in the top right corner of the screen.
- A side panel will open, displaying the "Seal Allocation" creation form.
- Fill in the required fields:
- Allocation Number: This field is often auto-generated by the system (e.g., ALLOC-20230829/02).
- Date: Select the date of allocation using the date picker.
- Depot/Terminal *: Select the specific depot or terminal where the seals are being sent from the dropdown list.
- Allocated To *: Enter the name of the individual or their role who will be responsible for these seals at the selected depot/terminal.
- Seal Range Selection (Linking to "Seal In-Word"):
- This section allows you to select specific batches or ranges of seals that are being allocated. These seals must have first been received through the "Seal In-Word" module.
- Click the "+" icon to add a new row for selecting a seal batch.
- Batch: Choose the relevant "Seal In-Word" batch number from the dropdown list. This will populate the
Prefix,Start No, andEnd Nofields based on the seals available in that batch. - Prefix: (Auto-populated from "Seal In-Word") The prefix of the seal serial number range.
- Start No: (Auto-populated) The starting serial number of the seals being allocated from the chosen batch.
- End No: (Auto-populated) The ending serial number of the seals being allocated from the chosen batch.
- Allocated Date: The date on which this specific range of seals was allocated.
- The "Actions" column (Bin icon) allows you to remove a specific seal range line from the allocation if needed.
- Notes: Add any additional remarks or details regarding the seal allocation.
- Attachments: Use the "Attachments" button to upload relevant documents, such as internal transfer notes or acknowledgement receipts.
- Once all required information is entered, click the "Submit" button to save the new Seal Allocation entry.
- If you wish to abandon the entry, click "Discard."

