Purpose: To provide a consolidated view of the user's financial standing, including balances, pending transactions, and detailed transaction history.
Navigation : Tap on the 'WALLET' tab located in the top navigation bar.
Description :
Balance Information:
Receivable Balance: Displays the total amount owed to the user or available to be received.
Pending PV: Shows the value of pending Purchase Vouchers or similar pending financial entries.
Transaction History: The wallet displays a chronological list of transactions, typically showing:
Transaction Type: Indicates whether it's a CREDIT or DEBIT transaction.
Amount: The value of the transaction.
Payment TXN: The unique identifier for the payment transaction (e.g., TR/2024/10/00004).
Bank: The bank associated with the transaction.
Ref. ID: Reference Identification number, if applicable.
Date & Time: When the transaction was performed.
Performed By: The user or system entity that executed the transaction.
Description: Additional details or notes related to the transaction. Users can often tap to expand this section for more information.
Managing Payments
Purpose: To monitor the status of payments made or received, track transaction history, and manage payment disputes.
Navigation : Tap on the 'PAYMENTS' tab located in the top navigation bar.
Description:
Status Filters: Categorize payments based on their current stage:
ALL: Displays all recorded payment transactions.
PENDING: Shows payments that are currently being processed or awaiting confirmation.
CONFIRMED: Lists payments that have been successfully processed and confirmed.
DISPUTE: Highlights payments that are currently under review or dispute.
Viewing Invoices
Purpose: To review outstanding and settled invoices, track payment statuses, and manage associated financial details.
Navigation : Tap on the 'INVOICES' tab located in the top navigation bar.
Description:
Status Filters: Filter the invoice list based on their payment status:
ALL: Displays all invoices regardless of status.
PENDING: Shows invoices that are awaiting payment.
PARTIAL PAID: Displays invoices where only a portion of the amount has been paid.
PAID: Lists invoices that have been fully settled.
Financial Summary: Key financial totals are displayed prominently:
Total Amount: Represents the aggregate value of all invoices (or filtered invoices).
Total Payable Amount: Shows the sum of amounts currently due across all selected invoices.
Invoice Details: Each listed invoice typically includes:
Invoice Identification Number (e.g., HOG/TPV/25/00009).
Amount details (Payable Amount, Due Amount).
Association details (e.g., Associated With HOG/TRP/ 25/00005).
Voucher Date.
Information on who added the invoice (e.g., Added By Ogbeche Olatunde) and the date.
Payment Status Indicator (e.g., UNPAID).
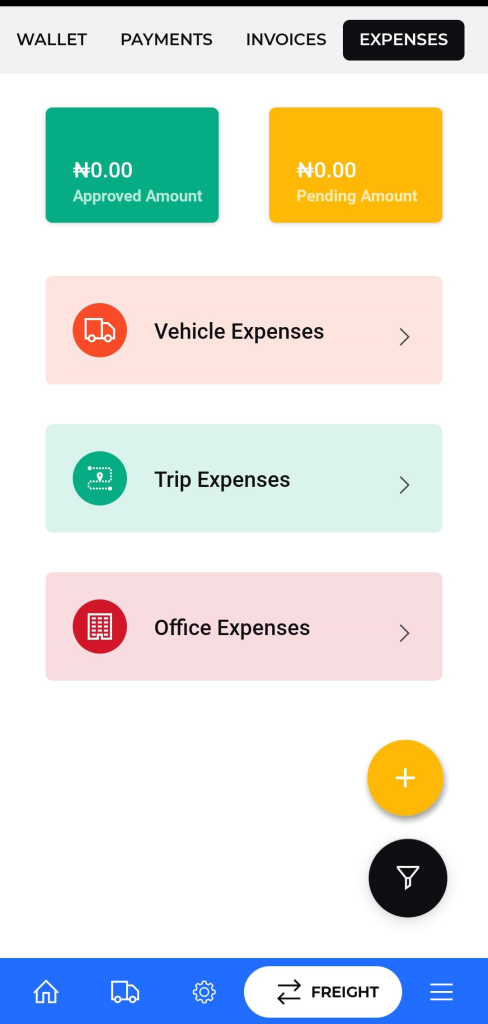
Managing Expenses
Purpose: To track, view, and manage various operational expenses related to the transport business.
Navigation: Tap on the 'EXPENSES' tab located in the top navigation bar.
Description : :
Summary View: The top section provides a quick overview of financial statuses:
Approved Amount: The total value of expenses that have been approved.
Pending Amount: The total value of expenses currently awaiting approval.
Expense Categories: Access detailed expense reports by tapping on the respective category links:
Vehicle Expenses: View expenses related to vehicle maintenance, repairs, fuel (if categorized separately), etc
Trip Expenses: View expenses incurred during specific trips, such as driver allowances, tolls, etc. (See Article: Adding Trip Expenses).
Office Expenses: View general administrative and operational costs associated with the office. (See Article: Adding Office Expenses).
Actions:
Add Expense (+): The floating action button (+) allows users to add new expense records. Selecting a category from the screen above will direct you to the relevant expense entry form.
Filter/Sort: Use the floating 'Y' icon (likely representing filter or sort options) to manage the displayed list of expenses.
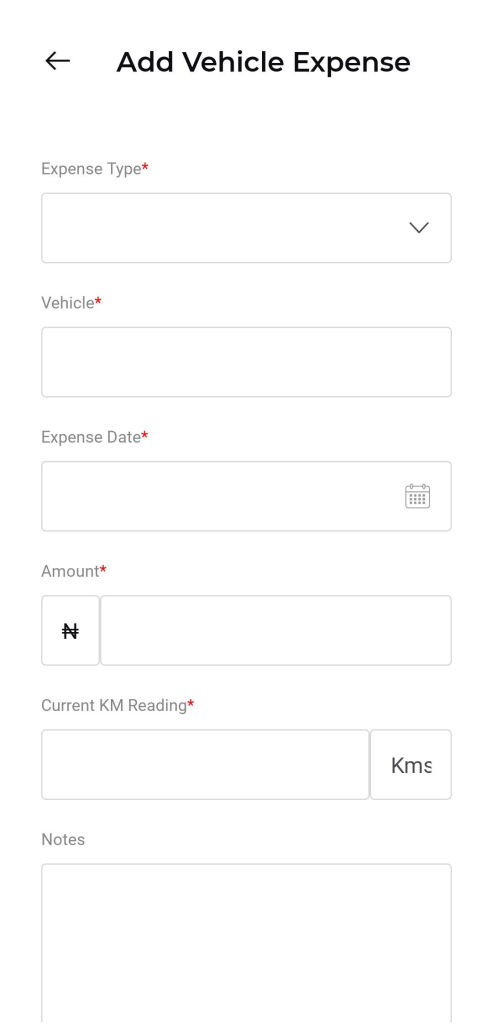
Adding Vehicle Expenses
Purpose: To record expenses specifically related to vehicles, such as maintenance, repairs, or parts.
Navigation :
Navigate to the 'EXPENSES' tab.
Tap on the 'Vehicle Expenses' option.
Description:
To add new Vehicle Expense below are the fields that include:
Category: Pre-selected as 'Vehicle Expenses'.
Amount: Enter the total monetary value of the expense.
Date: Select the date the expense was incurred or paid.
Remarks: Provide a description or notes about the expense.
Attachments: Upload relevant documents like receipts or invoices.
Submit the expense details using the appropriate button
Adding Trip Expenses
Purpose: To record expenses incurred during the course of a specific transport trip, such as fuel, tolls, driver allowances, or parking fees.
Navigation:
Navigate to the 'EXPENSES' tab.
Tap on the 'Trip Expenses' option.
Description:
To add new Trip Expense below are the fields that include:
Category: Pre-selected as 'Trip Expenses'.
Amount: Enter the total monetary value of the expense.
Date: Select the date the expense was incurred or paid.
Remarks:Provide a description or notes about the expense. You may also be able to associate the expense with a specific trip ID if prompted.
Attachments: Upload relevant documents like receipts or invoices.
Submit the expense details using the appropriate button.
Adding Office Expenses
Purpose: To record general administrative or operational expenses not directly tied to vehicles or specific trips, such as rent, utilities, or office supplies.
Navigation:
Navigate to the 'EXPENSES' tab.
Tap on the 'Office Expenses' option.
Description:
To add new Office Expense below are the fields that include:
Category: Pre-selected as 'Office Expenses'.
Amount: Enter the total monetary value of the expense.
Date: Select the date the expense was incurred or paid.
Remarks: Provide a description or notes about the expense
Attachments:Upload relevant documents like receipts or invoices.
Submit the expense details using the appropriate button.