Trip Management
Purpose :
Allows you to create, view, and manage all transportation trips. This knowledge base article provides a guide to navigating the trip list, creating new trips, and using the various management features.
Viewing the Trips List
The trip list provides a summary of all scheduled, active, and completed trips.
- Filters: You can filter the list to view trips based on their current status using the buttons at the top:
- ALL: Displays every trip registered in the system.
- SCHEDULED: Shows trips that have been planned and assigned but have not yet started.
- UPCOMING: Displays trips that are scheduled for a future date.
- ON GOING: Shows trips that are currently in transit.
- Delivered : Shows trips that are Completed.
- Trip Information: Each card in the list displays key details:
- Trip ID: A unique reference number for the trip (e.g., "HOG/TRP/25/07/0003").
- Trip Status: The current status of the trip (e.g., SCHEDULED, DELIVERED).
- Vehicle: The registration number of the assigned vehicle.
- Driver Name: The name of the assigned driver.
- Scheduled Date: The date and time the trip is scheduled to start.
- Origin & Destination: The starting and ending locations of the trip.

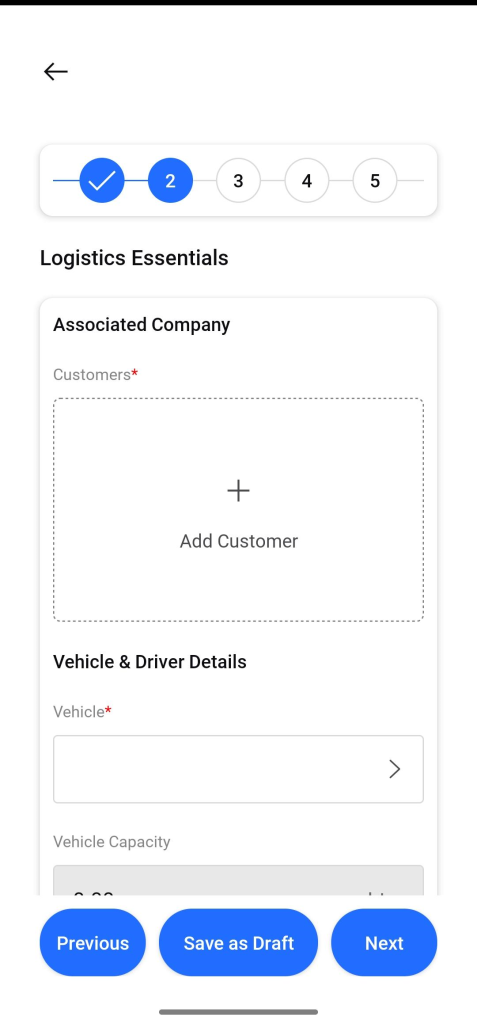
Creating a New Trip
To create a new trip, you will use a multi-step form.
- From the trip list screen, tap the "+" floating action button at the bottom-right corner.
- The "Create Trip" form will appear, guiding you through a series of steps (1 to 5).
- Step 1: Cargo Section
- Vehicle Type*: Select the type of cargo the vehicle will be carrying from the provided options (e.g., Wet Cargo, Dry Cargo, Bulk Cargo, Container).
- Product Name*: Enter or select the specific product being transported.
- Step 2: Logistics Essentials
- Associated Company (Customers)*: Add the customer(s) for this trip.
- Vehicle*: Select the vehicle to be used for the trip.
- Driver Details: Add the driver(s) who will be operating the vehicle.
- After completing each step, you can use the action buttons at the bottom:
- Previous: Return to the previous step.
- Save as Draft: Save the current progress without creating the trip.
- Next: Proceed to the next step of the form.

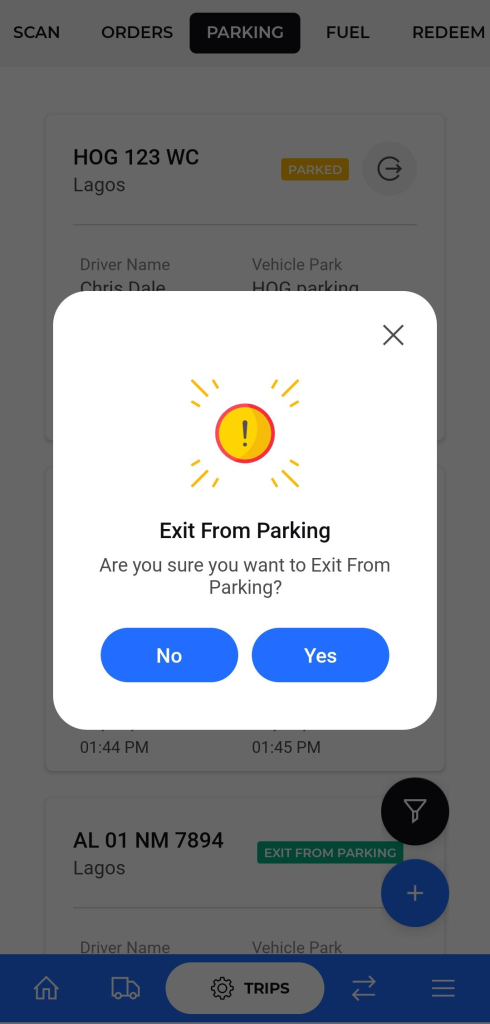
Parking Management
Purpose
- Provides a real-time log of vehicles that are checked into or have recently departed from designated parking locations.
Navigation
- Trips > PARKING
Description
- Parking Status Cards: Each entry is displayed on a card that shows the key details needed to monitor parking activity.
Key fields on each parking card :
- Vehicle ID: The vehicle registration number.
- Status: The current parking state.
- PARKED: The vehicle is currently inside a designated parking area.
- EXIT FROM PARKING: The vehicle has recently been checked out of the parking area.
- Driver Name: The name of the driver operating the vehicle.
- Vehicle Park: The name of the specific parking depot.
- Entry Time: The exact date and time the vehicle was checked into the parking location.
- Exit Time: The date and time the vehicle was checked out.
Fuel Management :
Purpose
- Provides a real-time log of all fuel transactions (voucher or cash) associated with trips, depots, and fuel dispensations. It enables tracking of fuel usage, pricing, and redemption.
Navigation
- Trips > FUEL
Description
- Fuel Status Cards: Each fuel entry is displayed on a card that shows the essential details needed to monitor fueling activity.
Key fields on each fuel card :
- Fuel Type: Voucher or Cash.
- Fuel for Trip: Yes or No, indicating whether the fuel is tied to a specific trip.
- Trip: The associated trip ID.
- Product: The fuel product used (e.g., Premium Motor Spirit).
- Fuel Rate Per Litre: The price per litre used for the transaction.
- Depot: The fuel depot or location where fuel was dispensed.
- Quantity: The amount of fuel dispensed, typically in litres.
- Depot Amount (if shown): The monetary value of the fuel dispensed.
- Redeem Quantity and Redeem Amount: (If applicable) quantities and values redeemed against a voucher or incentive.
- Entry Time and Exit Time: Timestamps for when the fuel entry was created and, if applicable, when it was reversed or closed.
- Attachment: Optional attachments such as receipts or invoices.

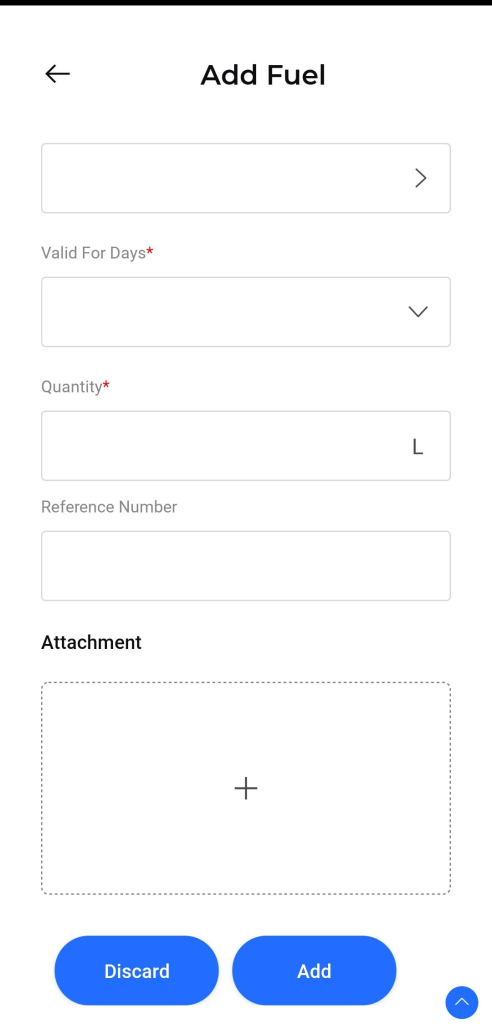
Add
Tap Add Fuel to open the Add Fuel form.
- Fill in the required fields:
- Type: Choose Voucher or Cash.
- Fuel for Trip: Yes or No.
- Trip: Select the related trip ID.
- Product: Select the fuel product.
- Fuel Rate Per Litre: Enter the price per litre.
- Depot: Select the depot used.
- Valid For Days: Choose the validity window for the fuel entry.
- Quantity: Enter the amount of fuel in litres.
- Reference Number: Optional internal reference.
- Attachment: Optional upload of related receipts or documents.
- Actions:
- Add: Save the new fuel entry to the system.
- Discard: Cancel and close without saving.
Using the Redeem Feature
- Purpose : To facilitate a redemption process, potentially for vouchers, points, or services, using a QR code.
- Navigation : Tap on the 'REDEEM' tab located in the top navigation bar.
- Functionality :
- The screen prominently displays a QR code.
- This feature is likely used in scenarios requiring verification, such as drivers presenting the code at a location for fuel collection, confirming delivery, or redeeming benefits. The specific context depends on the system's workflow.

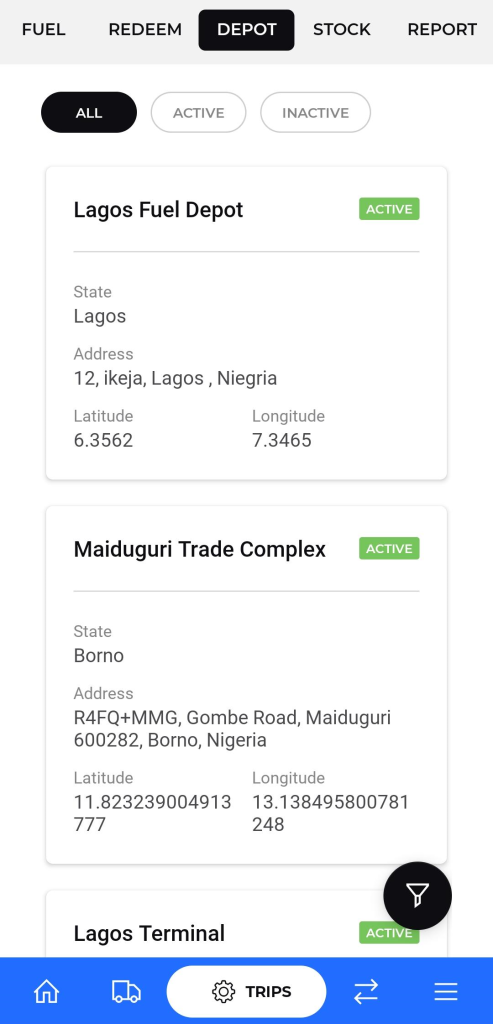
Viewing Depot Information
- Purpose: To browse and review details of all registered depots within the transport network.
- Navigation: Tap on the 'DEPOT' tab located in the top navigation bar.
- Features:
- Status Filters: Use the 'ALL', 'ACTIVE', or 'INACTIVE' tabs at the top to filter the list of depots based on their operational status.
- Depot Details: Each depot listing includes:
- Depot Name
- Operational Status
- State
- Full Address
- Geographical Coordinates (Latitude and Longitude)
Managing Stock Levels
- Purpose: To view fuel inventory details across different locations and manage stock-related transactions.
- Navigation : Tap on the 'STOCK' tab located in the top navigation bar.
- Viewing Stock Details:
- The screen lists different fuel products (e.g., AGO, PMS) available at various locations
- For each entry, the current quantity (in Liters), Weighted Average Cost (WAC), and any pending quantities or awaiting vouchers are displayed.
- Performing Stock Actions:
- Locate the specific stock item you wish to manage.
- Tap the vertical ellipsis icon located to the right of the stock item details.
- Select an option from the menu that appears:
- View Transactions: Displays a history of all transactions (fueling, adjustments) related to this specific stock item and location.
- Credit/Debit: Opens the transaction form (see Article 3: Recording Credit/Debit Transactions) to record adjustments to the stock.
- Update WAC: Allows you to manually update the Weighted Average Cost for the selected stock item.
- View WAC logs: Shows a history of changes made to the WAC value.


To Add new Stock need to add below details :
- Type Of Transaction: Select either 'Credit' (to add fuel stock) or 'Debit' (to remove fuel stock) using the radio buttons.
- Depot: Tap to select the relevant depot where the transaction occurred or is being recorded.
- Product: Tap to select the specific fuel product involved in the transaction.
- Quantity: Enter the amount of fuel (in Liters 'L') being credited or debited.
- Price: Enter the price per unit of fuel (in the specified currency '₦').
- Remarks: Add any relevant notes or comments regarding the transaction.
- Attachments: Use this option to upload supporting documents or images (e.g., receipts, photos).
- Submit the transaction (button not visible in screenshot, but implied).

Manage Reports :
- Purpose: To access and view various operational reports generated by the system.
- Navigation : Tap on the 'REPORT' tab located in the top navigation bar.
- Available Reports:
- Trip-Dispatch For Delivery: Allows users to view reports specifically related to trip dispatches and delivery statuses.
- Trip-Safety Check: Provides access to reports detailing the results of safety checks conducted for trips.
- Vehicle Report: Enables users to view comprehensive reports pertaining to vehicle status, maintenance, or other relevant vehicle data.
