Payroll Dashboard
Introduction/Purpose:
A payroll dashboard is an interactive interface displaying real-time payroll data, allowing HR and payroll professionals to analyze key metrics and trends efficiently. It provides a centralized platform for monitoring and managing payroll processes, offering easy access to essential information within an organization's payroll HRMS.
Dependency to record payroll dashboard:
To effectively record payroll information in a payroll dashboard, there are several key dependencies that need to be considered.
- Employee Data: Accurate and up-to-date employee information is a crucial dependency for recording payroll in the dashboard. This includes details such as employee names, identification numbers, tax withholding status, salary or hourly rates, and other relevant employment information.
- Time and Attendance Tracking: To calculate employee wages accurately, the payroll dashboard relies on time and attendance data. This data may come from time-tracking systems, punch cards, or other timekeeping methods to record hours worked, absences, leaves, and overtime.
- Benefits and Deductions: The payroll dashboard should account for various benefits and deductions applicable to employees, such as health insurance premiums, retirement contributions, taxes, and other withholdings. The accurate recording of these amounts ensures correct net pay calculations.
By addressing these dependencies and ensuring their accurate and timely integration into the payroll dashboard, organizations can maintain reliable and efficient recording of payroll data.
Process Flow:
How To Navigate:
The navigation to record an Payroll Dashboard in the HRMS system typically involves the following steps:
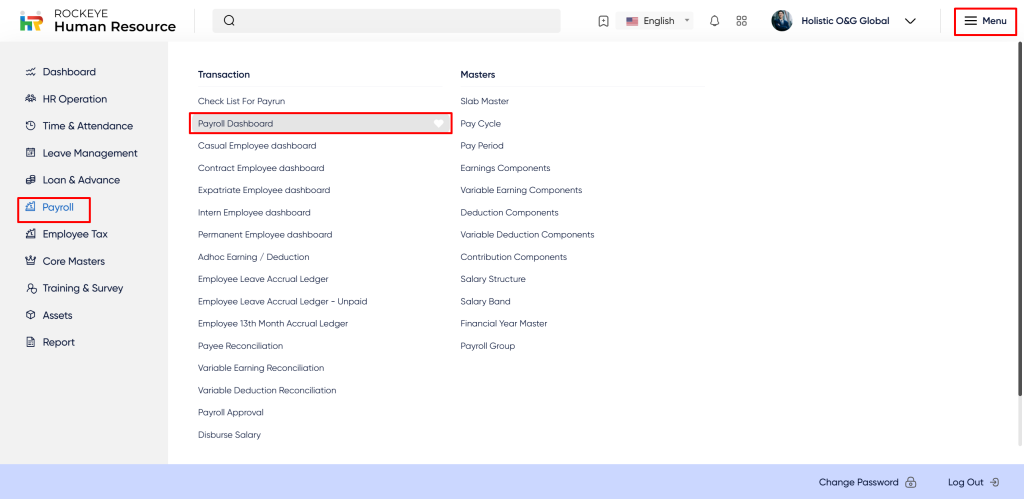
- Click on the main navigation icon which is located on the top right corner of the screen then click on the Payroll section which is located on the left side menus on the screen.
- Click on the Payroll Dashboard section which is located in the masters under Payroll. After clicking on this link you can navigate Payroll Dashboard record Listing.
Listing:
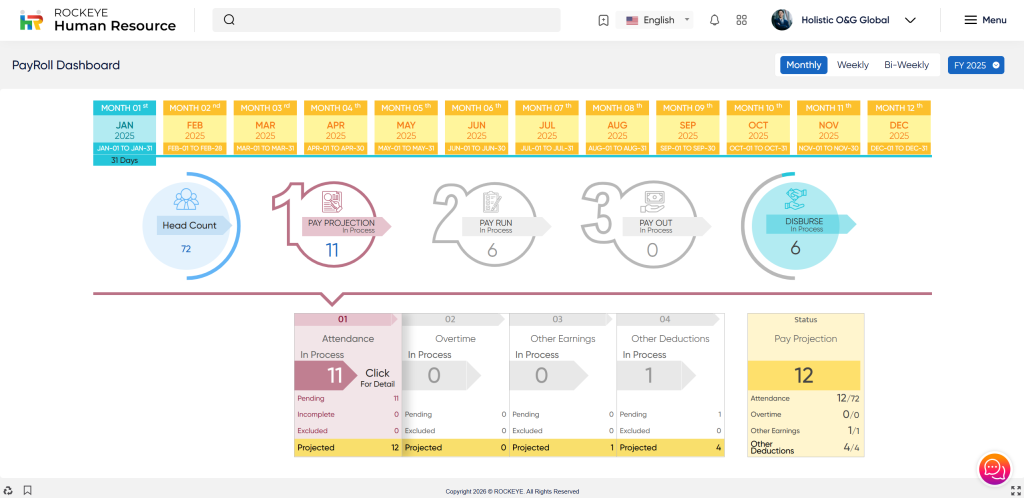
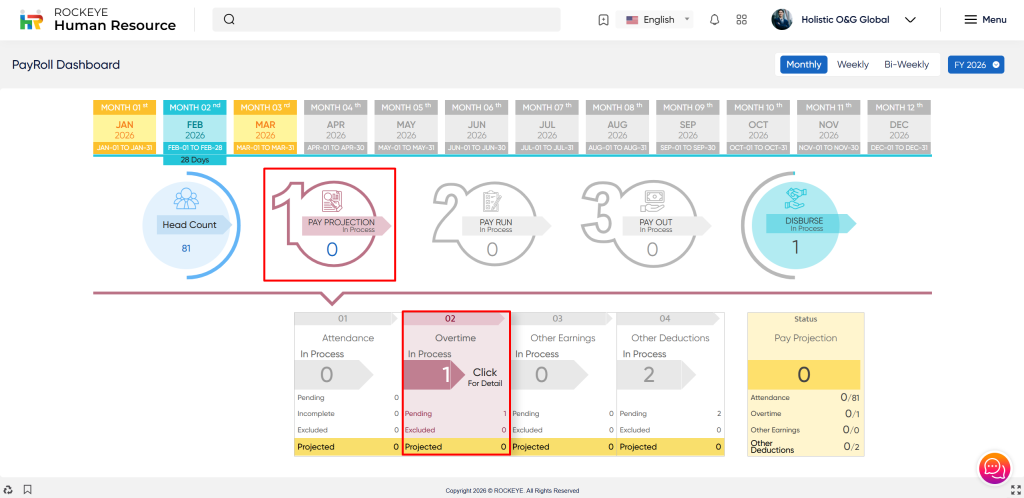
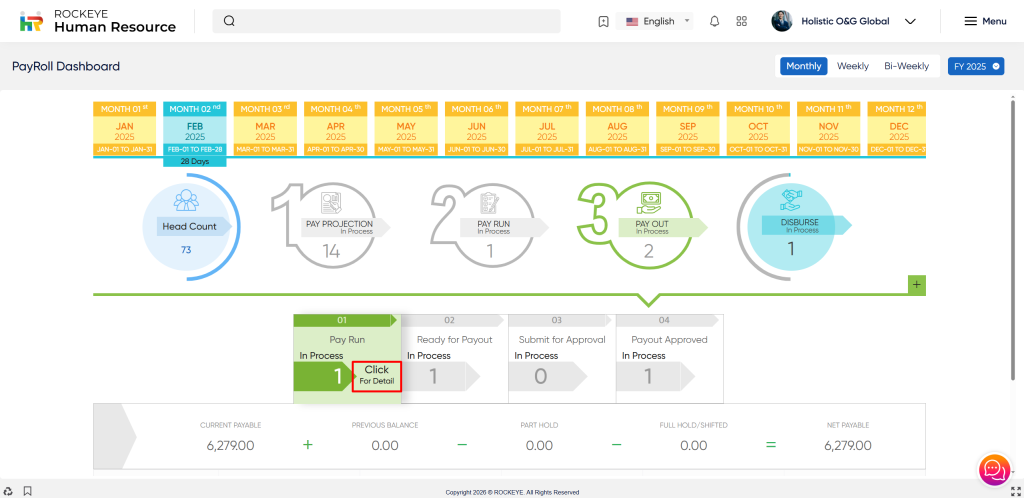
The Payroll Dashboard allows users to view the stages of the payroll processing, which starts from the pay projection to disbursement, and users here perform different actions.
The key features of the payroll dashboard listing are included below:
- Filter: User can filter the payroll dashboard based on the following:
- Financial Year Wise: User can filter the dashboard based on the financial year such as
- FY-2020
- FY-2021
- FY-2022
- FY-2023
- Monthly: Based on the Financial year, the user can also filter the dashboard based on the monthly Pay Period.
Overview:

A payroll dashboard in a payroll HRMS is a centralized interface displaying real-time data and analytics on employee compensation, payroll processing, tax deductions, and other key payroll metrics. It offers an overview of payroll-related information and trends in a visual format.
Head Count:
- Pay Projection: Pay projection refers to estimating future payroll expenses. It helps organizations plan and budget for salaries, wages, bonuses, and other compensation components. Pay projection is the initial stage of payroll , if pay projection is successful, the pay run proceeds.
The user will be able to view the following sections in the Pay Projection :
- Attendance: In the Attendance section, users will be able to view following details :-
- In process ( Refers to Attendance record is in process )
- Pending ( Refers to the attendance record being in pending status and not performing any action.)
- Excluded ( Refers to the attendance record of the selected employee are excluded, and others are processed for pay projection.)
- Projected (Refers to the attendance record of selected employees that is projected and goes for the payrun processing.)

When a user clicks on "Click for Detail" in the attendance section, they will be redirected to the pending attendance listing page.
Attendance Listing
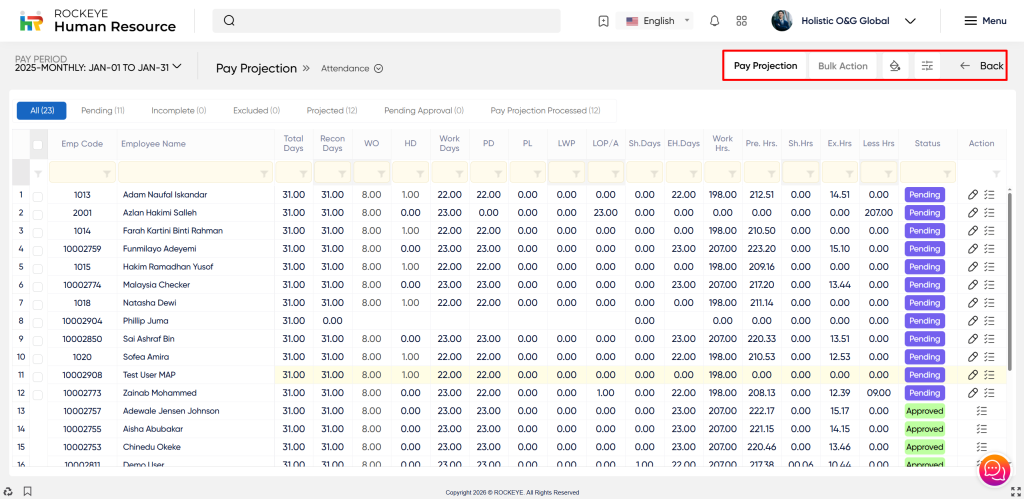
The Attendance listing page allows users to view all pending Attendance records to process pay projection .
The user will be able to see the attendance listing based on the different status such as
- All (refers to all pending , excluded , incomplete , pending approval attendance record).
- Pending ( Refers to the attendance record being in pending status and not performing any action).
- Incomplete ( Refers to attendance record are incomplete).
- Excluded ( Refers to the attendance record of the selected employee are excluded, and others are processed for pay projection).
- Projected (Refers to the attendance record of selected employees that is projected and goes for the payrun processing).
- Pending Approval (This Refers to the attendance record being processed from the user’s end and approval pending from higher authority).
- Pay Projection Processed (Refers to Attendance records that pay projection is processed and approved by higher authority and go for the payrun).
The key features of the Attendance listing is include below:
- Hide/Show Columns: This option allows users to customize columns by adding/removing columns to display from the Listing page
- In this option user have to select column which they want to view in the list , if the user uncheck/unselect all column then system will give error message that “Please check at least one column”
- The user can view following action in this section
- Ok: On clicking the "Ok" button, the user can submit the checked option, and based on the selection, the column will display to the user in the list.
- Cancel :On clicking this button the user can cancel the check column.
- Pending:
- First, the user has to select at least one record from the listing; otherwise, the system will give an error message, "At Least one record should be selected."
- After selecting a record, the user clicks on the pending button, and the selected record is marked as pending in the listing.
- The user can view the pop-up message "Status update successfully".
- Exclude:
- First, the user has to select at least one record from the listing; otherwise, the system will give an error message, "At Least one record should be selected."
- After selecting a record, the user clicks on the pending button, and the selected record is marked as Excluded in the listing.
- The user can view the pop-up message “Status update successfully’.
- Excluded means that the attendance record of that employee is not projected.
- Pay Projection:
- First, the user has to select at least one record from the listing; otherwise, the system will give an error message, "At Least one record should be selected."
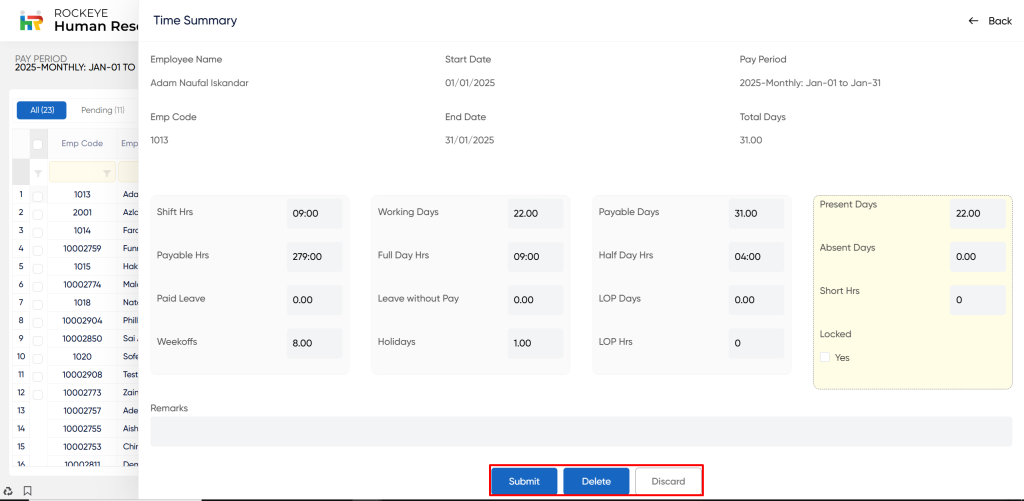
- After selecting a record, the user clicks on the Pay Projection button the user will able to view pop-up screen where user will enter remark
The user can perform following action in this section
- Submit : This option allows the user to submit the entered field in a pay projection.
- Discard : This option allows the user to discard the entered field and be redirected to the attendance page.
- Import Attendance Summary: In the import attendance summary page user will have following fields:
- Upload Sheet: The user must upload a file in.csv or excel format in this field. If the user uploads another formatted file, then the system gives an error saying "The file is not acceptable."
- Date Format: The user has to select the date format from the drop down menu such as
- Y-m-d
- d-m-Y
- m/d/Y
- Y/m/d
- d.m.Y
- Date Time Format: The user has to select the date time format from the drop down menu such as:
- Y-m-d H:i
- Y-m-d H:i:s
- d-m-Y H:i
- d-m-Y H:i:s
- m/d/Y H:i
- m/d/Y H:i:s
- Y/m/d H:i
- Y/m/d H:i:s
- d.m.Y H:i
- d.m.Y H:i:s
The user can perform following operation in this section
- Next: This option allows the user to preview the Attendance summary. On the Preview Attendance summary page, the user can perform the following action:
- Preview: On clicking this option, the user will be redirected to the Attendance summary page. Here, the user can perform the following options:
- Import: In this option, the user can import the Attendance summary that the user added in the previous steps.
- Back: This option allows the user to move back to the previous page.
- Preview: On clicking this option, the user will be redirected to the Attendance summary page. Here, the user can perform the following options:
- Discard: This option allows the user to discard the importing of the attendance summary.
- Export Attendance Summary: User can also export the attendance summary in the form of .csv or excel .
- Filter: The user can also filter the overtime attendance record by choosing the pay period from the drop-down menu.
- Record Filter: Filter option allows users to filter the list of records based on visible columns, such as:
- Employee code
- Employee name
- Total Days
- Recon days
- Week Off
- Holiday
- Workday
- Paid Day
- Paid Leave
- Leave without Pay
- Overtime:
- In the overtime section, users will be able to view following details :-
- In process ( Refers to Overtime record is in process )
- Pending ( Refers to the Overtime record being in pending status and not performing any action.)
- Excluded ( Refers to the overtime record of the selected employee are excluded, and others are processed for pay projection.)
- Projected (Refers to the overtime record of selected employees that is projected and goes for the payrun processing.)
- In the overtime section, users will be able to view following details :-
When a user clicks on "Click for Detail" in the overtime section, they will be redirected to the pending overtime listing page.
Overtime Sheet Listing
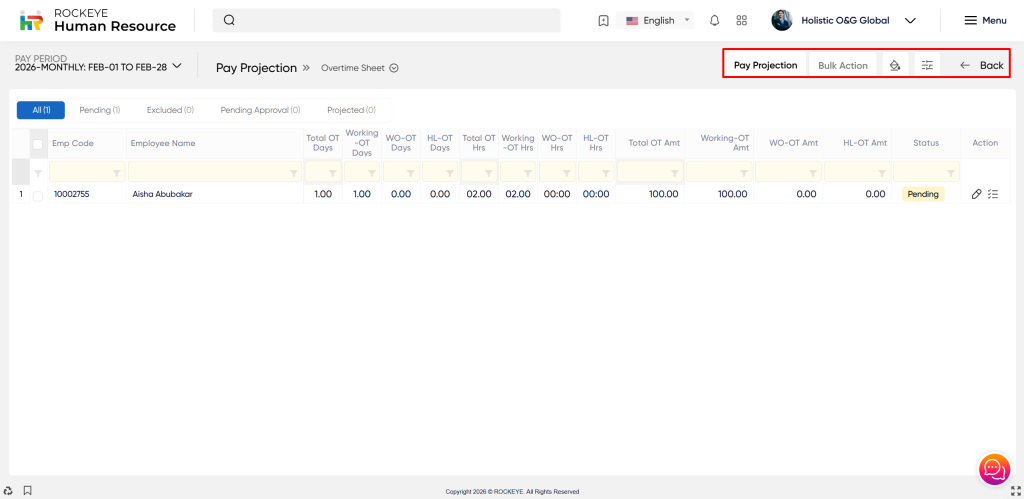
The Overtime Listing page allows users to view all pending Overtime records to process pay projections.
The user will be able to see the attendance listing based on different statuses, such as
- All ( refers to all pending, excluded, and pending approval overtime records).
- Pending ( Refers to the overtime record being in pending status and not performing any action).
- Excluded ( Refers to the overtime record of the selected employees who are excluded and others who are processed for pay projection).
- Projected (Refers to the Overtime record of selected employees that is projected and goes for the payrun processing).
- Pending Approval (This Refers to the Overtime record being processed from the user’s end and approval pending from higher authority).
- Pay Projection Processed (Refers to Overtime records that pay projection is processed and approved by higher authority and goes for the payrun).
- The key features of the Overtime sheet listing is include below:
- Hide/Show Columns
- This option allows users to customize columns by adding/removing columns to display from the Listing page
- In this option user have to select column which they want to view in the list , if the user uncheck/unselect all column then system will give error message that “Please check at least one column”
- The user can view following action in this section
- Ok :-On clicking the "Ok" button, the user can submit the checked option, and based on the selection, the column will display to the user in the list.
- Cancel :- On clicking this button the user can cancel the check column.
- Pending:
- First, the user has to select at least one record from the listing; otherwise, the system will give an error message, "At Least one record should be selected."
- After selecting a record, the user clicks on the pending button, and the selected record is marked as pending in the listing.
- The user can view the pop-up message "Status update successfully".
- Exclude:
- First, the user has to select at least one record from the listing; otherwise, the system will give an error message, "At Least one record should be selected."
- After selecting a record, the user clicks on the pending button, and the selected record is marked as Excluded in the listing.
- The user can view the pop-up message “Status update successfully’.
- Excluded means that the Overtime record of that employee is not projected.
- Pay Projection:
- First, the user has to select at least one record from the listing; otherwise, the system will give an error message, "At Least one record should be selected."
- After selecting records, the user clicks on the Pay Projection button the user will able to view pop-up screen where user will enter a remark
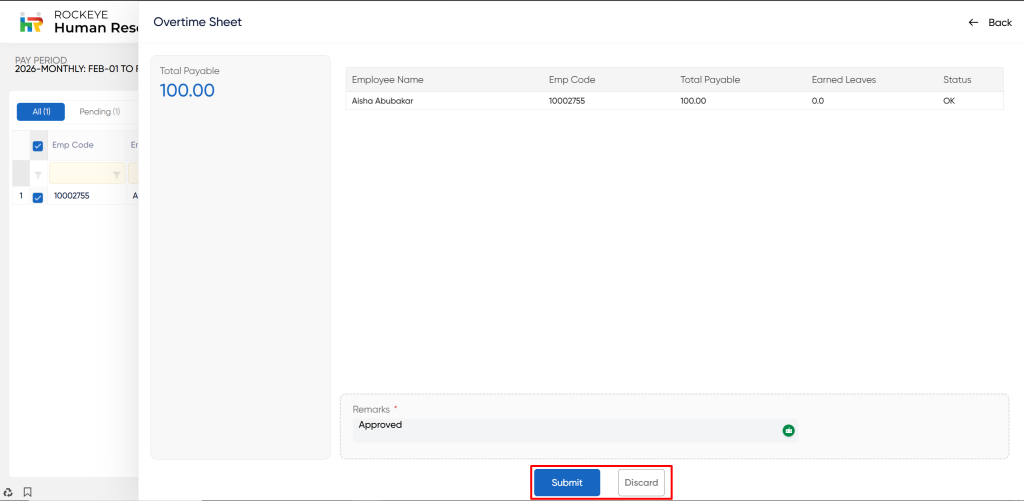
The user can perform the following action in this section
- Submit: This option allows the user to submit the entered field in a pay projection.
- Discard: This option allows the user to discard the entered field and be redirected to the Overtime page.
- Delete Record(s): The Delete option allows the user to delete the record. The user first has to select at least one record; otherwise, the system will give an error message "Please select at least one record".
- After clicking on the delete button, a pop-up message will appear: "Are you sure you want to delete the selected record?"
- Along with this message, the user can perform the following actions:
- Delete: This option allows the user to delete the selected record.
- Cancel: This option allows the user to cancel the selected record and go back to the Overtime Sheet listing
- Import Overtime Summary: In the import Overtime summary page user will have following fields:
- Upload Sheet: The user must upload a file in.csv or excel format in this field. If the user uploads another formatted file, then the system gives an error saying "The file is not acceptable."
- Date Format :- The user has to select the date format from the drop down menu such as
- Y-m-d
- d-m-Y
- m/d/Y
- Y/m/d
- d.m.Y
- Date Time Format :- The user has to select the date time format from the drop down menu such as
- Y-m-d H:i
- Y-m-d H:i:s
- d-m-Y H:i
- d-m-Y H:i:s
- m/d/Y H:i
- m/d/Y H:i:s
- Y/m/d H:i
- Y/m/d H:i:s
- d.m.Y H:i
- d.m.Y H:i:s
The user can perform following operation in this section
- Next: This option allows the user to preview the Overtime summary. On the Preview Overtime summary page, the user can perform the following action:
- Preview: On clicking this option, the user will be redirected to the Overtime summary page. Here, the user can perform the following options:
- Import: In this option, the user can import the Overtime summary that the user added in the previous steps.
- Back: This option allows the user to move back to the previous page.
- Preview: On clicking this option, the user will be redirected to the Overtime summary page. Here, the user can perform the following options:
- Discard: This option allows the user to discard the importing of the Overtime summary.
- Record Filter: Filter option allows users to filter the list of records based on visible columns, such as
- Working OverTime days
- Total OverTime days
- WeeoOff OverTime days
- HL- OverTime days
- Total OverTime hrs
- working OverTime hrs
- Week Off OverTime hr
- HL OverTime hrs
- Total OverTime amount
- Working OverTime amount
- Show All Listing Columns: This option allows the user to clear all Filter and display all records on the Listing page.
- Other Earning: Click here to view Other Earning
- Other Deduction: Click here to view Other Deduction
- Pay Run: Pay run in a payroll dashboard refers to the process of executing and finalizing payroll calculations and payments for a specific pay period. It involves generating payslips, calculating net pay, deducting taxes and other withholdings, and disbursing payments to employees.
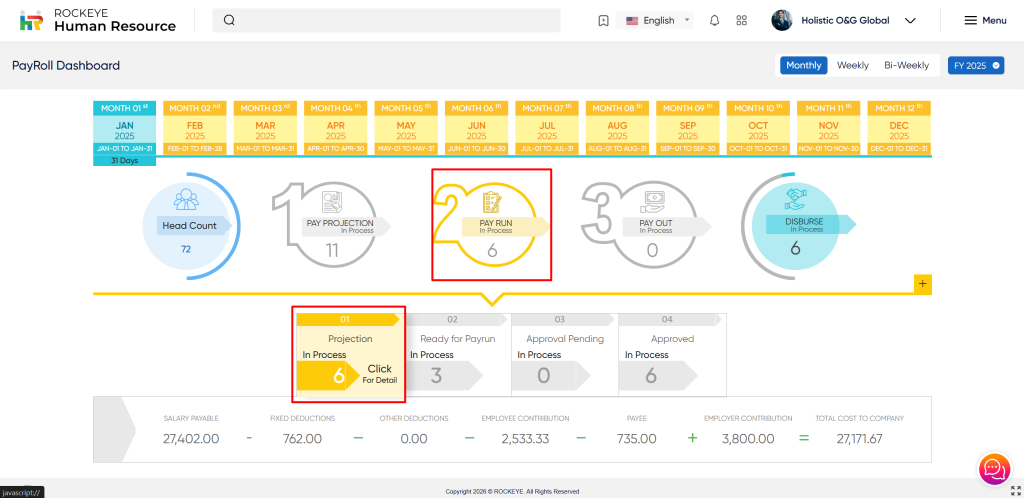
When a user clicks Pay Run on the Payroll Dashboard page, they will see four parts in Pay Run: In addition to these parts, users can examine an extra section for each one, which shows small dashboards with the following information:
- Salary Payable
- Fixed Deduction
- Other Deduction
- Employee Contribution
- Payee
- Employer Contribution
- Total Cost to the Company
The user will be able to view the following sections in the Pay Run :
- Projection: A projection estimates future payroll expenses by calculating expected costs of salaries, wages, taxes, benefits, and other payroll-related expenses, providing financial insights for upcoming pay periods.
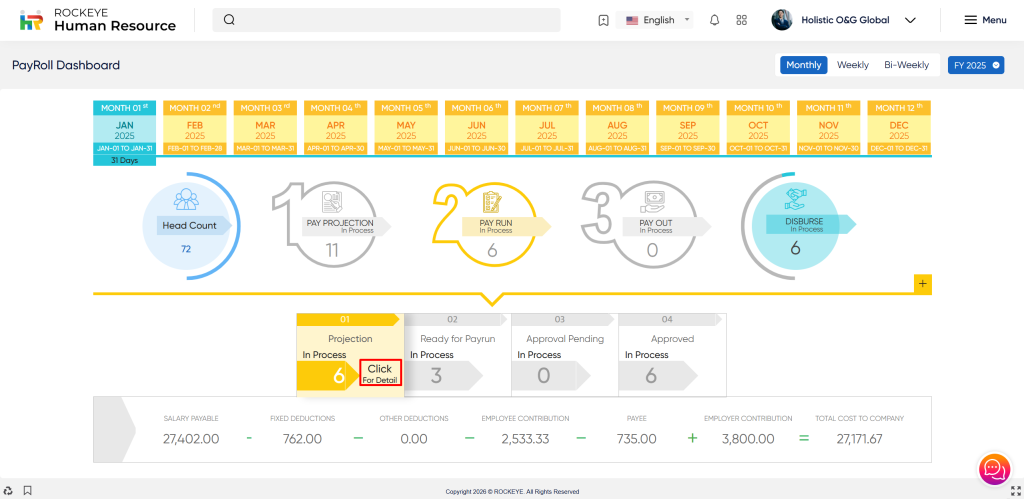
When a user clicks on "Click for Detail" in the Projection section, they will be redirected to the pending projection listing page.
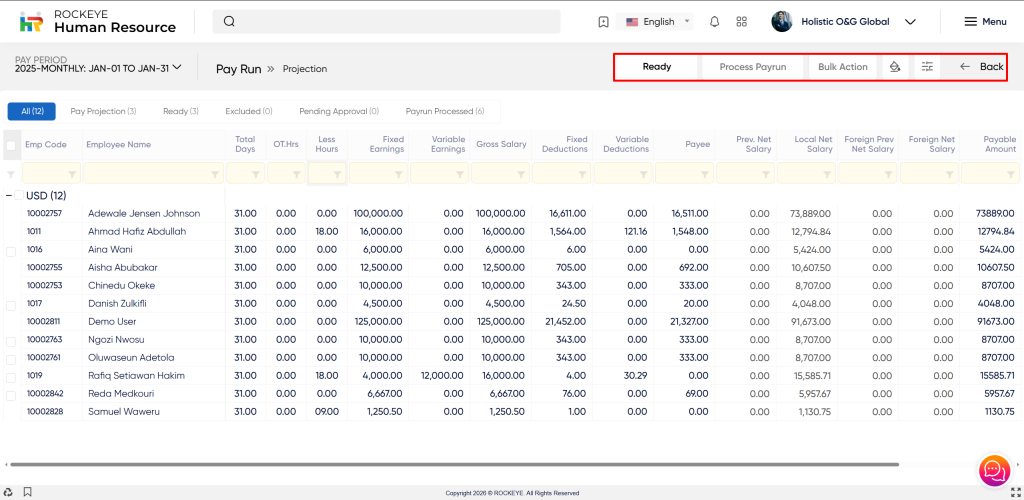
The Projection listing page allows users to view all pending projected records to process pay run.
The user will be able to see the pay projected record listing based on the different status such as
- All ( refers to all pending , excluded , incomplete , pending approval Pay Projection record )
- Pay Projection ( Refers to the records for which the pay projection is processed.)
- Ready ( Refers to pay projection records that are ready for the pay run. )
- Excluded ( Refers to the Pay Projection record of the selected employee are excluded, and others are processed for pay projection.)
- Projected (Refers to the Pay Projection record of selected employees that is projected and goes for the payrun processing.)
- Pending Approval (This Refers to the Pay Projection record being processed from the user’s end and approval pending from higher authority.)
- Pay Run Processed (Refers to records that show that the pay run is processed and approved by higher authority and goes for the payout.)
- The key features of the Projection listing is include below:
- Hide/Show Columns: This option allows users to customize columns by adding/removing columns to display from the Listing page
- In this option user have to select column which they want to view in the list , if the user uncheck/unselect all column then system will give error message that “Please check at least one column”.
- The user can view following action in this section
- Ok: On clicking the "Ok" button, the user can submit the checked option, and based on the selection, the column will display to the user in the list.
- Cancel: On clicking this button the user can cancel the check column.
- Pending:
- First, the user has to select at least one record from the listing; otherwise, the system will give an error message, "At Least one record should be selected."
- After selecting the records, the user clicks on the pending button, and the selected record is marked as pending in the listing.
- The user can view the pop-up message "Status update successfully".
- Ready:
- First , the user has to select at least one record from the listing , otherwise the system will give an error message “Please at least one record should be selected”.
- After selecting the records , the user clicks on the Ready button, and the selected record is marked as ready in the listing.
- The user can view the pop-up message “status updated successfully”.
Note : When the Pay run is processed successfully, the user cannot move to the ready state. When the user, in the pay run's processed steps, clicks on the ready button, the system gives an error message, "Cannot do this action."
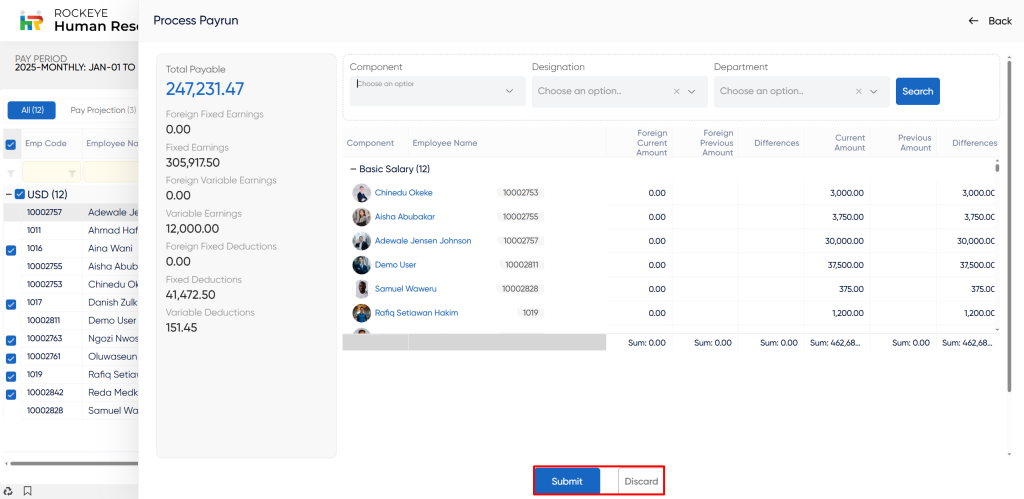
- Process Pay Run:
- First , the user has to select only one group from the listing , otherwise the system will give an error message “Please at least one record should be selected”
- After selecting one group , the user clicks on the process pay run , the pop will be displayed to the user which contains the following information such as
- Total Payable
- Foreign Fixed Earning
- Fixed Earning
- Foreign variable earnings
- Variable Earnings
- Foreign Fixed Deductions
- Fixed Deductions
- Variable deductions
The user has to enter the following details in this section
- Component: This field allows user to choose component from the drop down menu such as
- 13th month salary
- Basic Salary
- Housing Allowance
- Leave Allowance
- Lunch Allowance
- Transport Allowance
- Designation: This field allows user to choose the Designation from the drop down menu such as
- Accounts Manager
- Admin Assistant
- Admin Manager
- Administrative Assistant
- Administrative Officer
- Archives Supervisor
- Ass. Distribution Supervisor
- Asst. Legal Counsel
- Aviation Admin Assistant
- Aviation Commercial Team Lead
- Department: This field allows user to choose the department from the drop down menu :-
- MARKETING
- Lab
- Procurement
- EXECUTIVE MANAGEMENT
- Project & Maintenance
- TAS Team - Branding
- CEO's Office
- Bestaf Trading
- Terminal
- Corlay Cameroun
- Supply & Trading
- TCI Terminal
- Laboratory
This user can perform the following action in this section.
- Submit: This option allows the user to filter the record using the above criteria.
- The user has to enter following detail in this section:
- Voucher Posting date: This field refers to the date of voucher posting.
- Remarks*: This field refers to the remark or comment for the pay run.
- The user has to enter following detail in this section:
The user can perform following actions in this section
- Submit: This option allows the user to submit the pay run for approval of the higher authority.
- Discard: This option allows the user to discard the record.
- Bulk Action: Bulk action includes the action which is performed on the bulk of record.
- Recalculate:
- First user has to select at least one record from listing otherwise the system will give an error message “At Least one record should be selected”.
- After selecting one record , the user clicks on the recalculate , the selected record is recalculated.
- The pop-up message will be displayed to the user as "Success".
- Exchange Rate:
- On clicking exchange rate , a pop-up displayed to the user which contain following field such as
- NGN to USD
- NGN to EUR
- NGN to GBP
This section allows the user to perform following action:
- Submit: This option allows the user to submit the above entered field to define the exchange rate.
- Pay Run Report: Pay Run Report will display the complete report of pay run.
- Export: The user can Export the Pay Run report in the form of xls.
- Record Filter: Filter option allows users to filter the list of records based on visible columns, such as:
- Employee code
- Employee Name
- Total Days
- OT hrs
- Less hours
- Fixed earning
- Variable earning
- Gross Salary
- Fixed Deduction
- Variable Deduction
- Paye
- Previous Net salary.
Key Notes for Pay Run
- In the projection section user can perform ready , process projection action on the individual or bunch of records based on the currency .
- When the user is in the pay run process state, the user cannot move back to the previous step, such as ready or Pay projection.
- In the Pending Approval and Payrun Processed section, the user cannot see the Ready, Excluded, and Process Projection options.
- After the Pay run is approved, In the pay run process, the user can download the voucher slip for the overall pay run disbursement to the employees. The user can download the following vouchers:
- Employee Wise - Vouchers
- Component wise - Vouchers
- Voucher wise - employees
- Once the Pay Run is Processed, it is moved to the next stage, which is Payout.
- Pay Out: "Pay out" refers to the total amount of money that is disbursed to employees during a specific pay period. It represents the sum of all salaries, wages, bonuses, commissions, and other earnings paid to employees. In the pay-out section, the user selects the payment method and approves the records.
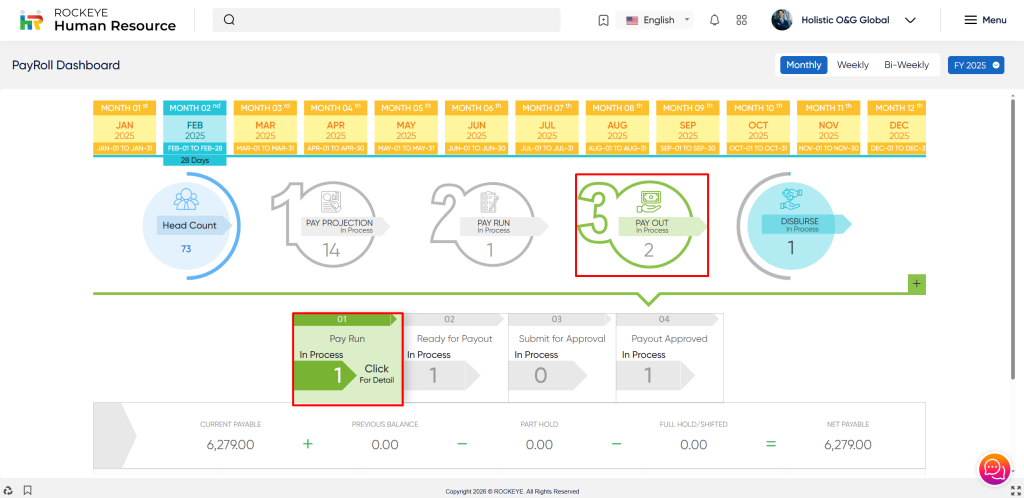
When a user clicks Pay Out in the Payroll Dashboard page, they will see four parts in Pay Out In addition to these parts, users can examine an extra section for each one, which shows small dashboards with the following information:
- Currency
- Current Payable
- Previous balance
- Part Hold
- Full Hold/Shifted
- Net Payable
The user will be able to view the following sections in the Pay Out :
- Pay Run: “Pay run” refers to the process of calculating and finalizing employee salaries or wages for a specific pay period. It involves various tasks such as calculating gross pay, deducting taxes and other withholdings, accounting for any overtime or bonuses, and arriving at the net pay for each employee. In Pay Run, the user can view the records in which Pay Run is processed.
When a user clicks on "Click for Detail" in the Projection section, they will be redirected to the all pending , approved record listing page.
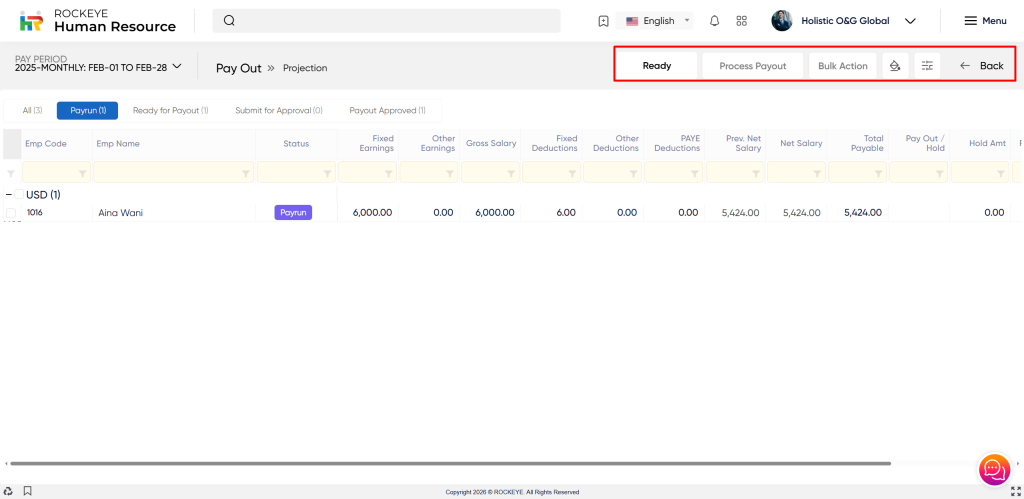
The pay run listing page allows users to view all pending pay run records to process pay out.
The user will be able to see the pay run record listing based on the different status such as
- All ( refers to all pending , pending approval Pay Run record )
- Pay Run ( Refers to the records for which the Payrun is processed.)
- Ready for Payout ( Refers to pay run records that are ready for the Payout. )
- Submit for Approval (Refers to the Pay Run record of selected employees that is processed and goes for the payrun processing.)
- Payout Approved (Refers to records that show that the payout is processed and approved by higher authority and goes for the disburse salary.)
The key features of the Pay Out listing is include below:
- Hide/Show Columns
This option allows users to customize columns by adding/removing columns to display from the Listing page- In this option user have to select column which they want to view in the list , if the user uncheck/unselect all column then system will give error message that “Please check at least one column”. The user can view following action in this section.
- Ok: On clicking the "Ok" button, the user can submit the checked option, and based on the selection, the column will display to the user in the list.
- Cancel: On clicking this button the user can cancel the check column.
- In this option user have to select column which they want to view in the list , if the user uncheck/unselect all column then system will give error message that “Please check at least one column”. The user can view following action in this section.
- Ready for Payout:
- First , the user has to select atleast one record from the listing , otherwise system will display an error “At Least one record should be selected”
- After selecting the records , the user clicks on the Ready for Payout button, and the selected record is marked as ready in the listing.
- The user can view the pop-up message “status updated successfully”.
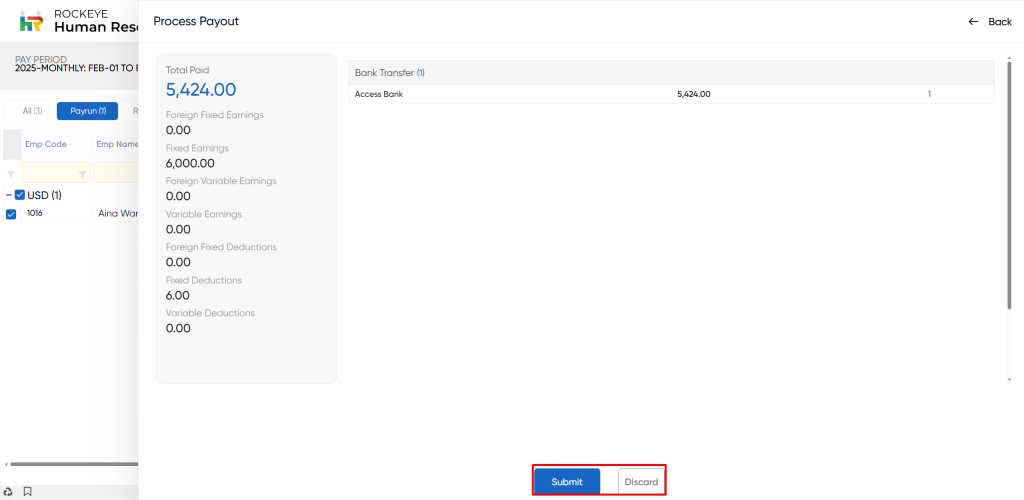
- Process Payout:
- First , the user has to select only one group from the listing , otherwise the system will give an error message “Please at least one record should be selected”
- After selecting records, the user clicks on the process Payout , the pop will be displayed to the user which contains the following field
- Voucher Posting Date :- This field allows the user to enter the voucher posting date.
- Attachment :- This field allows user to choose an attachment file from the local storage to support the payout.
- Remarks * :- This field allows user to enter the remark or comment for the payout processing.
The user can perform following action in this section
- Submit for Approval: This option allows the user to submit the record for payout approval.
- Discard: This option allows the user to discard the record and back to the payout page.
- Pending: The user can mark as pending the selected record in the listing by clicking the pending option.
- Record Filter: Filter option allows users to filter the list of records based on visible columns, such as
- Employee code
- Employee Name
- Status
- Fixed earning
- Variable earning
- Gross Salary
- Fixed Deduction
- Variable Deduction
- Paye Deduction
- Previous Net salary
- Show All Listing Columns: This option allows the user to clear all Filter and display all records on the Listing page.
- Bulk Action: Bulk action includes the action which is performed on the bulk of record.
- Payment Mode: User can add new payment mode by entering following details such as
- Payment Mode: User have to select payment mode to process payout. User can select payment mode such as cash , Cheque , Bank Transfer , Other
- Bank Account (local): User have to select the account based on the payment mode selection, it may be bank account, cash account, other account
- Bank Account ( Foreign ): User have to select the foreign bank account to process payout.
User can perform following action in this section:
- Apply for Selected: The "Apply For Selected" option allows the user to submit the entered information for the payment mode.
- Discard: The ‘Discard" option allows the user to discard the information entered by the user.
- Apply Schedule Payment: User can apply for the schedule payment on clicking Apply Schedule payment option. User have to fill following details such as :-
- Payout Option: In Payout Option user can select the option from the drop down menu such as
- Full payout
- Full Schedule
- Part Payout
- Hold
- Payout Percent: In Payout percent user can enter the percentage of payout depending on the employees.
- Pay Period: The user can schedule the payout on the basis of the pay period. The user can select the pay period from the drop-down menu to schedule the payout. Pay Period such as
- 2023-Monthly: Jun-26 to Jul-25
- 2023-Monthly: Jul-26 to Aug-25
- 2023-Monthly: Aug-26 to Sep-25
- 2023-Monthly: Sep-26 to Oct-25
- Payment Mode: User have to select payment mode to process payout. User can select payment mode such as
- cash
- Cheque
- Bank Transfer
- Other
- Comment: In the comment field user can write notes or comments related to the payment schedule.
User can perform following action in this section :-
- Apply for Selected: The "Apply For Selected" option allows the user to submit the entered information for the payment mode.
- Discard: The ‘Discard" option allows the user to discard the information entered by the user.
- Revert:
- First user has to select at least one record from the list , otherwise the system will display an error message “At Least one record should be selected”.
- After selecting record , the user clicks on the revert option , the pop message will display “Are you sure want to revert the records”
The user can perform following action in this section :
- Revert: This option allows the user to revert the selected record
- Cancel: This option allows the user to cancel the selected record.
- Export : User can export payout report of these record in the .csv format
- Send Salary Slip:
- First user has to select atleast one record from the list , otherwise the system will display an error message “At least one record should be selected”.
- After selecting the record , the user clicks on the send salary slip option , the pop-up message will display “Email has been sent successfully. It may take time to update salary slip”
- Publish Salary Slip To ESS:
- First user has to select atleast one record from the list , otherwise the system will display an error message “At least one record should be selected”.
- After selecting the record , the user clicks on the Publish salary slip to ESS option , the pop-up message will display “Are you sure want to publish salary slip?”
The user can perform following option in this section :
- Okay: This option allows the user to publish the salary slip of employees to ESS.
- Cancel: This option allows user to cancel to publish the salary slip of employees
Keynote for Payout
- In the Payout section user can perform ready , process payout action on the individual or bunch of records.
- The payout of an employee is approved or submitted for approval then the record can not move back to the previous step such as ready for payout or pay run.
- In the submit for approval and Payout Approved section, the user cannot see the Ready and Process Payout options.
- After the Pay out is approved, In the pay out process, the user can view the voucher slip for the overall pay out. The user can download the following vouchers:
- Voucher - Payment Mode Wise
- Employees - Payment Mode Wise
- Employee - Bank Wise
- Employees - Full Hold
- Employee - Part Hold
- Once the PayOut is Approved, it is moved to the next stage, which is disburse.
- Disburse: "Disburse" refers to the process of distributing or transferring funds to employees as payment for their work during a specific pay period. It involves the actual transfer of money from the employer's account to the employees' accounts or the issuance of physical checks
When user clicks on the disburse option in payroll dashboard user will able to view three sections
- Salary Payout: When the user clicks on the Salary Payout section, they will be able to view the list of salary payouts.
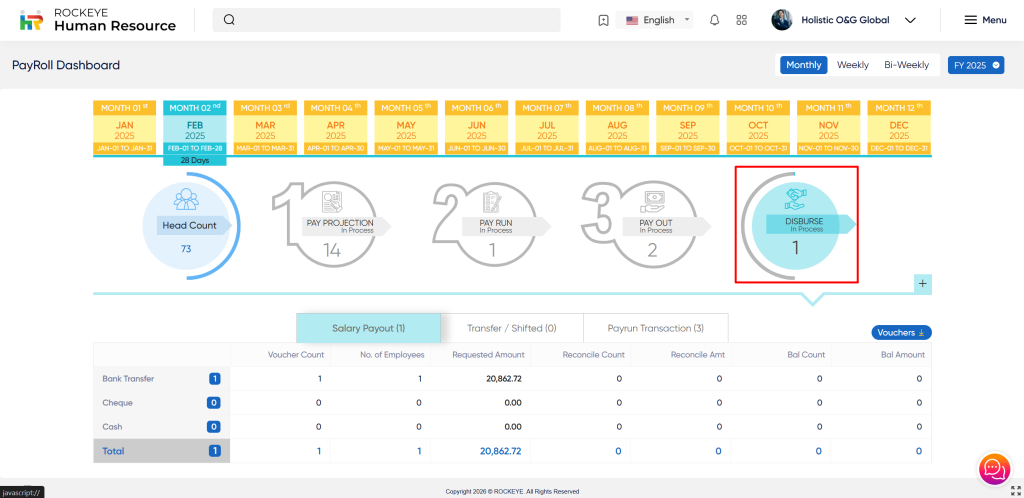
In the list of salary Payout user can view following column:
- Voucher count
- Number of Employees
- Requested amount
- Reconcile count
- Reconcile amount
- Balance Count
- Balance Amount
The user can also download the voucher in the disburse , salary payout sections. These vouchers are as follows
- Vouchers - Payment mode wise: On clicking Vouchers - Payment mode wise , the user will be able to view and download the Payment mode wise .The user can download the list in both formats. CSV and PDF formats.
- Employees - Payment Mode wise: On clicking Employees - Payment Mode Wise , the user will be able to view and download the Payment Mode Wise List." The user can download the list in both formats. CSV and PDF formats.
- Employees - Bank Wise: On clicking Employees - Bank Wise , the user will be able to view and download the Employees - Bank Wise List. The user can download the list in both formats. CSV and PDF formats.
- Transfer Shifted: "Transfer shifted" in the disbursement process refers to a situation where a payment or transfer of funds to an employee has been rescheduled or moved to a different date or payment cycle.
- In the list of Transfer Shifted user can view following column:
- Current Payable
- Previous Payable
- Total Payable
- Hold/Shifted
- Cost to Company
- In the list of Transfer Shifted user can view following column:
The user can also download the voucher in the disburse , Transfer Shifted section. These vouchers are as follows
- Employees - Full Hold: On clicking Employee Full Hold Vouchers, the user will be able to view and download the Employee Full Hold Vouchers and Pending List." The user can download the list in both formats. CSV and PDF formats.
- Employee - Part Hold: On clicking Employee Part Hold Vouchers, the user will be able to view and download the Employee Part Hold Vouchers and Pending List." The user can download the list in both formats. CSV and PDF formats.
- Payrun Transaction: "Payrun Transaction" in the disburse process of a payroll dashboard refers to the specific action or record of transferring funds from the employer to the employee as part of the payroll payout process.
- In the list of Payrun transactions, the user can view following column:
- Component
- Voucher number
- Voucher Date
- From account
- To Account
- In the list of Payrun transactions, the user can view following column:
The user can also download the voucher in the disburse , Payrun Transaction sections. These vouchers are as follows
- Vouchers: On clicking Vouchers, the user will be able to view and download the vouchers. The user can download the list in both formats. CSV and PDF formats.
- Employeewise vouchers: On clicking Employee Wise Vouchers, the user will be able to view and download the Employee Wise Voucher. The user can download the list in both formats. CSV and PDF formats.
- Componentwise voucher: On clicking Componentwise Vouchers, the user will be able to view and download the Componentwise Vouchers . The user can download the list in both formats. CSV and PDF formats.
Key Notes for Payroll Dashboard
- The user can view and make changes to the other earning options in the pay projection section of the payroll dashboard. To elaborate on its feature, the same functionality is given to the variable earning reconciliation located in the list of transactions under the payroll section.
- The user can view and make changes to the other deduction option in the pay projection section of the payroll dashboard. To elaborate on its feature, the same functionality is given to the variable deduction reconciliation located in the list of transactions under the payroll section.
- The user can view the payroll dashboard of all users by clicking the payroll dashboard in the payroll section.
- The user can view different Payroll dashboards in the payroll section, which have the same functionality for the different entities.
- The user can view three types of payroll dashboards based on the employee, such as :-
Refrence Video Link