System Workflows
Purpose
This serves as an indispensable resource within the broader context of the Complete Solution Guide: ROCKEYE - Human Resource Solution. Its primary purpose is to deliver a comprehensive understanding of the system by providing detailed insights into system overviews, and workflows.
System Architecture Visualization: Illustrate the system's architectural elements, showcasing modules, components, and subsystems also Enhancing comprehension of the overall system structure through visual representation.
System Overview: Offer a high-level overview of the ROCKEYE - Human Resource System and provide context on the system's purpose, functionalities, and role within the broader organizational framework.
Workflow Details: Detail key operational workflows within the ROCKEYE - Human Resource System, and provide step-by-step visual representations of processes, from user interactions to backend operations.
System Overview
In this section, we present a visual representation of the system overview of the product. The diagrams below offer a comprehensive view of how various modules interact to deliver a seamless and efficient user experience. The below figure depicts the system overview of the ROCKEYE - Human Resource System, offering quick insight into its structure and key elements
The below Figure 1 depicts the system overview of the ROCKEYE - Human Resource System, offering a quick insight into its structure and key elements
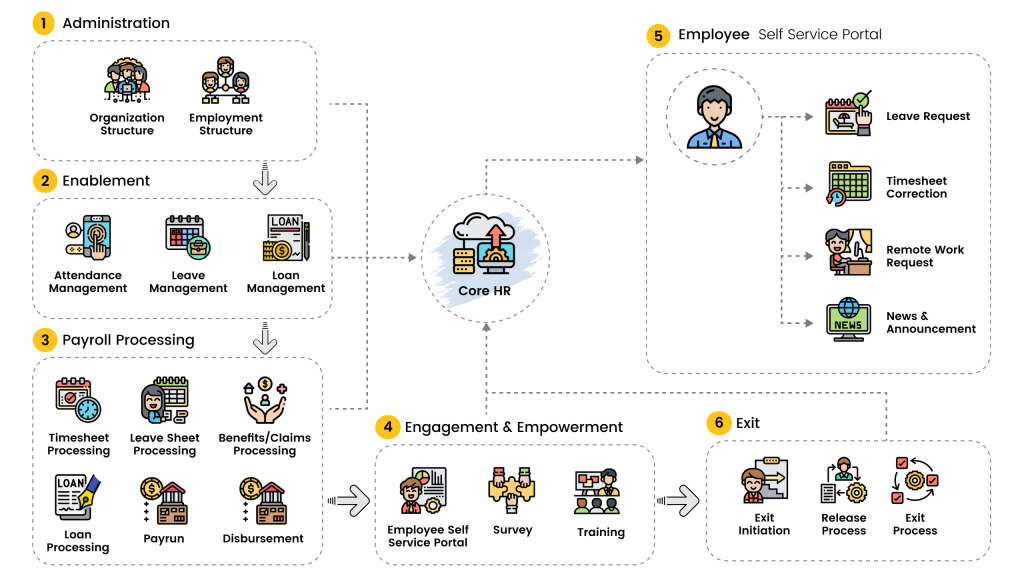
Figure 1
The ROCKEYE - Human Resource System functions as a comprehensive and integrated platform designed to streamline and organize the multifaceted aspects of personnel management within an organization. Commencing with the onboarding process, it facilitates the seamless guidance of selected candidates through essential paperwork and training protocols.
Following the integration of employees into the system, the ROCKEYE - Human Resource System undergoes a transformation into a centralized hub housing all pertinent employee-related information, spanning personal details, work history, and training records. This centralized repository ensures precise payroll management, facilitates streamlined benefits administration, and simplifies the tracking of leave balances. Furthermore, it serves as a catalyst for efficient performance management, enabling goal-setting, regular reviews, and continual feedback to foster employee development, thereby aligning individual objectives with organizational goals.
The ROCKEYE - Human Resource System extends its functionality beyond administrative tasks by providing a self-service portal for employees. This portal empowers them to manage personal information, submit leave requests, and access critical documents such as pay stubs. Additionally, the system plays a pivotal role in talent development by identifying skill gaps and recommending relevant training opportunities. Automated tracking of certifications and licenses ensures regulatory compliance, while robust security features safeguard sensitive employee information, ensuring transparency and accountability.
In essence, the ROCKEYE - Human Resource System constitutes a user-friendly and all-encompassing solution, managing the entire employee lifecycle from integration to retirement. Its impact extends beyond administrative efficiency, actively contributing to enhanced employee engagement, talent development, and compliance assurance. The system incorporates diverse modules, including Dashboard, HR Operation, Time & Attendance, Leave Management, Loan & Advance, Payroll, Employee Tax, Support, Core Masters, Training & Survey, Assets, and Report, thereby contributing to the establishment of a well-organized and flourishing work environment.
System Workflows
This section provides a detailed overview of our ROCKEYE - Human Resource System workflows, outlining the intricacies that drive its seamless functioning. These workflows serve as the backbone of our HR architecture, detailing the step-by-step execution of tasks and interdependencies among components. From onboarding to performance management, leave tracking, training, and more, these workflows ensure optimal HR operations, enhancing overall efficiency and employee experience.
Employee Management
The below Figure 2 depicts the Employee Management of the ROCKEYE - Human Resource.
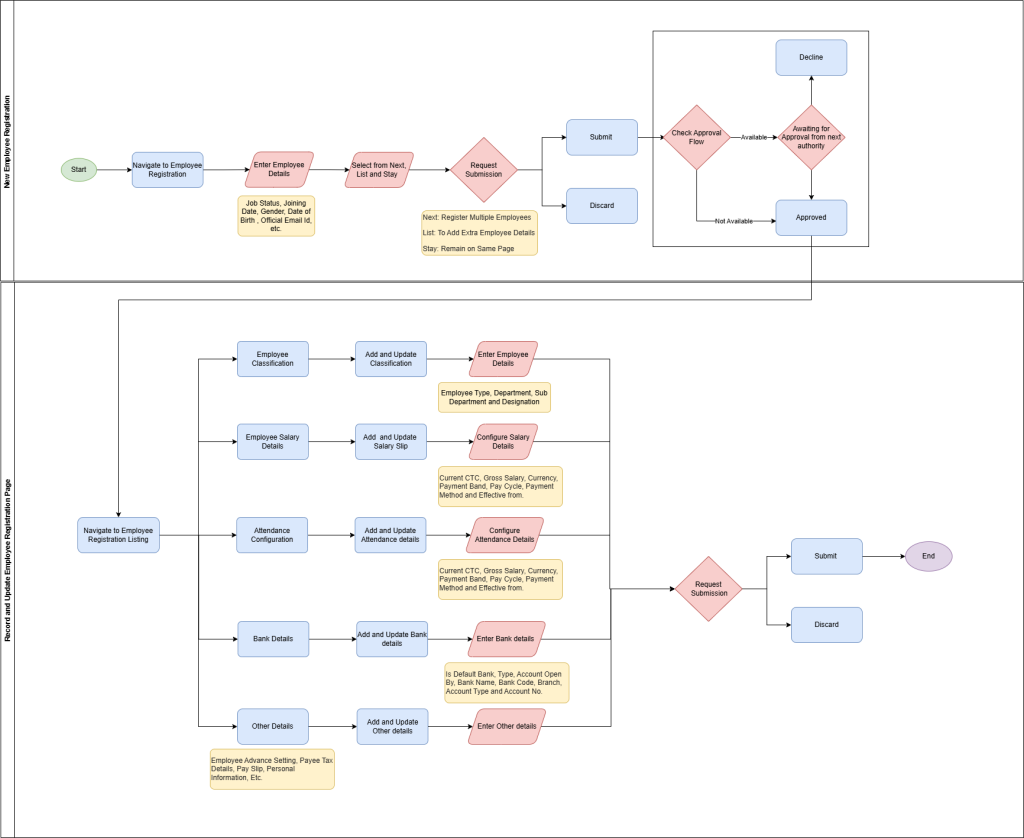
Figure 2
Employee Creation
This section pertains to the process of creating a new employee record within the HRMS system. It includes essential details such as the employee's personal information (name, date of birth, gender), contact information (email, phone numbers), employment details (joining date, job status), and any additional identifiers (employee code, photo). The purpose of this section is to gather comprehensive information about the employee to facilitate efficient management within the HR system.
- Employee Code: A unique identifier assigned to each employee within the HRMS system.
- Job Status: Indicates the current employment status of the employee (e.g., active, on leave, terminated).
- Joining Date: The date when the employee officially started working with the company.
- Exp At Joining: The prior work experience of the employee at the time of joining the company.
- Employee Name: The full name of the employee.
- Father Name: The name of the employee's father.
- Mother Name: The name of the employee's mother.
- Gender: The gender of the employee (e.g., male, female, non-binary).
- Date of Birth: The date of birth of the employee.
- Actual Date of Birth: The actual date of birth of the employee (in case there are any discrepancies).
- Photo: A photograph of the employee for identification purposes.
- Personal Email: The personal email address of the employee.
- Official Email: The official email address assigned to the employee by the company.
- Personal Mobile: The personal mobile number of the employee.
- Official Phone Number: The official phone number assigned to the employee by the company.
- WhatsApp No: The WhatsApp number of the employee.
- Alternative Mobile No: An alternative mobile number of the employee (if any).
- Attendance Code: A unique code assigned to track the attendance of the employee.
- Ref No: A reference number associated with the employee (if any).
- Confirmation Date: The date when the employee's probationary period is confirmed.
- Exit Date: The date when the employee leaves the company.
- Is Email Verified: Indicates whether the employee's email address has been verified.
- Is Email Active: Indicates whether the employee's email address is currently active.
Employee Classification
In this section, employees are categorized based on various parameters such as their type (e.g., permanent, contract), grade, department, sub-department, designation, and work location. Additionally, it outlines the employee's reporting structure, including their immediate superior, line manager, and head of department. The classification helps in organizing employees based on their roles, responsibilities, and hierarchical relationships within the organization.
- Employee Type: Specifies the type of employee (e.g., permanent, contract, part-time).
- Employee Grade: The grade or level of the employee within the company hierarchy.
- Department: The department to which the employee belongs.
- Sub Department: A sub-division within the department to which the employee belongs.
- Designation: The job title or position held by the employee.
- Work Location: The physical location where the employee performs their duties.
- Work Station: The specific workstation or desk assigned to the employee.
- Immediate Superior: The immediate supervisor or manager of the employee.
- Line Manager: The manager directly responsible for overseeing the employee's work.
- Head of Department: The head or leader of the department to which the employee belongs.
Employee Salary Details:
Here, detailed information about the employee's salary is provided. This includes their current cost to company (CTC), gross salary, currency, salary structure (e.g., basic, allowances), payment cycle, and payment method. Additionally, any relevant documentation or contracts related to salary (salary proof) are mentioned. This section ensures transparency and accuracy in managing employee compensation.
- Current CTC: The current cost to company (CTC) or total compensation package of the employee.
- Gross Salary: The total salary before any deductions or taxes.
- Currency: The currency in which the employee's salary is paid.
- Salary Proof/Contract: Documentation or contract outlining the terms of the employee's salary.
- Payment Band: The salary range or band within which the employee's salary falls.
- Salary Structure: The breakdown of the employee's salary components (e.g., basic, allowances, bonuses).
- Pay Cycle: The frequency at which the employee is paid (e.g., monthly, bi-weekly).
- Effective From: The date from which the salary details are effective.
- Payment Method: The method through which the employee receives their salary (e.g., bank transfer, cheque).
Employee Attendance Configuration
This section deals with configuring attendance-related settings for employees. It includes aspects such as holiday calendars, attendance groups (e.g., shift, department), effective dates for attendance configurations, and leave groups. By specifying these parameters, organizations can effectively track employee attendance, manage leave requests, and ensure compliance with company policies and regulations.
- Holiday Calendar: The calendar specifying holidays observed by the company.
- Leave Group: The Leave Group specifying leaves observed by the company.
- Shift roster : The shift roster specifying the shift observed by the company.
- Overtime group: The overtime group specifying the overtime observed by the company.
Leave Management
Figure 3 below depicts the Leave management of the ROCKEYE - Human Resource
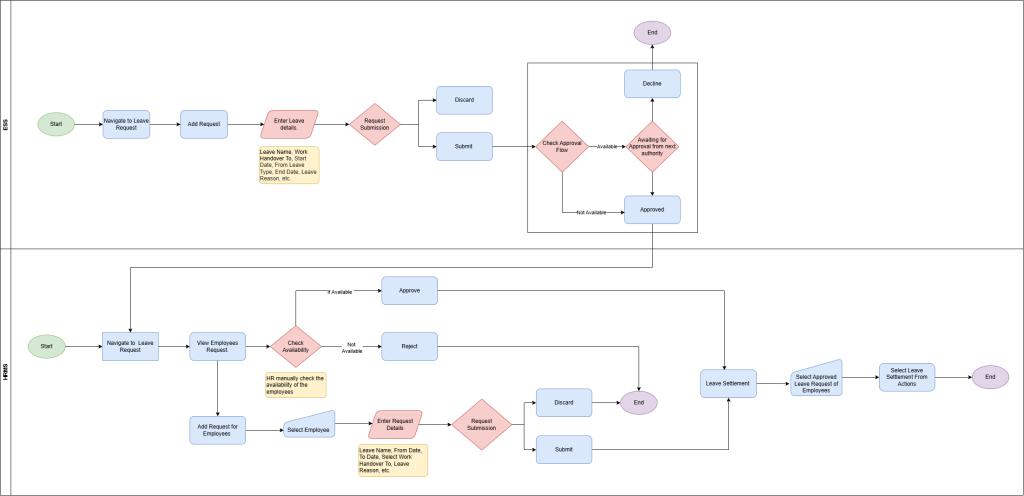
Figure 3
Employee Leave Initiation:
- Employees access the leave request module in the ESS system.
- Employee fills out the leave request form with the following details:
- Leave Name: Type of leave requested (e.g., annual leave, sick leave).
- From Date: Start date of the leave.
- To Date: End date of the leave.
- From Leave Type: Type of leave request for the start date (e.g., full day, first half, second half).
- To Leave Type: Type of leave request for the end date.
- Work Handover to: Employee to whom work will be handed over during the leave period.
- Handover Note: Instructions or notes for the employee taking over work responsibilities.
- Leave Reason: Reason for requesting the leave.
- Attachments: Any relevant documents attached to support the leave request.
- Notes: Additional comments or information related to the leave request.
- Employee submits the leave request through the ESS system.
HR Review:
- HR receives the leave request submitted by the employee.
- HR reviews the request for accuracy and compliance with company policies.
- HR may communicate with the employee to clarify details or request additional information if needed.
HR Leave Initiation:
- HR accesses the leave request module in the HRMS system.
- HR fills out the leave request form with the necessary details:
- Similar fields as employee initiation: Employee Name, Leave Name, From Date, To Date, From Leave Type, To Leave Type, Work Handover to, Handover Note, Leave Reason, Attachments, and Notes.
Remote Work Management
Below Figure 4 depicts the Remote work Management of the ROCKEYE - Human Resource as per the roles.
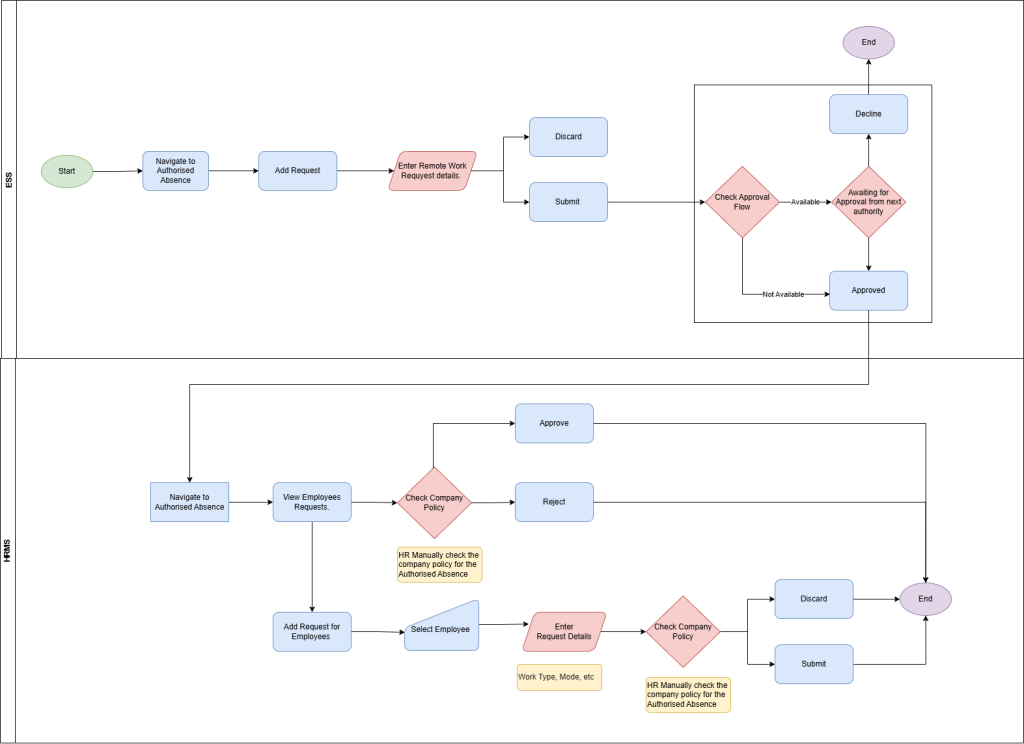
Figure 4
Employee Remote Work Initiation
- Employee access remote work module in the ESS system.
- Employee fills out remote work request form with following details:-
- Work Type* :- Work types such as Remote work , Official Assignment , Training Leave etc .
- Mode :- Choose the mode of work type such as permanent , Temporary.
- Start Date* :- Indicates the Start date of the Authorized leave.
- End Date* :- Indicates the End date of the Authorized leave.
- Work Type Reason* :-The "Work Type Reason" field in the authorized absence is used to specify the reason why the employee chose authorized absence.
- Location :- The "Location" field in the Authorized absence indicates the location of authorized work.
- HR Review:
- HR receives the remote work request submitted by the employee.
- HR reviews the request for accuracy and compliance with company policies.
- HR may communicate with the employee to clarify details or request additional information if needed.
- HR Leave Initiation:
- HR accesses the remote work request module in the HRMS system.
- HR fills out the remote work request form with the necessary details:
- Similar fields as employee initiation: Employee Name, work type, mode, From Date, To Date, From work type reason, and location.
Loan Management
Below Figure 5 depicts the Loan Management of ROCKEYE - Human Resource System as per the roles.
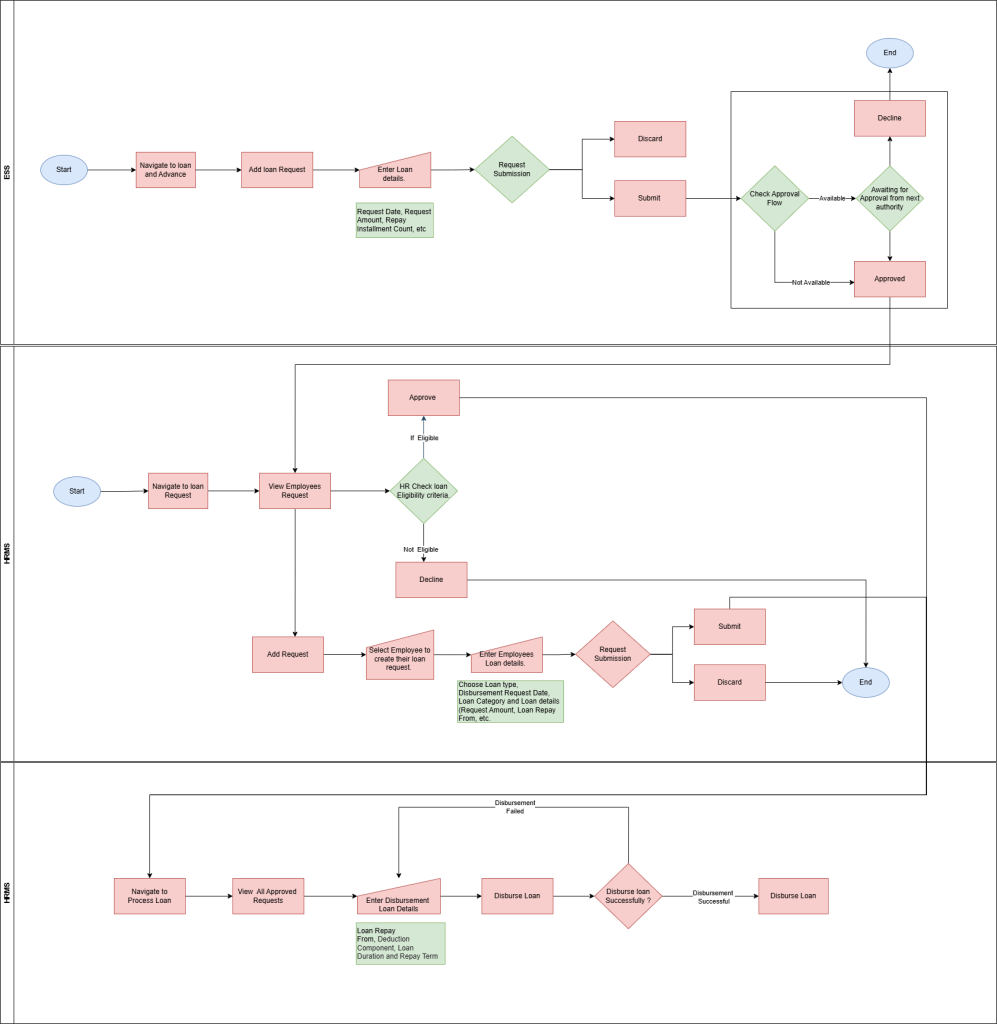
Figure 5
Loan Request Initiation
The loan request process begins when an employee requires financial assistance. The employee accesses the loan request module in the Employee Self service system and fills out the loan request form, providing necessary details such as personal information, loan amount, purpose, and repayment terms. After submission, HR or the designated department reviews the request for accuracy and compliance.
- Employee*: Specify the name or identification of the employee who is requesting the loan.
- Request Date*: Enter the date on which the loan request is being submitted.
- Choose Loan*: Select the type of loan the employee wishes to apply for from the available options.
- Disbursement Request Date: Enter the preferred date for loan disbursement if it differs from the request date.
- Loan Category: Specify the category or purpose of the loan (e.g., personal loan, advance).
- Interest Rate*: State the applicable interest rate for the loan. This could be a fixed rate or a variable rate depending on the organization's policies.
- Interest Calculation Term: Indicate the method for calculating the interest on the loan.
- Loan Details: Provide any additional details related to the loan, such as special terms, conditions, or requirements.
- Request Amount: Enter the amount of money the employee is requesting as a loan.
- Loan Repay From: Specify the date from which the loan repayments should start.
- Deduction Component: Determine the specific component from which the loan repayments will be deducted (e.g., monthly salary, bonus).
- Loan Duration (In Years): Enter the desired duration of the loan in years.
- Guarantor Type: Choose the type of guarantor for the loan. It can be an internal guarantor (e.g., another employee) or an external guarantor (e.g., a family member or friend).
- Internal: If an internal guarantor is selected, provide the necessary details about the guarantor.
- External: If an external guarantor is selected, provide the necessary details about the guarantor.
- Repay Term*: Specify the repayment terms for the loan (e.g., monthly installments, quarterly installments).
- Remarks: Include any additional comments or notes related to the loan request.
- Yearly Installments: Calculate and display the number of installments to be paid per year.
- Total Installments: Calculate and display the total number of installments required to repay the loan.
- Documents: If any supporting documents are required for the loan request, specify the document type and attach the necessary files.
Process Loan
If the loan request meets company criteria, it is approved. HR notifies the employee of the approval and provides details regarding the loan terms and repayment schedule. Once approved, the loan amount is disbursed to the employee, who then repays it according to the agreed-upon terms. Details of the loan request and transactions are recorded for documentation and compliance purposes.
- Repay Start Date*: This refers to the date on which the user is expected to start repaying the loan.
- Disburse amount*: This indicates the total amount of money that will be disbursed.
- Disbursement Date*: This is the specific date on which the loan amount will be provided to the user.
- Payment Method*: This field refers to the chosen method through which the user will make loan repayments.
- Reference No*: The reference number serves as an identifier for the loan disbursement transaction.
- Remarks: This field provides an optional space for any additional comments, or notes related to the loan disbursement.
Asset Management
Below Figure 6 depicts the Asset Management Process within the ROCKEYE - Human Resource as per the roles.
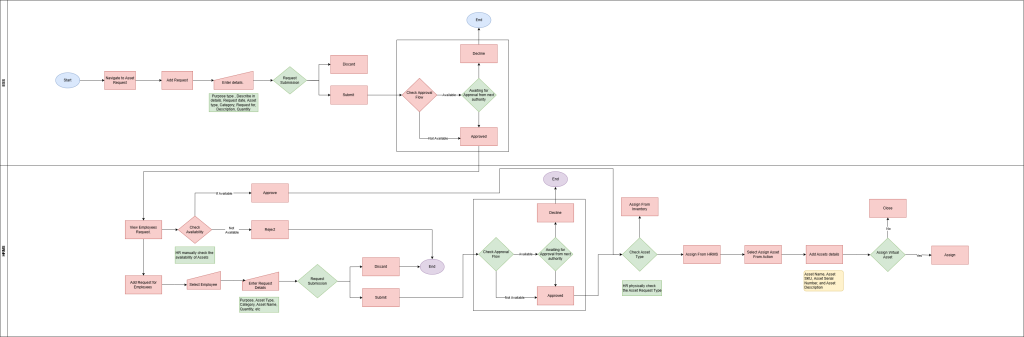
Figure 6
Asset Assigning
The asset assignment process involves selecting the employee for whom an asset is intended and identifying the specific asset to be allocated. Once confirmed, the asset is physically handed over to the employee, with all pertinent details documented for record-keeping purposes. Continuous monitoring ensures proper asset usage and maintenance by the employee. In case of reassignment or return, necessary updates are made to the records to reflect changes in asset ownership or status.
- Employee Name: Used to capture the name of the employee making the asset request.
- Purpose: Specifies the reason or purpose behind the asset request.
- Description: Allows employees to provide additional details or specifications about the requested asset.
- Attachments: Enables employees to attach supporting documents or files related to their asset request.
- Asset Request Items: Allows users to add multiple assets by clicking on the "Add New" button.
- Asset Type: Specifies the type or category of the asset being requested.
- Category: Further refines the classification of the asset being requested.
- Asset Name: Provides the specific name or model of the requested asset.
- Description: Allows the requester to provide additional details or specifications about the requested asset.
- Quantity: Specifies the desired quantity of the asset being requested.
- Cancel Quantity: Allows modification or cancellation of a previously submitted asset request.
- Actions: Provides options to perform certain actions on the asset request item.
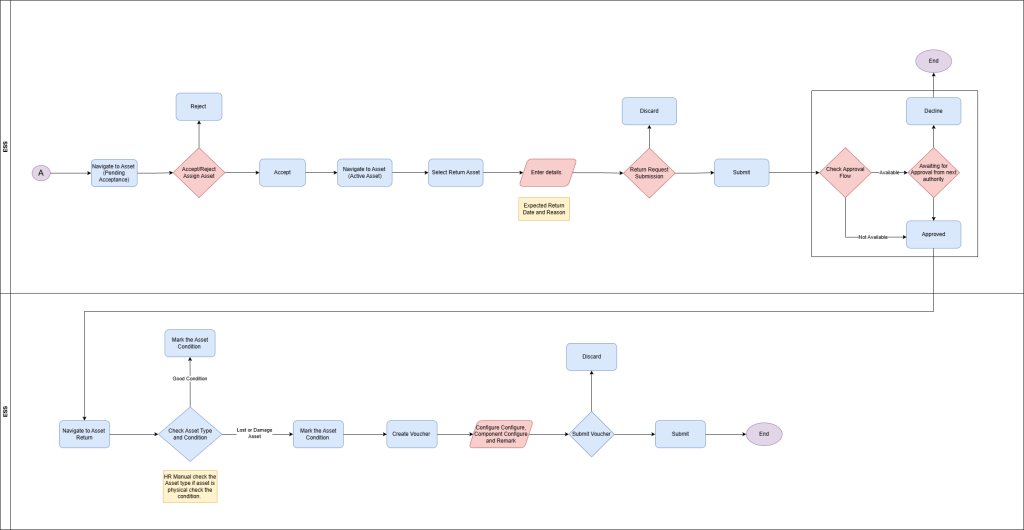
Asset Return Request
The asset return process begins with the employee initiating the return, followed by the identification and assessment of the returned asset's condition. If the asset is found to be damaged, the employee may be liable to pay a penalty as per company policy. Documentation of the return and any penalties incurred is then completed, with the employee responsible for paying the penalty amount, if applicable. Finally, the asset is dispositioned accordingly, records are updated, and feedback may be gathered to improve the return process in the future
- Expected Return Date: Date by which the asset is expected to be returned.
- Description: Description of the asset return request.
- From Inventory: Indicates whether the asset is being returned from inventory.
- Request: Specifies the request details.
- Third Party Remark: Remarks or comments from a third party involved in the return process.
- Asset Condition: Condition of the asset being returned.
- Weighted Average Cost: Cost associated with the asset being returned.
Payroll Management
Below Figure 7 depicts the Payroll Management within the ROCKEYE - Human Resource as per the roles.
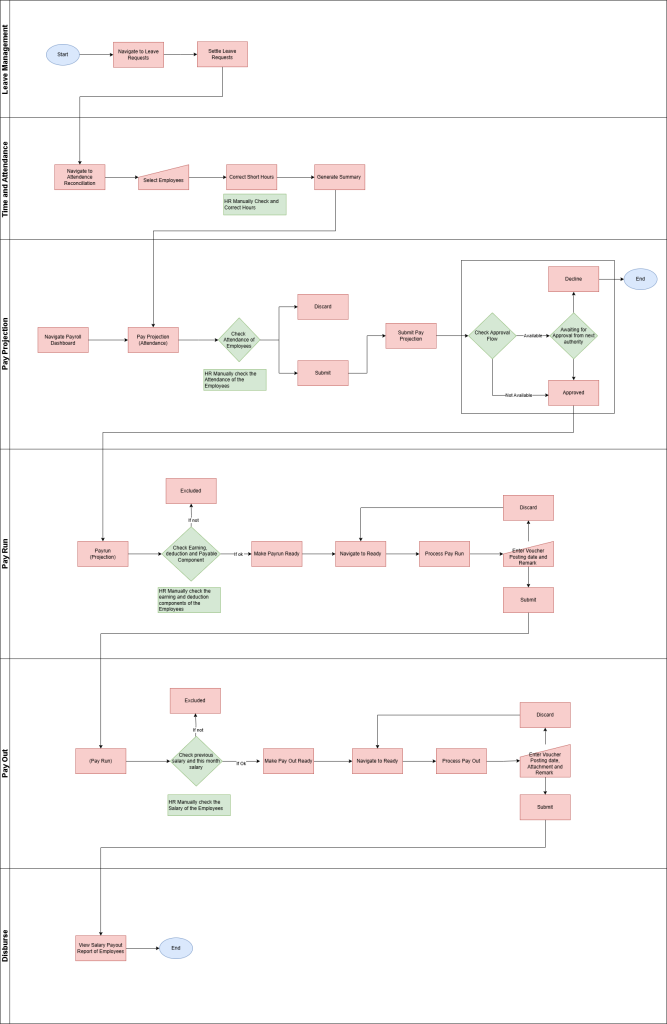
Figure 7
- Leave Settlement:
- Calculate and settle leave balances for the respective month for each employee.
- Ensure accurate deduction of leave days from entitlements and adjustments for any accrued leave.
- Timesheet Reconciliation:
- Verify the accuracy of employee timesheets against scheduled shifts and recorded attendance.
- Rectify any discrepancies or errors in attendance records to ensure accurate payroll processing.
- Pay Projection:
- Generate a pay projection detailing each employee's attendance for the month, including working days, paid days, and unpaid days.
- Provide insights into employee attendance patterns and potential impacts on payroll calculations.
- Payrun Process:
- Reconcile all payroll data, including attendance records, leave settlements, and applicable deductions.
- Calculate employee earnings, deductions, taxes, and other relevant factors to determine the final payout amount.
- Payout Process:
- Publish salary slips to employees, detailing earnings, deductions, and net pay for the month.
- Allow employees to review and verify salary slips for accuracy before finalizing the payout.
- Disbursement:
- Transfer funds to employees' designated bank accounts or issue physical paychecks.
- Ensure timely and accurate payment of salaries to employees, adhering to company policies and legal requirements.
Exit Process
Below Figure 9 depicts the Exit Process within the ROCKEYE - Human Resource as per the roles.
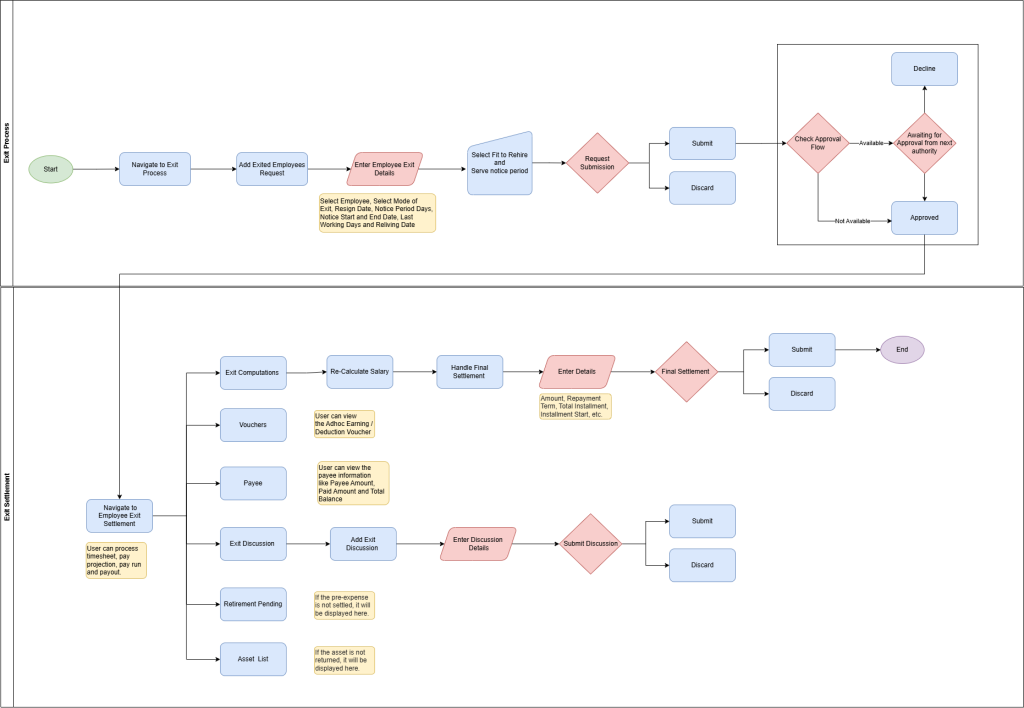
Figure 8
Employee Exit Process:
The employee exit process ensures a smooth departure for both the employee and the organization. It involves initiating the exit, conducting interviews, completing formalities, and documenting the process. Meanwhile, the post-exit settlement focuses on calculating payments, verifying details, reviewing agreements, and updating asset records. These steps are vital for a seamless transition and financial clarity.
- Exit Initiation
- The exit process begins when an employee submits a formal resignation or termination notice to HR, indicating their intention to leave the organization.
- Notice Period Initiation
- HR records the notice period start date based on the employee's resignation notice, and calculates the total notice period days required as per company policy.
- Exit Date Confirmation:
- HR confirms the exit date, last working date, and tentative relieving date with the departing employee, ensuring alignment with company procedures and policies.
- Notice Period Management:
- Monitor the employee's notice period, ensuring compliance with contractual obligations and providing support as needed during the transition period.
- Exit Formalities Completion:
- Complete all necessary exit formalities, including the return of company assets, settlement of pending dues, and submission of required documentation.
- Exit Discussion:
- Conduct discussions with the departing employee regarding post-exit settlement, including computations, vouchers, and payee details, to facilitate a smooth transition.
- Fit To Rehire Assessment:
- Assess the departing employee's eligibility for rehire based on performance, conduct, and other relevant factors, documenting the decision for future reference.
- HR Comment:
- Document HR comments or feedback regarding the employee's exit process, including any additional observations or considerations.
Post Exit Settlement Process:
- Exit Computations:
- Calculate and finalize the employee's post-exit settlement, including any outstanding payments, benefits, or reimbursements owed to the departing employee.
- Vouchers Preparation:
- Prepare vouchers for payment processing, ensuring accuracy and compliance with company policies and legal requirements.
- Payee Verification:
- Verify payee details and payment instructions to ensure funds are disbursed to the correct recipient in a timely manner.
- Exit Discussion Review:
- Review exit discussions and agreements with relevant stakeholders to ensure alignment and resolve any discrepancies or outstanding issues.
- Asset List Management:
- Update the asset list to reflect the return or disposal of company assets by the departing employee, maintaining accurate records for audit and compliance purposes.
In This Article
- Employee Management
- Employee Creation
- Employee Classification
- Employee Salary Details:
- Employee Attendance Configuration
- Leave Management
- Employee Leave Initiation:
- HR Review:
- HR Leave Initiation:
- Remote Work Management
- Employee Remote Work Initiation
- Loan Management
- Loan Request Initiation
- Process Loan
- Asset Management
- Asset Assigning
- Asset Return Request
- Payroll Management
- Exit Process
- Employee Exit Process:
- Post Exit Settlement Process: