System Workflows
Purpose
Purpose Of This Document
This document serves as an essential resource within the broader context of the Complete Solution Guide: ROCKEYE- Visitor Management. Its primary purpose is to deliver a comprehensive understanding of the system by providing detailed insights into system overviews and workflows.
System Architecture Visualization: Illustrate the system’s architectural elements, showcasing modules, components, and subsystems also Enhancing comprehension of the overall system structure through visual representation.
System Overview: Offer a high-level overview of the ROCKEYE- Visitor Management and provide context on the system’s purpose, functionalities, and role within the broader organizational framework.
Workflow Details: Detail key operational workflows within the ROCKEYE- Visitor Management, and provide step-by-step visual representations of processes, from user interactions to backend operations.
System Overview
Overview
In this section, we present a visual representation of the system overview of the product. The diagrams below offer a comprehensive view of how various modules interact to deliver a seamless and efficient user experience. The below figure depicts the system overview of the ROCKEYE- Visitor Management, offering quick insight into its structure and key elements.
The below Figure 1 depicts the system overview of the ROCKEYE- Visitor Management, offering a quick insight into its structure and key elements.
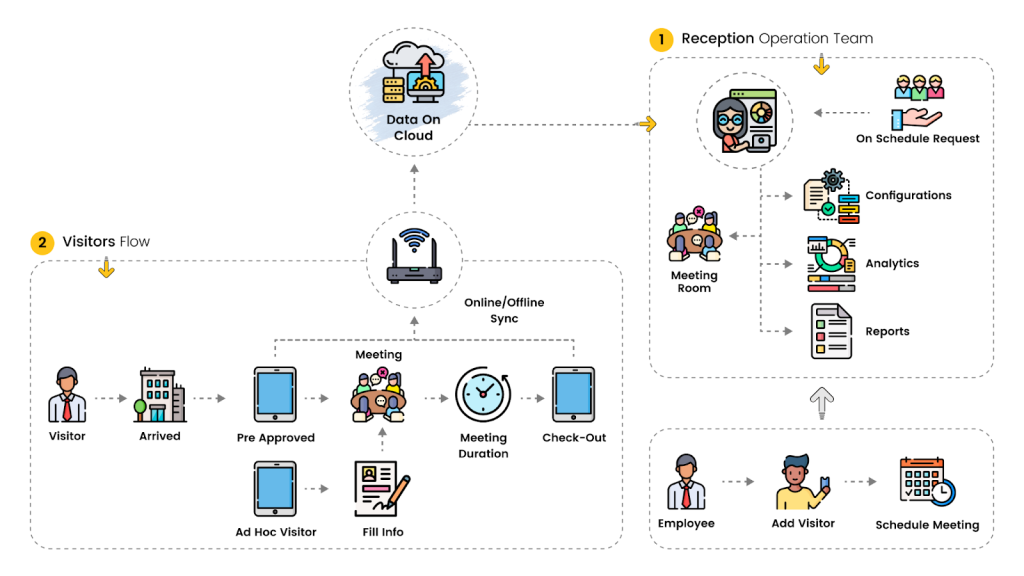
Figure 1
The ROCKEYE- Visitor Management orchestrates a meticulously designed sequence of operations, seamlessly guiding the entire process from visitor registration to their ultimate check-out, inclusive of visitor tracking and reporting functionalities. It all begins with the front desk personnel initiating visitor entries, which then progress to the validation phase. This system offers versatile options for visitor validation, providing administrators with heightened control over managing visitor interactions. Whether validating a single visit or multiple visits, the system accommodates these variations adeptly, even generating reports for detailed visitor activity analysis.
Upon visitor check-in, the system allows administrators to assign hosts and manage visitor permissions seamlessly. Leveraging an intuitive user interface seamlessly integrated into the system, the Visitor Management System provides a guiding framework for visitors. This guidance ensures the systematic processing of visitor interactions, paving the way for visitors to execute their planned activities associated with their visit, ultimately leading to a smooth check-out process.
Through this structured workflow, the Visitor Management System ensures efficient visitor tracking, enhanced security protocols, and streamlined ROCKEYE- Visitor Management processes for organizations.
System Workflows
This section provides a detailed exploration of the system workflows, offering a comprehensive understanding of the orchestrated processes that drive the seamless functioning of our system. Workflows serve as the backbone of our system architecture, delineating the step-by-step execution of tasks and the interdependencies among various components. The following workflows encapsulate the key stages and interactions within our system, ensuring optimal performance and user experience
Admin Management
The below Figure 2 depicts the warehouse management of the ROCKEYE- Visitor Management.
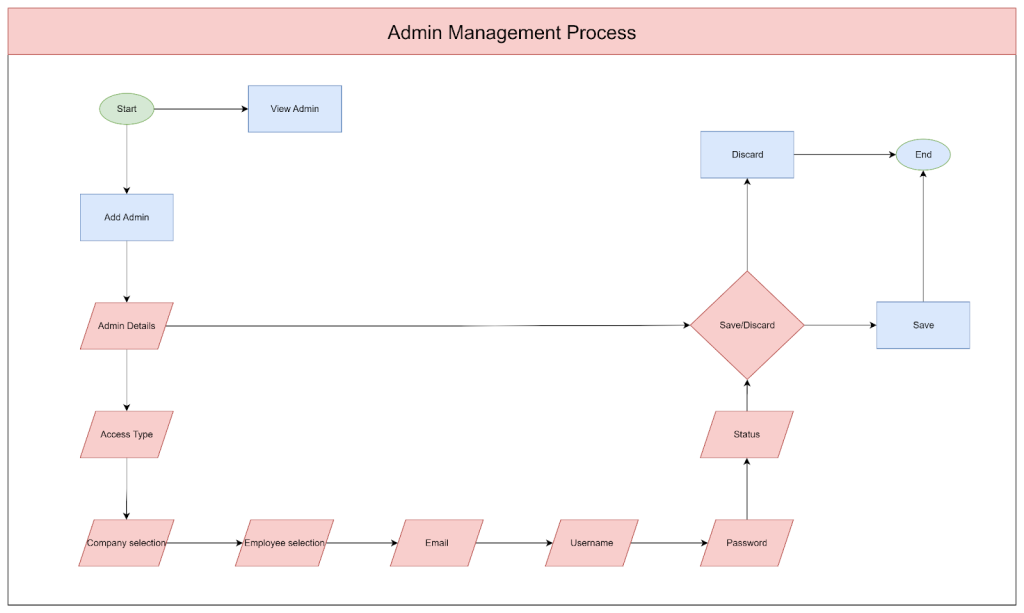
Figure 2
Admin Creation:
The Admin Creation process is crucial for establishing the administrative framework in the Visitor Management System. It involves designating an individual as the administrator, granting comprehensive privileges to oversee visitor management functions effectively.
Access Type:
- Defines the level of access granted to the administrator. For this workflow, it is set as “Admin,” granting full administrative privileges
Company:
- Identifies the company or organization associated with the administrator. This field ensures that the admin is linked to a specific company within the visitor management system.
Employee:
- Establishes a connection between the admin and an existing employee within the system. This linkage ensures that administrative responsibilities are assigned to a specific individual.
Email:
- Represents the email address unique to the admin. This email serves as both an identifier and a means of communication within the visitor management system.
Username:
- Specifies a chosen username for the admin’s account. This username is utilized during the login process for secure access.
Password:
- Indicates the confidential password associated with the admin’s account. This password is used to ensure secure authentication and access to the visitor management system.
Status:
- Determines the current status of the admin account. An “Active” status implies that the admin has access privileges, while an “Inactive” status restricts access.
By following this Admin Creation process, organizations can establish an effective foundation for managing visitor activities and ensuring secure access to the visitor management system.
Employee Management
Figure 3 below depicts the Stock In-Bound management of the RockEye – Visitor Management.
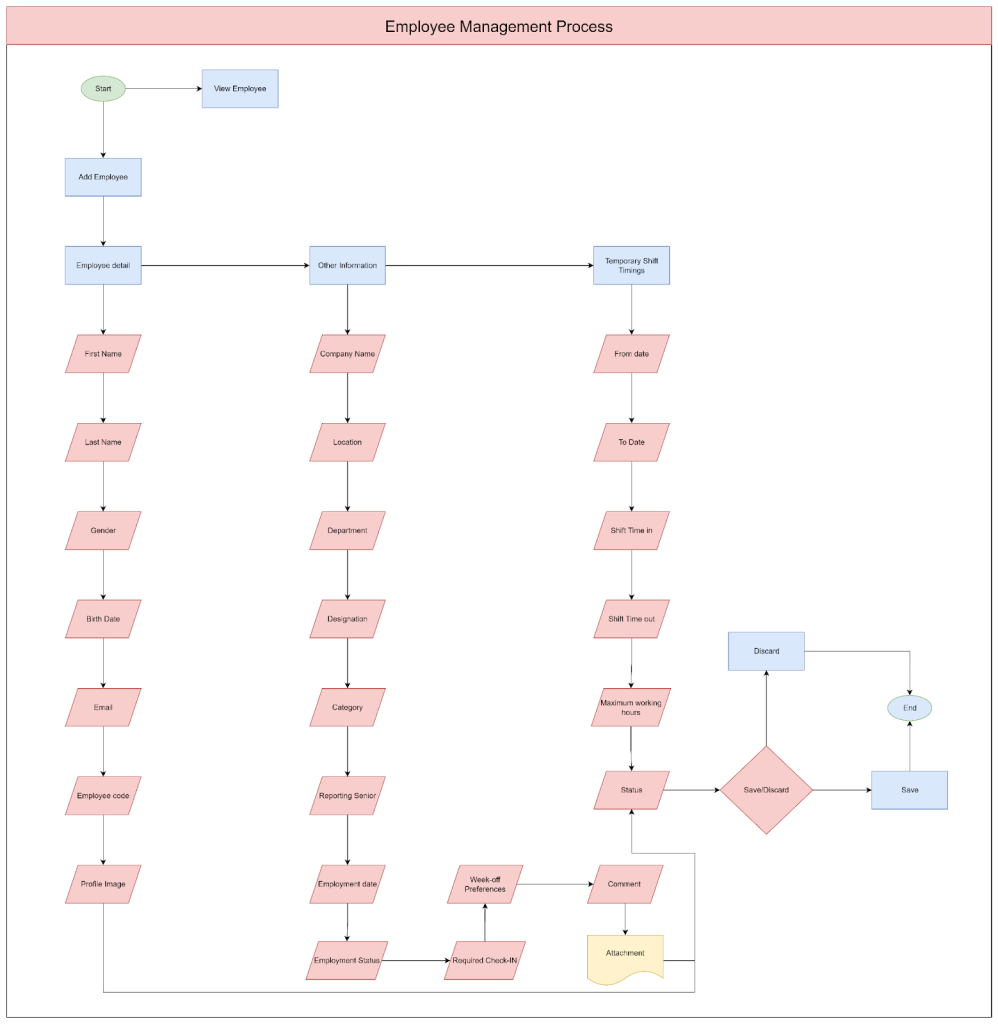
Figure 3
Employee Creation:
- Enter the employee’s basic details such as first name, last name, gender, date of birth, and email address.
- Assign a unique employee code for identification purposes within the system.
- Optionally, allow the employee to upload a profile image for visual identification.
Employee Additional Information:
- Specify the company name to which the employee belongs.
- Select the location, department, and designation where the employee will be working.
- Choose the appropriate category to classify the employee’s employment status (e.g., full-time, part-time, contractor).
- Enter the employment date to record when the employee started working.
- Set the employment status (e.g., active, inactive) based on the employee’s current status within the organization.
- Define the required check-ins and week-off preferences according to the attendance policy.
Add Temporary Shift Timings (if applicable):
- If the employee has temporary shift timings, specify the start date, end date, shift start time, shift end time, and maximum working hours.
- Indicate the status of the temporary shift (e.g., active, inactive).
By following this Employee Creation process, organizations can efficiently onboard and manage employee details within the visitor management system, ensuring accurate tracking of visitor interactions and enhancing overall security protocols.
Visitor Management
Below Figure 4 depicts the Visitor Management of the RockEye – Visitor Management as per the roles.
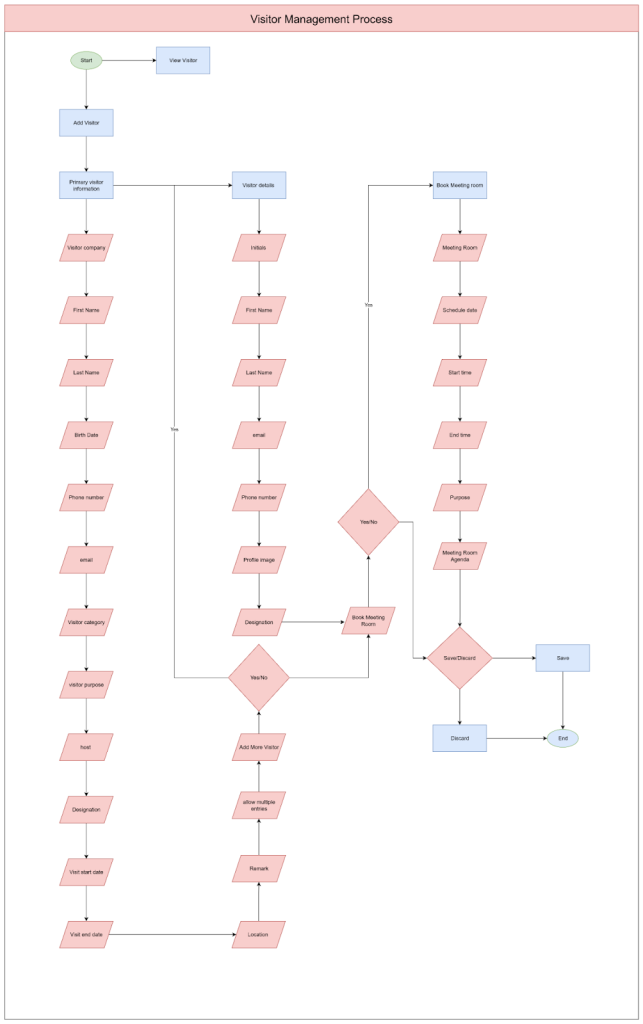
Figure 4
Enter Essential Details:
- Input essential details such as visitor company, name, contact information, email, visitor category, purpose of visit, host details, visit duration, and any location remarks.
Allow Multiple Entries:
- If recurring visits are allowed, enable this feature to record multiple entries.
- Enter visitor details for each entry, including initials, name, contact information, email, profile image, and designation.
Book Meeting Room (Optional):
- If meeting rooms can be booked, provide scheduling details including the date, start and end times, purpose of the meeting, and agenda.
- Schedule Date
- Start Time
- End Time
- Purpose of the Meeting
- Meeting Room Agenda
Meeting Room Management
Below Figure 5 depicts the Meeting room management of RockEye – Visitor Management .

Figure 5
Meeting Room Creation:
Code:
- A unique identifier assigned to the meeting room for easy reference and identification within the system.
Category:
- Specifies the type or classification of the meeting room, aiding in organizing and categorizing meeting spaces based on their intended use or features.
Location:
- Identifies the physical location or building where the meeting room is situated, helping users to locate the room within a larger facility or complex.
Operation Times:
- Indicates the designated operational hours or availability schedule for the meeting room, allowing users to plan meetings within the allotted time frame.
Approval Requirement:
- Specifies whether booking the meeting room requires prior approval from an administrator or supervisor, ensuring proper authorization for room reservations.
Capacity:
- Defines the maximum seating or occupancy capacity of the meeting room, enabling users to select a suitable space based on the expected number of attendees.
Image:
- Provides a visual representation or photograph of the meeting room, offering users a preview of the room’s layout, design, and amenities.
Description:
- Offers a brief overview or summary of the meeting room, highlighting its features, amenities, and any special considerations that may be relevant to users.
Status:
- Indicates the current availability or operational status of the meeting room, informing users whether the room is available for booking or already reserved for a specific time slot.
Meeting Room Attachment:
- Users can upload and attach relevant documents or files to the meeting room record, such as floor plans, equipment manuals, or safety guidelines. This ensures that all necessary information is readily accessible for meeting organizers, attendees, or maintenance personnel.
Meeting Room Amenities:
- This section allows users to specify the amenities available within the meeting room, such as audiovisual equipment, seating arrangements, catering services, and Wi-Fi. By detailing these amenities, users can effectively communicate available resources to meeting organizers and participants, facilitating smooth and productive meetings.