Procurement
Purchase Requsition
Introduction
This guide will walk you through the process of creating, viewing, and managing Purchase Requisitions (PRs) using the mobile procurement application. A Purchase Requisition is a formal request for goods or services made by a department to the purchasing department, initiating the procurement cycle.
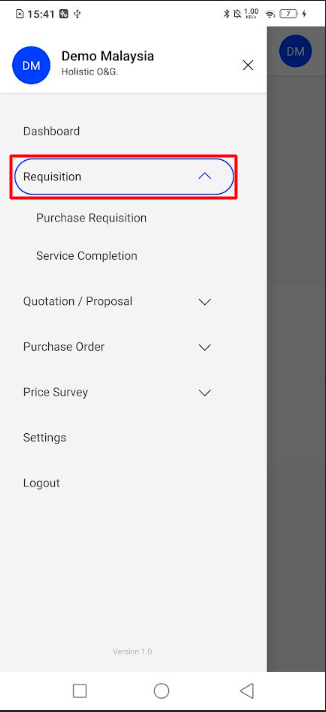
How To Navigate
- From the Dashboard, tap on Requisition to expand the menu.
- Select Purchase Requisition.
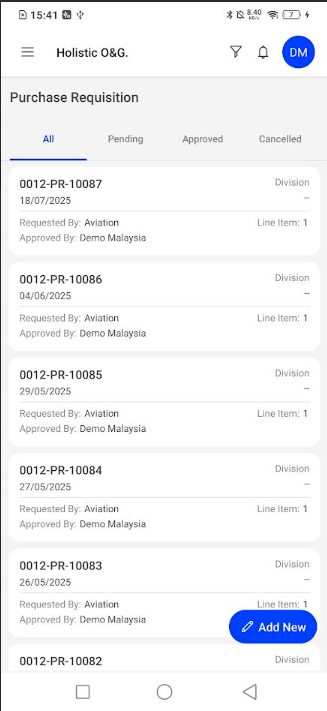
This will take you to the main Purchase Requisition list screen, showing all your existing PRs.
Creating a New Purchase Requisition
- From the Purchase Requisition list screen, tap the blue Add New button (plus icon) at the bottom right.
- You will be directed to the “Purchase Requisition” creation form.

- Fill in the header details:
- PR Number: This is typically auto-generated by the system.
- Requisition Date: Defaults to the current date but can be adjusted using the calendar icon.
- Requesting Department: Select the department making the request from the dropdown list.
- Optionally, you can add:
- Remark: General comments for the entire PR.
- Attachment: Tap the
+icon to upload any supporting documents. - Notes: Additional notes relevant to the PR.
Add Materials / Services to the PR
After filling out the header, you need to specify the items you wish to purchase:
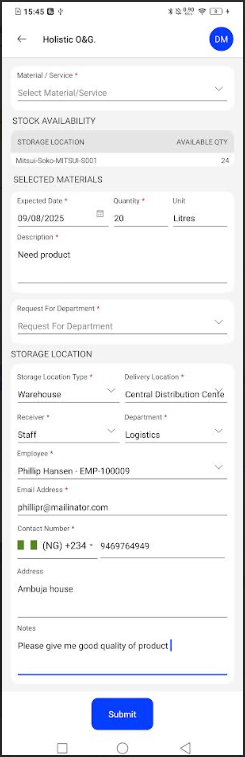
- Under the SELECTED MATERIALS section, tap Add New.
- A new form will appear to add details for a specific material or service:
- Material / Service: Tap to search for and select the required item from your inventory or service catalog.
- Stock Availability: (Informational) Displays the available quantity of the selected material in stock.
- Expected Date: The date by which the material/service is required.
- Quantity: Enter the amount needed.
- Unit: Select the unit of measure (e.g., Litres, Pieces, Kgs).
- Description: Provide a detailed description of the material or service.
- Request For Department: If this specific item is for a department different from the overall PR.
- Storage Location Type: Select where the item will be stored (e.g., Warehouse).
- Delivery Location: Specify the final delivery point.
- Receiver: Select the Staff or Employee who will receive the item. Their Email Address and Contact Number will auto-populate.
- Address: The delivery address.
- Notes: Any specific notes for this particular material/service line item.
- Tap Submit at the bottom of the material/service detail screen to add this line item to your PR.
- Once all materials/services have been added, review the entire Purchase Requisition form.
You have two options at the bottom:
- Discard: To cancel the PR creation and return to the list
- Submit: To finalize and send the Purchase Requisition for approval.
Listing
The Purchase Requisition list provides an overview of all PRs and their current status.
- List Display: Each entry shows:
- PR Number (e.g., 0012-PR-10087)
- Requisition Date
- Requested By Department
- Approved By (if applicable)
- Number of Line Items
- Status Filters: Use the tabs at the top to filter PRs by:
- All
- Pending
- Approved
- Cancelled
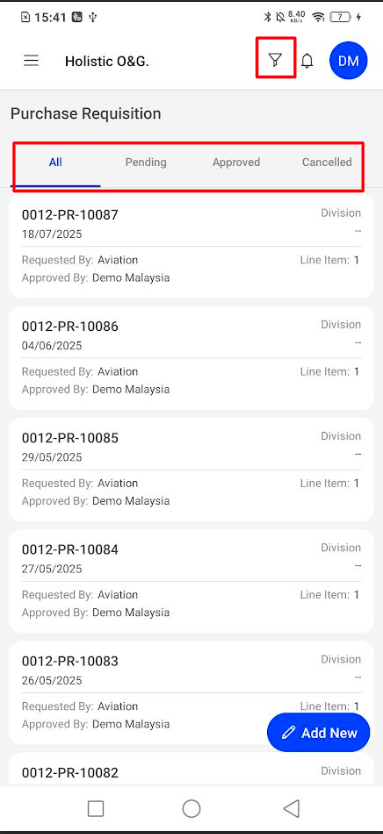
Filtering Purchase Requisitions
To quickly find specific Purchase Requisitions:
- From the main Purchase Requisition list screen, tap the Filter icon (funnel icon) at the top right of the screen.
- A filter pop-up will appear. You can search by:
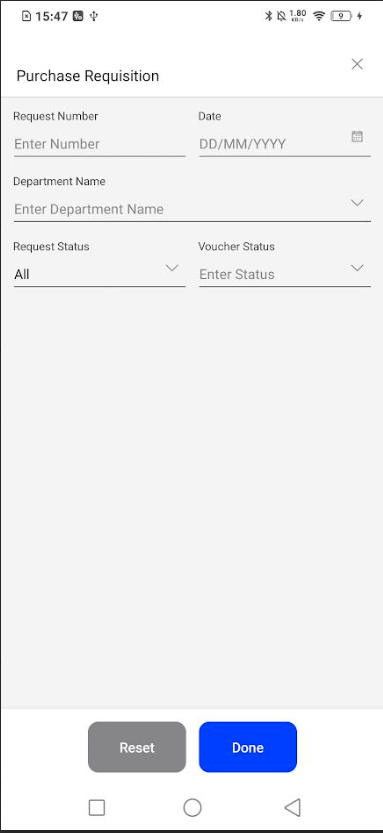
- Request Number
- Date (by range or specific date)
- Department Name
- Request Status (e.g., All, Pending, Approved, Cancelled)
- Voucher Status
- Tap Done to apply the filters and view the results.
- Tap Reset to clear all applied filters.