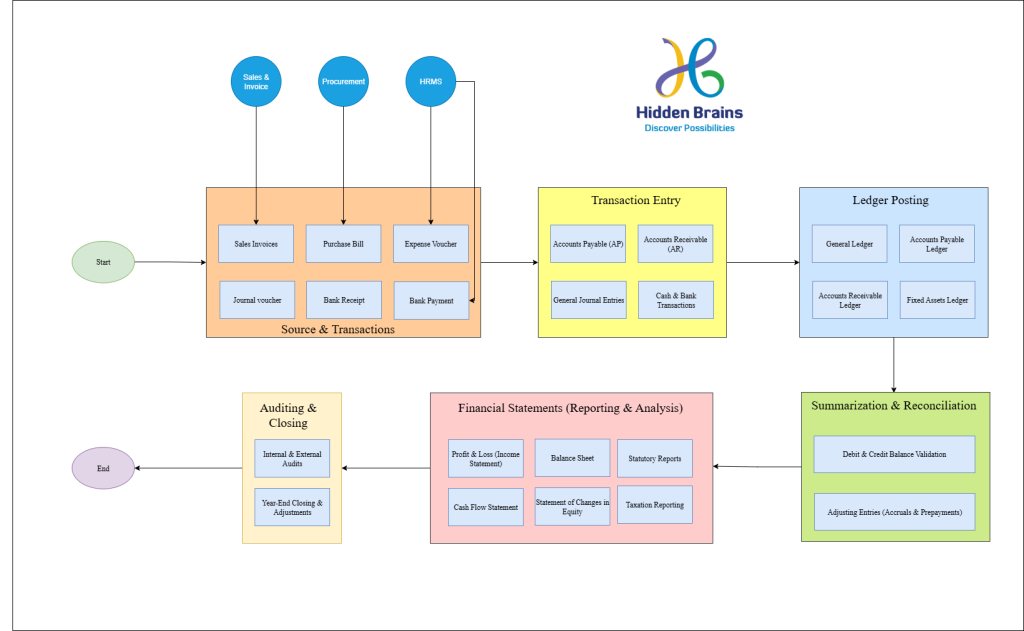
System Overview Diagram
In this section, we present a visual representation of the system overview of the product. The diagrams below offer a comprehensive view of how various modules interact to deliver a seamless and efficient user experience. The below figure depicts the system overview of the Financial Accounting System, offering quick insight into its structure and key elements
The Finance Management System (FMS) operates as a comprehensive and integrated platform designed to streamline and organize the intricate aspects of financial management within an organization. Beginning with financial planning and budgeting, it facilitates the seamless guidance of financial strategies and allocation of resources.
Following the integration of financial data into the system, the FMS transitions into a centralized hub housing all pertinent financial information, spanning budget details, expense records, and revenue streams. This centralized repository ensures precise financial management, facilitates streamlined expense tracking, and simplifies financial reporting. Furthermore, it serves as a catalyst for efficient financial analysis, enabling performance evaluation, variance analysis, and forecasting to optimize financial performance and achieve organizational objectives.
The FMS extends its functionality beyond traditional financial tasks by providing tools for risk management and compliance. This includes monitoring financial risks, ensuring regulatory compliance, and implementing internal controls to safeguard financial assets. Additionally, the system plays a pivotal role in strategic decision-making by providing real-time financial insights and scenario analysis to support informed decision-making.
In essence, the FMS constitutes a user-friendly and all-encompassing solution, managing the entire financial lifecycle from planning to reporting. Its impact extends beyond financial efficiency, actively contributing to risk mitigation, compliance assurance, and strategic alignment. The system incorporates diverse modules, including Budgeting & Forecasting, Expense Management, Financial Reporting, Vendor Management, Asset Management, Tax Compliance, Risk Management, and Strategic Planning, thereby contributing to the establishment of a well-organized and financially sound organization.
This section provides a detailed overview of our Financial Accounting System workflows, outlining the intricacies that drive its seamless functioning. These workflows serve as the backbone of our finance architecture, detailing the step-by-step execution of tasks and interdependencies among components. These workflows form the backbone of the finance architecture—covering processes such as accounts payable, receivable, general ledger management, reconciliations, budgeting, and financial reporting. Each workflow is designed to ensure accuracy, compliance, and operational efficiency across the financial lifecycle.
Bank Payment Process
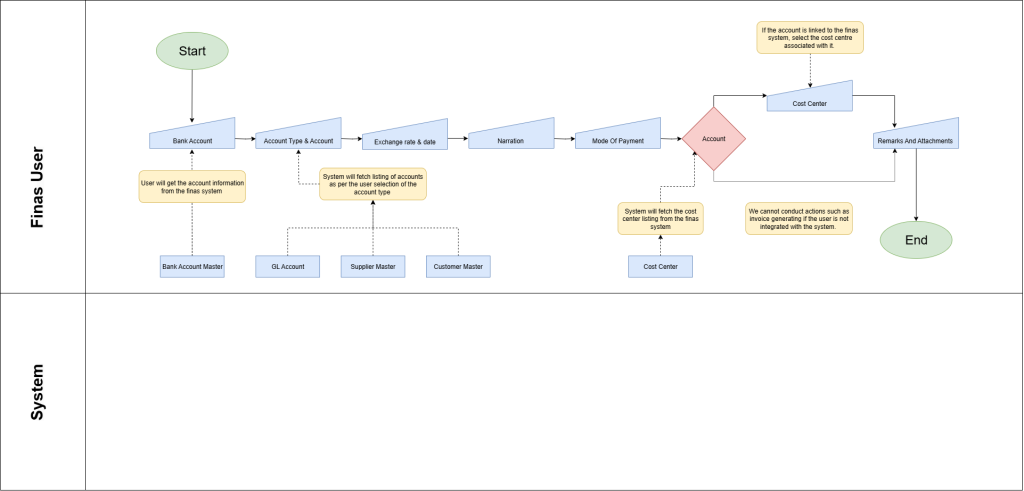
The bank payment process involves the transfer of funds from a company’s bank account to another party or entity. This process is crucial for managing financial transactions, paying vendors, suppliers, employees, and other business expenses. Below is the detailed explanation of each step in the bank payment process:
- Select Bank Account:
The process begins by selecting the appropriate bank account from which the payment will be made. This could be a checking account, savings account, or any other designated account.
- Account Type & Account:
Specify the type of bank account being used for the transaction, such as savings or current account. Additionally, choose the specific account from which the funds will be debited.
- Exchange Rate & Date:
If the payment involves currency conversion, enter the exchange rate and date to determine the equivalent amount in the desired currency. This step ensures accurate conversion of funds if dealing with international transactions.
- Narration:
Provide a brief description or explanation of the payment transaction. This may include details about the purpose of the payment, recipient, or any other relevant information for record-keeping and documentation purposes.
- Mode of Payment:
Select the mode of payment that will be used to initiate the transfer. This could include options such as online transfer, cheque, cash, or electronic payment methods like wire transfers or Automated Clearing House (ACH) transactions.
- Account:
Specify the recipient’s bank account or financial institution details to which the payment will be credited. This could include providing the account number, routing number, and other relevant information.
- Cost Center:
Allocate the payment to a specific cost center or department within the organization for tracking and reporting purposes. This helps in accurately recording expenses and analyzing financial performance across different areas of the business.
- Remark and Attachment:
Add any additional remarks, comments, or notes regarding the payment transaction. This could include details about the payment purpose, reference numbers, or any other pertinent information. Additionally, attach relevant documents or supporting files to the payment record for documentation and audit trail purposes.
By following these steps in the bank payment process, organizations can efficiently manage their financial transactions, ensure accuracy in payments, and maintain proper documentation for audit and compliance purposes.
Bank Receipt Process
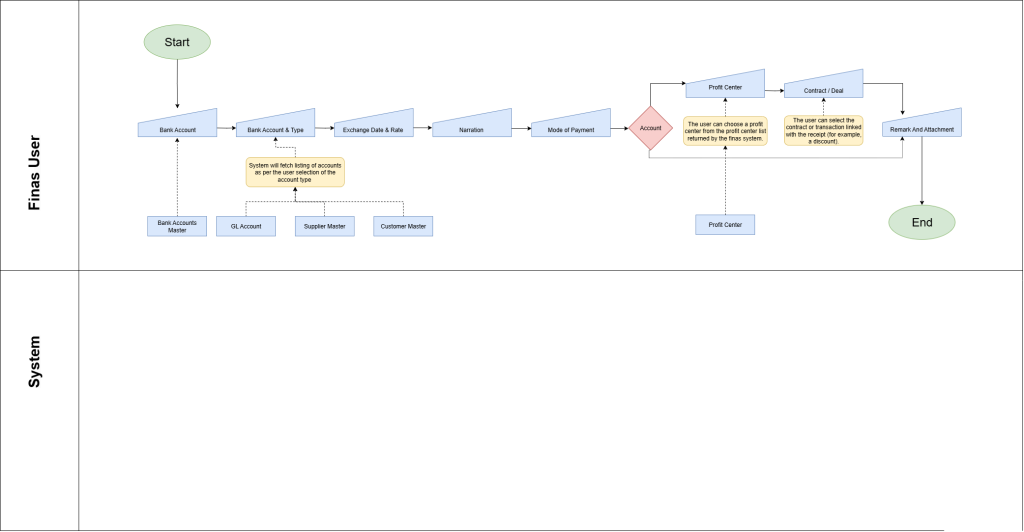
The bank receipt process involves the reception of funds into a company’s bank account from another party or entity. This process is essential for recording incoming financial transactions, including payments from customers, clients, investors, or other sources. Below is a detailed explanation of each step in the bank receipt process:
- Source Identification:
Begin by identifying the source of the received funds. This could include payments from customers, clients, investors, or other parties.
- Bank Account Selection:
Select the appropriate bank account where the receipt will be deposited. This could be a checking account, savings account, or any other designated account for incoming funds.
- Bank Account & Type:
Specify the type of bank account receiving the funds, such as savings or current account. Additionally, indicate the specific account where the funds will be credited.
- Exchange Date & Rate (if applicable):
If the receipt involves currency conversion, record the exchange rate and date to determine the equivalent amount in the receiving currency. This step ensures accurate conversion of funds, particularly for international transactions.
- Narration:
Provide a brief description or explanation of the receipt transaction. This may include details about the source of the funds, payer information, or any other relevant details for documentation purposes.
- Account:
Specify the account within the organization where the received funds will be credited. This could involve providing the account number, department, or other relevant information for proper allocation.
- Profit Center (if applicable):
Allocate the received funds to a specific profit center or department within the organization. This helps in tracking revenue streams and analyzing financial performance across different segments of the business.
- Contract/Deal (if applicable):
If the receipt is associated with a specific contract or deal, record the relevant details to link the transaction to the corresponding agreement. This step ensures accurate tracking of revenue and obligations related to contractual arrangements.
- Remark and Attachment:
Include any additional remarks, comments, or notes regarding the receipt transaction. This could involve details about the payment source, reference numbers, or any other pertinent information. Additionally, attach relevant documents or supporting files to the receipt record for documentation and audit trail purposes.
By following these steps in the bank receipt process, organizations can efficiently manage their incoming funds, ensure accuracy in recording receipts, and maintain proper documentation for audit and compliance purposes.
Cash Receipt process
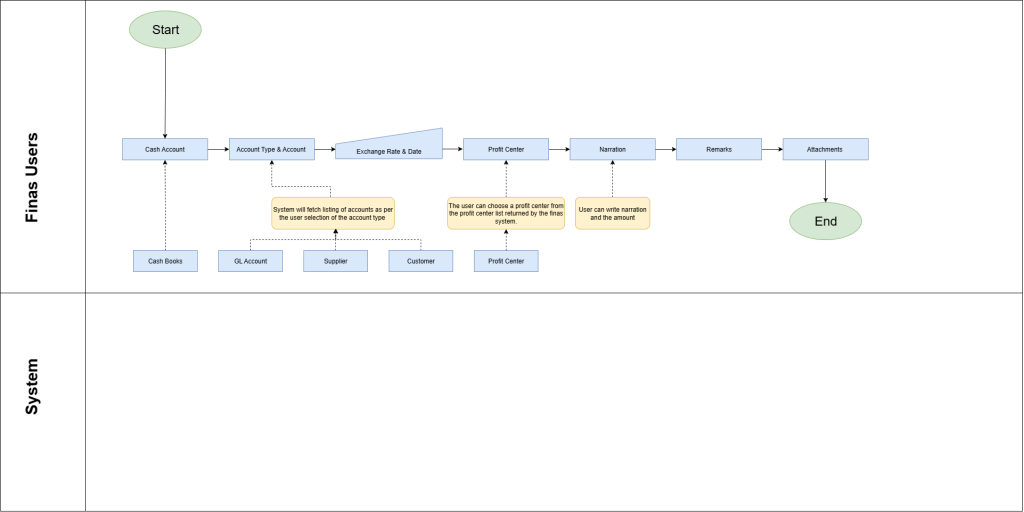
The cash receipt process involves the receipt of physical currency or cash equivalents into a company’s cash account. This process is crucial for recording incoming financial transactions accurately. Below is a detailed explanation of each step in the cash receipt process:
- Cash Account:
Begin by identifying the cash account where the received funds will be deposited. This could be a petty cash fund or any other designated account for handling physical currency.
- Account Type & Account:
Specify the type of cash account being used for the transaction, such as petty cash or cash on hand. Additionally, choose the specific account where the funds will be credited.
- Exchange Rate & Date (if applicable):
If the receipt involves currency conversion, record the exchange rate and date to determine the equivalent amount in the receiving currency. This step ensures accurate recording of cash equivalents, particularly for transactions involving foreign currencies.
- Profit Center (if applicable):
Allocate the received funds to a specific profit center or department within the organization. This helps in tracking revenue streams and analyzing financial performance across different segments of the business.
- Narration:
Provide a brief description or explanation of the cash receipt transaction. This may include details about the source of the funds, payer information, or any other relevant details for documentation purposes.
- Remarks:
Include any additional remarks, comments, or notes regarding the cash receipt transaction. This could involve details about the payment source, reference numbers, or any other pertinent information for internal record-keeping.
- Attachments:
Attach relevant documents or supporting files to the cash receipt record for documentation and audit trail purposes. This could include receipts, invoices, or any other documents related to the transaction.
By following these steps in the cash receipt process, organizations can efficiently manage their incoming cash transactions, ensure accuracy in recording receipts, and maintain proper documentation for audit and compliance purposes.
Cash Payment Process
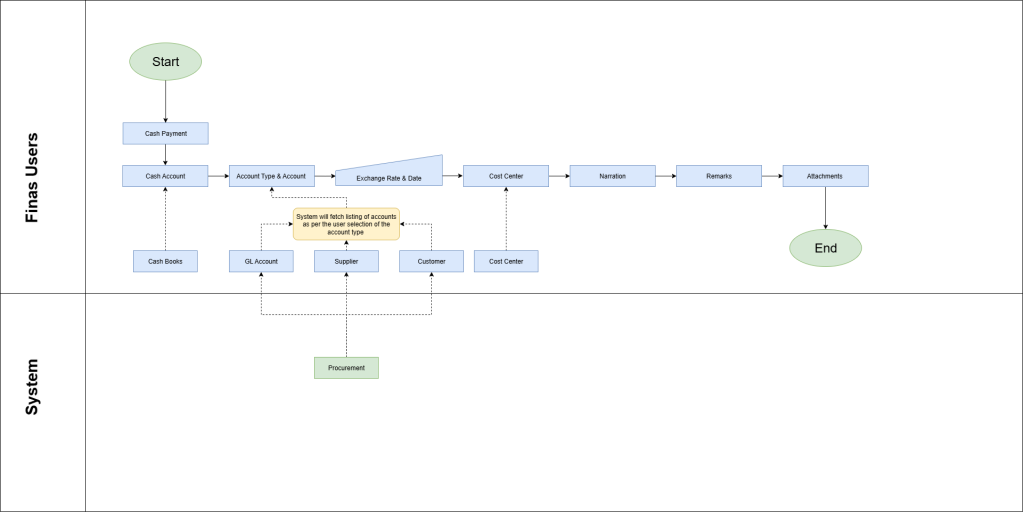
The cash payment process involves the disbursement of physical currency or cash equivalents from a company’s cash account to another party or entity. This process is essential for managing financial transactions that require immediate payment. Below is a detailed explanation of each step in the cash payment process:
- Cash Payment:
Identify the cash payment transaction, which involves the withdrawal or use of physical currency or cash equivalents for making a payment to a vendor, supplier, employee, or for other business expenses.
- Cash Account:
Select the appropriate cash account from which the payment will be made. This could be a petty cash fund or any other designated account for handling physical currency.
- Account Type & Account:
Specify the type of cash account being used for the transaction, such as petty cash or cash on hand. Additionally, choose the specific account from which the funds will be debited.
- Exchange Rate & Date (if applicable):
If the payment involves currency conversion, record the exchange rate and date to determine the equivalent amount in the desired currency. This step ensures accurate recording of cash equivalents, particularly for transactions involving foreign currencies.
- Cost Center:
Allocate the payment to a specific cost center or department within the organization for tracking and reporting purposes. This helps in accurately recording expenses and analyzing financial performance across different areas of the business.
- Narration:
Provide a brief description or explanation of the cash payment transaction. This may include details about the purpose of the payment, recipient, or any other relevant information for record-keeping and documentation purposes.
- Remarks:
Include any additional remarks, comments, or notes regarding the cash payment transaction. This could involve details about the payment purpose, reference numbers, or any other pertinent information for internal record-keeping.
- Attachments:
Attach relevant documents or supporting files to the payment record for documentation and audit trail purposes. This could include invoices, receipts, or any other documents related to the payment transaction.
By following these steps in the cash payment process, organizations can efficiently manage their financial transactions, ensure accuracy in payments, and maintain proper documentation for audit and compliance purposes.
Journal voucher
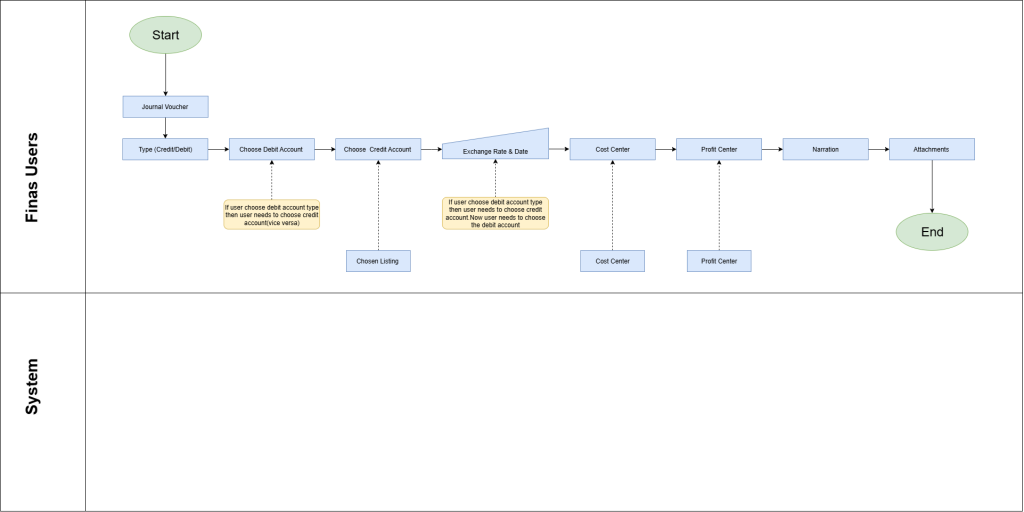
The journal voucher process involves recording financial transactions in the accounting system by creating journal entries. This process is crucial for accurately documenting transactions that affect the organization’s financial position. Below is a detailed explanation of each step in the journal voucher process:
- Journal Voucher:
Identify the journal voucher transaction, which represents the recording of financial activity through a journal entry in the accounting system.
- Type (Credit/Debit):
Determine whether the journal entry involves a credit or debit transaction. This distinction is important for accurately reflecting the direction of the financial impact on the accounts.
- Choose Debit Account:
Select the appropriate debit account from the chart of accounts. This account represents the source of funds or the account being debited in the journal entry.
- Choose Credit Account:
Select the appropriate credit account from the chart of accounts. This account represents the destination of funds or the account being credited in the journal entry.
- Exchange Rate & Date (if applicable):
If the transaction involves currency conversion, record the exchange rate and date to determine the equivalent amount in the desired currency. This step ensures accurate recording of transactions involving foreign currencies.
- Cost Center:
Allocate the transaction to a specific cost center or department within the organization for tracking and reporting purposes. This helps in accurately attributing expenses and analyzing financial performance across different areas of the business.
- Profit Center:
Allocate the transaction to a specific profit center or business segment within the organization. This helps in tracking revenue streams and analyzing financial performance across different segments of the business.
- Narration:
Provide a brief description or explanation of the journal entry transaction. This may include details about the nature of the transaction, accounts involved, or any other relevant information for documentation purposes.
- Attachments:
Attach any relevant documents or supporting files to the journal voucher for documentation and audit trail purposes. This could include invoices, receipts, or any other documents related to the transaction.
By following these steps in the journal voucher process, organizations can ensure accurate recording of financial transactions, maintain compliance with accounting standards, and facilitate effective financial reporting and analysis.
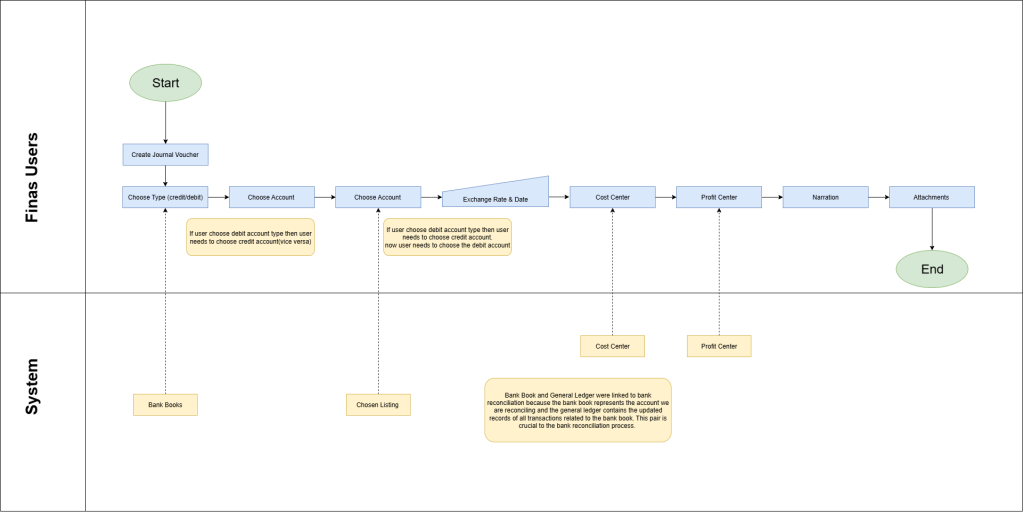
Bank Reconciliation

The bank reconciliation process involves comparing the transactions recorded in the company’s bank book with those in the bank statement to ensure consistency and accuracy. This process is crucial for identifying discrepancies and reconciling differences between the two records. Below is a detailed explanation of each step in the bank reconciliation process:
- Reconcile:
Initiate the reconciliation process by comparing the transactions recorded in the company’s bank book with those in the bank statement.
- Bank Book:
Review the transactions recorded in the company’s bank book, which represents the internal record of financial transactions related to the bank account.
- Bank Statement:
Review the transactions listed in the bank statement received from the bank, which represents the external record of financial transactions processed by the bank.
- Time Period:
Specify the time period for which the reconciliation is being performed. This could be a monthly, quarterly, or annual reconciliation, depending on the company’s accounting practices.
- Reconciliation:
Categorize transactions into two main categories:
- Unreconciled/Pending: Identify transactions that have not yet been reconciled between the bank book and bank statement. These transactions require further review and reconciliation.
- Entry Approval: Identify transactions awaiting approval or verification before they can be reconciled.
- Email Configuration: Review any discrepancies related to email notifications or communication with the bank.
- Manually Reconcile: Manually reconcile transactions that require additional attention or cannot be reconciled automatically.
- Reconciled: Update the status of reconciled transactions once they have been successfully reconciled between the bank book and bank statement.
- Reconciled:
Identify transactions that have been successfully reconciled between the bank book and bank statement. These transactions match and have been verified for accuracy.
By following these steps in the bank reconciliation process, organizations can identify and resolve discrepancies between their internal records and the bank statement, ensuring the accuracy of financial information and maintaining proper control over their bank accounts.
Payment Request
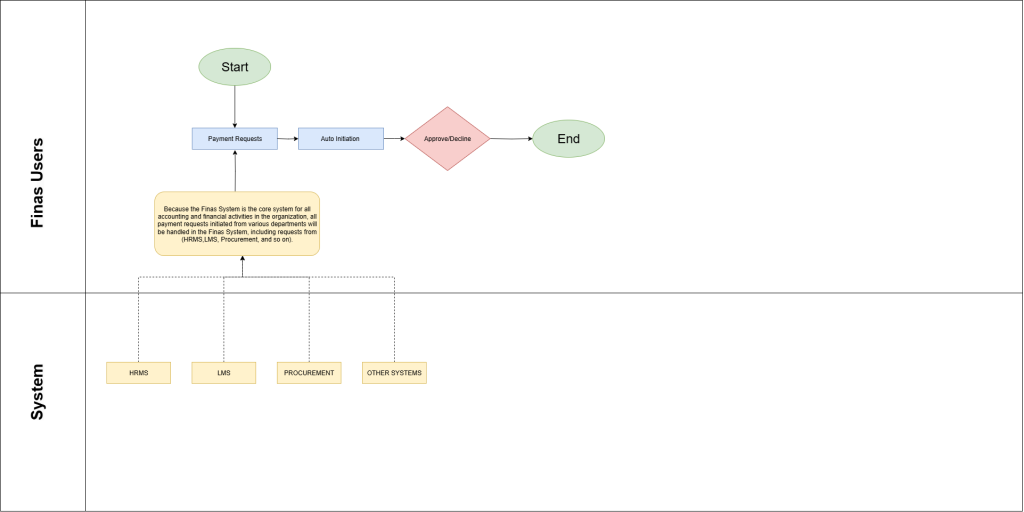
The payment request process involves the submission, review, and approval or rejection of payment requests originating from various systems such as HRMS (Human Resource Management System), LMS (Learning Management System), Procurement, or other integrated systems. This process ensures that payments are properly authorized and processed in a timely manner. Below is a detailed explanation of each step in the payment request process:
- Payment Request (Coming from HRMS, LMS, Procurement, Other System):
Initiate the payment request, which originates from one of the integrated systems such as HRMS, LMS, Procurement, or any other system requiring payment processing.
- Auto Initiation:
Automatically initiate the payment request within the financial system (FINAS) upon receipt from the originating system. This step streamlines the process and ensures prompt handling of payment requests.
- Pending at the FINAS System:
Review and process the payment request within the FINAS system. The request remains pending until it undergoes further review and approval by authorized personnel.
- Approve and Decline:
Authorized personnel review the payment request and take appropriate action:
- Approve: Authorize the payment request for processing. Approved requests proceed to the next stage for payment execution.
- Decline: Reject the payment request if it does not meet the necessary criteria or requires further clarification. Declined requests are returned to the originating system for revision or cancellation.
By following these steps in the payment request process, organizations can ensure that payment requests from various systems are efficiently managed, properly authorized, and processed in accordance with established procedures. This helps in maintaining financial control, ensuring compliance, and minimizing the risk of unauthorized payments.
Payable Allocation
The Payable Allocation process involves the structured matching of outgoing payments to corresponding outstanding purchase invoices or vendor liabilities. This ensures that accounts payable balances are accurately reduced, vendor ledgers are kept up to date, and financial reports reflect true expense recognition and cash outflows. Below is a step-by-step explanation of each component in the payable allocation workflow.
The process typically begins when a payment has been made to a supplier—such as through bank transfer, mobile money, cheque, or any other approved disbursement method. Once the payment is recorded in the financial system (e.g., FINAS), the next step is to allocate this payment against open purchase invoices. This action ensures the vendor account reflects accurate liability status and improves transparency in supplier reconciliation and cash flow tracking.
- Select Disbursed Unallocated Payment:
The user initiates the process by accessing the Payable Allocation module and reviewing the list of payments that have been made but not yet assigned to specific invoices. These could be advance payments, partial settlements, or bulk transfers. Key fields to validate include the vendor name, payment reference, date, amount, and payment method. Confirming this information ensures the right transaction is selected for allocation.
- Choose Allocation Mode
Once the unallocated payment is selected, the user proceeds to choose how the payment will be applied. The system presents three main allocation options:
- Allocate to Single Existing Voucher – used when the payment is meant to clear a specific supplier invoice.
- Allocate to Multiple Existing Voucher – applied when the payment covers more than one invoice.
- Create New Purchase Bill and Allocate – used for advance payments or scenarios where an invoice has not yet been posted; allows invoice generation directly from this point for immediate allocation.
This structure accommodates a wide range of vendor payment scenarios, including staged billing or project-based procurement.
- Match Purchase Bill (s) and Specify Allocation Amounts:
The system displays all open payables for the selected vendor based on the chosen allocation mode. The user selects the relevant invoice(s) and enters the allocation amount for each. The allocation can be:
- Full Allocation – the entire invoice amount is paid and settled.
- Partial Allocation – only a portion of the invoice is covered, leaving an open balance.
The system automatically validates that the allocation does not exceed the unallocated payment amount and handles currency-related checks if the invoices are in foreign currency, including exchange rate prompts.
- Submit Allocation for Approval:
Once purchase bill matching and allocation amounts are confirmed, the user submits the allocation for review.
If approval workflows are active, the transaction routes to a designated approver within the finance or procurement team. The approver reviews the payment-to-invoice mapping, checks for accuracy, and either approves or sends back the transaction for correction. All actions are logged to ensure accountability and compliance with internal controls.
- Allocation Posted In System
After approval, the allocation is posted in the system. The system creates appropriate journal entries—debiting the Accounts Payable (or relevant vendor control account) and crediting the unallocated payments or cash/bank account used during disbursement. The allocated invoices are updated as fully or partially paid, while the payment record changes status from “Unallocated” to “Allocated.” This ensures real-time accuracy in vendor balances and liability tracking.
By following these steps in the payable allocation process, organizations can ensure accurate recording and allocation of expenses or liabilities, maintain compliance with accounting standards, and facilitate effective financial reporting and analysis.
Purchase bill
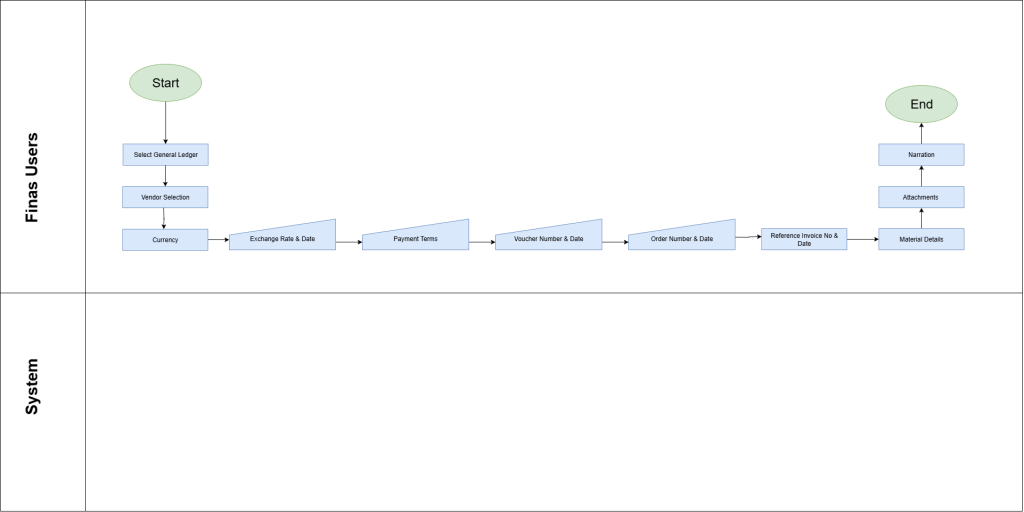
The Purchase Bill process involves the creation of purchase invoices to accurately record transactions related to goods or services procured by the organization. This process ensures that all expenses and liabilities arising from procurement activities are properly documented in the financial system. Below is a detailed explanation of each step in the purchase bill process:
The purchase bill process begins once a valid procurement transaction has been initiated, such as receipt of goods/services or a vendor invoice. This triggers the need to record the transaction in the FINAS system for financial and audit purposes.
- Select General Ledger
Users select the appropriate GL account to categorize the nature of the expense or procurement.
This is a critical step to ensure that expenses are reflected accurately in financial reports and budgets.
- Vendor Selection:
The user selects the vendor from the master list. This connects the transaction to the correct Accounts Payable (AP) record, enabling proper liability management, vendor history tracking, and payment scheduling.
- Currency:
If the purchase is made in foreign currency, the user must input or confirm the foreign currency in which the purchase bill is being processed.The system identifies that this transaction will require currency conversion if it’s not in the base currency.
- Exchange Rate/Date:
The exchange rate indicates the actual conversion value used to convert the foreign currency into the base currency at the time of posting the purchase bill.
The exchange rate date reflects the date on which the selected exchange rate is applicable.
- Voucher Number and Date:
The Voucher Number is a system-generated, unique identifier for the purchase bill transaction, while the Voucher Date is manually entered by the user. Together, they serve as the internal reference for the purchase bill, supporting traceability, audit trails, and effective document control.
- Order Number and Date:
This step links the purchase bill to a purchase order (PO) if one exists. It validates that the invoiced items match the approved PO and confirms the legitimacy of the transaction.
- Reference Invoice Number
The user enters the supplier’s invoice number, which acts as the external reference. This ensures alignment between the vendor’s documents and internal records.
- Material Details:
Details of the goods or services procured are captured here, including item descriptions, quantities, unit costs, tax (VAT/WHT), and cost centers. This is the most detailed part and forms the basis for the accounting entry.
- Attachments:
Attach any relevant documents or supporting files to the purchase bill for documentation and audit trail purposes. This could include purchase orders, invoices, receipts, or any other documents related to the purchase transaction.
- Narration
A short description or note is added here to provide context or remarks about the transaction. It may include reasons for the purchase, special terms, or internal references.
By following these steps in the purchase bill process, organizations can ensure accurate recording of procurement transactions, maintain compliance with accounting standards, and facilitate effective financial reporting and analysis.
Payable Credit Note

A Payable Credit Note is issued by a vendor and recorded by the purchasing organization to formally acknowledge the reduction or reversal of a previously recorded purchase invoice — either partially or in full. It serves as an official document to decrease the amount payable to the supplier due to reasons such as returned goods, quantity discrepancies, pricing errors, discounts, or service cancellations.
The Payable Credit Note process ensures accurate reversal of liabilities, tax, and inventory where applicable, while maintaining integrity in the organization’s accounts payable records.
- Select GL account
The user selects the appropriate Expense Reversal GL account that corresponds to the nature of the original procurement transaction. This step ensures that previously recognized expenses are properly reversed and categorized in the correct accounting head, preserving accuracy in financial statements, budget alignment, and audit compliance.
- Customer Selection:
The user selects the vendor from the master vendor list to whom the credit note is associated. This action links the payable credit note to the correct Accounts Payable (AP) record, ensuring that the vendor balance is adjusted accurately and that financial reports reflect true obligations. It also facilitates reconciliation and accurate supplier history tracking.
- Currency:
If the original purchase transaction was conducted in a foreign currency, the user must specify or confirm the currency for the credit note. This ensures correct reversal of the payable in both the foreign and base currencies, supports accurate currency conversion, and handles any related foreign exchange adjustments.
- Exchange Rate/Date:
The user records the exchange rate used to convert the foreign currency amount into the base currency. The exchange rate date determines when this rate is applicable. Capturing this information ensures accurate accounting for international transactions and supports proper financial reporting under multi-currency environments.
- Credit Note Number and Date
Each credit note is assigned a system-generated unique identifier (Credit Note Number) and a user-input Credit Note Date. These details form the official reference for the transaction, ensuring traceability, preventing duplication, and supporting internal controls, audit trails, and compliance with financial documentation standards.
- Reference Invoice Number and Date:
This section captures the full details of the returned or credited items or services, including item codes, descriptions, quantities, unit costs, associated tax components (such as VAT/WHT), and any applicable cost centers. This forms the backbone of the accounting entry, enabling precise expense reversal, inventory adjustment, and tax recalculation.
- Material/Service Details:
This section captures a comprehensive breakdown of the goods or services being credited, including item codes, descriptions, quantities, unit prices, discounts, and applicable taxes such as VAT or WHT. It may also include related cost centers or revenue dimensions. This information forms the foundation of the accounting entry, ensuring accurate reversal of revenue, correct tax adjustments, and proper inventory updates where physical goods are involved.
- Attachments:
The user attaches supporting documents to validate the credit note. These may include the original purchase invoice, return notes, supplier correspondence, rejection reports, or return authorization forms. Attachments create a complete audit trail, help resolve disputes, and ensure compliance with internal and external documentation policies.
- Narration
A concise note or comment is included to explain the reason behind the credit note—such as damaged goods, overbilling, quantity mismatch, or agreement-based discount. This narrative supports clarity for internal reviews, supplier communication, and auditing.
By following these steps in the Payable Credit Note process, organizations can ensure accurate reversal of procurement transactions, maintain the integrity of accounts payable records, support transparent vendor reconciliation, and remain compliant with accounting and audit standards. This process also facilitates more accurate budgeting, inventory tracking, and financial reporting.
Payable Purchase Return
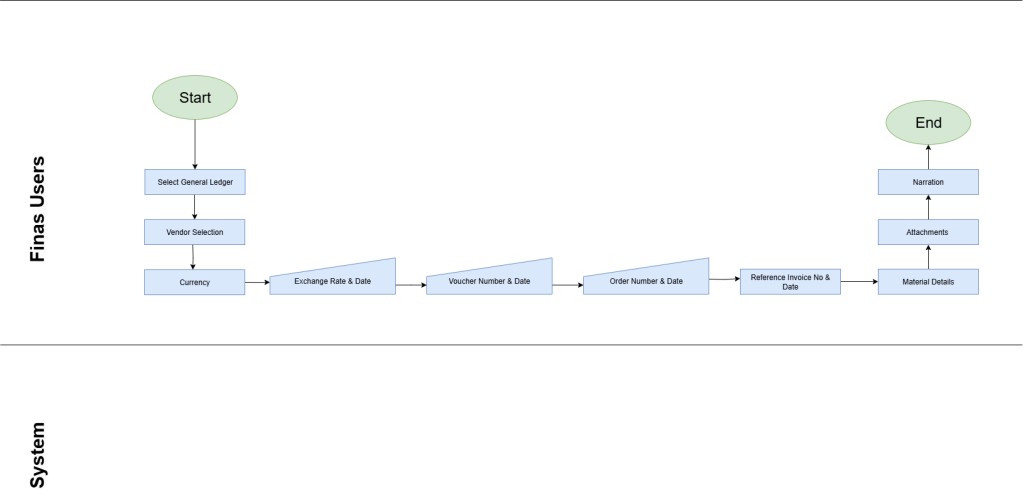
The payable purchase return process is crucial for handling transactions involving the return of previously purchased goods or materials to a vendor. It ensures that all related expenses and liabilities are accurately reversed, while maintaining proper documentation for reconciliation, audit trails, and compliance with financial policies.
The purchase return process is initiated when goods are returned to the vendor due to reasons such as defects, over-supply, or incorrect delivery. This triggers the need to update the FINAS system to reflect the reversal of the original purchase transaction.
Here’s a detailed description of each step in the process:
- Select General Ledger:
The user selects the appropriate General Ledger (GL) account,for the purchase Return to ensure that the financial impact of the return is accurately reflected in the organization’s books.
- Vendor Selection:
Select the vendor from whom the goods or materials were originally procured and are now being returned to ensure the return is correctly linked to the vendor’s account for accurate financial and accounts payable reconciliation.
- Currency:
Specify the currency used in the original transaction if the payable purchase return involves a foreign currency, ensuring accurate conversion and proper recording of the return amount in both the foreign and base currencies.
- Exchange Rate and Date:
Record the exchange rate and date if applicable, to determine the equivalent amount in the desired currency. This ensures accurate accounting for transactions involving foreign currencies.
- Voucher Number and Date:
Assign a unique voucher number and date to the payable purchase return transaction. This identifier facilitates tracking and referencing the transaction within the financial system.
- Order Number and Date:
Provide the order number and date associated with the original purchase transaction. This links the return to the initial purchase, aiding in tracking related transactions.
- Reference/Invoice Number and Date:
Enter the reference or invoice number from the original purchase transaction along with its date. This assists in identifying the specific invoice associated with the returned items, ensuring proper documentation and reconciliation.
- Material Details:
Specify details of the returned materials, including item descriptions, quantities, and prices. This ensures accurate recording of the returned items and their associated values, aiding in inventory management and financial reporting.
- Attachments:
Attach relevant documents or supporting files related to the purchase return transaction, such as return authorization forms or shipping documents. This helps maintain a complete audit trail and supporting documentation.
- Narrations:
Provide a brief description or explanation of the payable purchase return transaction. This may include details about the reason for the return, condition of the returned items, or any other pertinent information for documentation and reference.
- Tax Breakup:
Break down the tax components associated with the purchase return, including any applicable taxes such as sales tax or value-added tax (VAT). This ensures accurate tax reporting and compliance with tax regulations.
By following these steps in the payable purchase return process, organizations can effectively manage returned items, maintain accurate financial records, and ensure compliance with accounting and tax requirements.
Expense Voucher
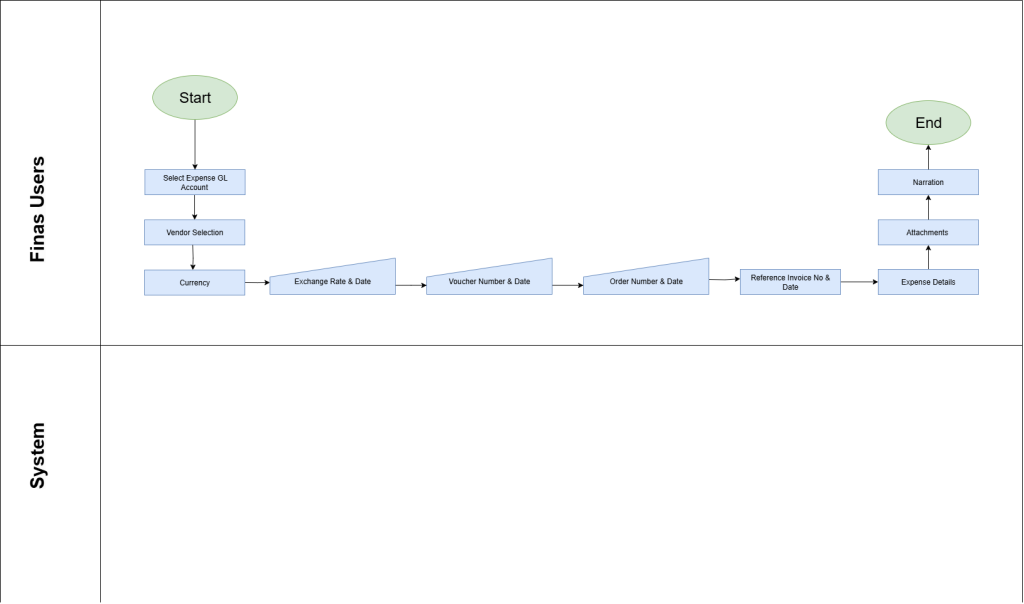
The expense voucher process is crucial for accurately recording and managing expenses incurred by the organization. Whether it’s for office supplies, utilities, travel expenses, or any other business-related costs, the expense voucher process ensures that all expenditures are properly documented and accounted for in the financial system. Here’s a detailed description of each step in the process:
- Select Expense GL Account:
The user selects the relevant expense GL account for corresponding to the nature of the expenditure.
- Vendor Selection:
Choose the vendor or payee for the expense transaction. Accurately selecting the vendor ensures that the expense is properly associated with the vendor’s account for tracking and reconciliation purposes.
- Currency:
Specify the currency if the expense involves transactions in foreign currencies. This step ensures that the expense amount is accurately converted and recorded in the desired currency, facilitating consistent financial reporting.
- Exchange Rate and Date:
Record the exchange rate and date if applicable, ensuring accurate accounting for transactions involving foreign currencies. This information is crucial for determining the equivalent amount in the desired currency and maintaining financial accuracy.
- Voucher Number and Date:
Assign a unique voucher number and date to the expense voucher transaction. This identifier helps in tracking and referencing the transaction within the financial system, providing a clear audit trail for reconciliation.
- Order Number and Date:
Provide the order number and date associated with the expense transaction, if applicable. This information helps in linking the expense to any corresponding purchase orders or contracts, facilitating accurate tracking and documentation.
- Reference/Invoice Number and Date:
Enter the reference or invoice number from the expense transaction along with its date. This information helps in identifying the specific invoice or document associated with the expense, facilitating accurate reconciliation and documentation.
- Expense Details:
Specify details of the expense, including item descriptions, quantities, and prices. Accurate recording of the expense items and their associated values is crucial for financial reporting and analysis.
- Attachments:
Attach relevant documents or supporting files related to the expense transaction, such as invoices, receipts, or contracts. Maintaining comprehensive documentation ensures transparency and facilitates efficient resolution of any discrepancies.
- Narrations:
Provide a brief description or explanation of the expense voucher transaction. This may include details about the nature of the expense, purpose of the transaction, or any other pertinent information for documentation and reference, ensuring clarity and transparency in the transaction.
- Tax Breakup:
Break down the tax components associated with the expense transaction, including any applicable taxes such as sales tax or value-added tax (VAT). This ensures accurate tax reporting and compliance with tax regulations, facilitating proper financial management and regulatory adherence.
By following these steps in the expense voucher process, organizations can effectively record and manage expenses, maintain accurate financial records, and ensure compliance with accounting and tax requirements, ultimately supporting efficient and transparent financial operations.
Sales Invoice
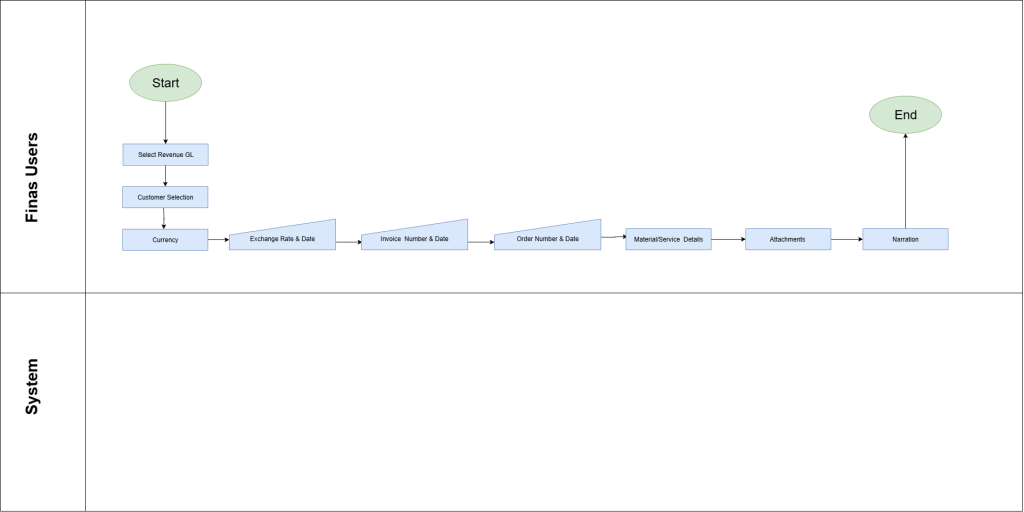
The Sales Invoice process involves the creation and posting of invoices to accurately record revenue generated from goods or services delivered to customers. This process ensures that income, tax liabilities, and receivables arising from sales activities are properly documented in the financial system. Below is a step-by-step explanation of each component in the sales invoice process.
The process typically begins after a valid sales transaction has occurred — such as the delivery of goods, provision of services, or issuance of a delivery note. This event triggers the need to generate and record a sales invoice in the FINAS system for financial reporting, accounts receivable tracking, and audit compliance.
- Select Revenue GL
Users select the appropriate Revenue GL account to categorize the nature of income from the sale
This step is critical for ensuring the revenue is accurately posted in the correct accounting head and reflected appropriately in financial reports, budgets, and statutory filings.
- Customer Selection:
The user selects the customer from the master customer list. This links the invoice to the correct Accounts Receivable (AR) record, allowing the system to track outstanding payments, customer credit limits, transaction history, and automate reminders or aging reports.
- Currency:
If the sale was made in a foreign currency, the user must specify or confirm the correct currency in which the invoice is being issued. This ensures proper multi-currency accounting, accurate revenue recognition, and real-time exchange loss/gain management where applicable.
- Exchange Rate/Date:
The exchange rate indicates the value used to convert the foreign currency into the base currency for reporting purposes. The exchange rate date represents the day on which this conversion is applicable. This is vital for accurate revenue recording and tax reporting, particularly in jurisdictions requiring compliance with specific exchange rate rules.
- Invoice Number and Date
The Invoice Number is a system-generated unique identifier for the sales invoice transaction. The Invoice Date is typically user-entered and reflects the official date of sale. Together, these serve as core references for audit trails, customer communication, internal controls, and document management.
- Order Number and Date:
If the invoice is linked to a Sales Order (SO), the order number and date are referenced here. This ensures the invoice corresponds to pre-approved terms (such as agreed price, quantity, and delivery date) and that goods/services have been fulfilled in line with the customer’s request.
- Material/Service Details:
This section captures the detailed breakdown of goods or services sold, including item codes, descriptions, quantities, unit prices, discounts, applicable taxes (e.g., VAT/WHT), and any related cost centers or revenue dimensions. It forms the basis of the accounting entry and is crucial for accurate inventory management (in case of goods), revenue booking, and tax calculation.
- Attachments:
The user may attach supporting documents such as sales orders, signed contracts, delivery notes, or email approvals. These attachments serve as the audit trail for the invoice, support reconciliation with customers, and enhance internal accountability and compliance with documentation policies.
- Narration
A brief narration or internal note is added to provide context on the invoice, such as the purpose of the sale, payment terms, project code, or any special remarks. This can be valuable during reviews, internal audits, or when responding to customer or regulatory queries.
By following these steps in the sales invoice process, organizations can ensure accurate recording of sales transactions, maintain compliance with accounting standards, and facilitate effective financial reporting and analysis.
Receivable Sales Return

The receivable sales return process is crucial for managing transactions where goods or materials previously sold to customers are returned. It ensures that all related revenues and receivables are accurately reversed in the system while maintaining proper documentation for reconciliation, audit trails, and compliance with financial and tax regulations.
The sales return process is typically initiated when a customer returns goods due to issues such as defects, excess supply, incorrect deliveries, or contract cancellations. This triggers the need to update the FINAS system to reflect the reversal of the original sales transaction.
Here’s a detailed description of each step in the process:
- Select General Ledger:
The user selects the appropriate Sales Return GL account to ensure that the financial impact of the return, reversal of revenue,is properly reflected in the organization’s books. This step ensures that income figures are not overstated and aligns with accounting best practices.
- Customer Selection:
The user selects the customer who originally received the goods and is now returning them. This links the return to the correct Accounts Receivable (AR) record, enabling accurate receivables reconciliation and updating of the customer’s outstanding balance or credit note allocation.
- Currency:
If the original sale was made in a foreign currency, the same currency must be specified for the return to maintain accuracy in transaction value and consistency in exchange rate accounting.
- Exchange Rate and Date:
Input the exchange rate and effective date to calculate the base currency value of the return. This step is essential for ensuring that foreign currency returns are accurately reflected in financial records and that any gains or losses from exchange rate fluctuations are correctly accounted for.
- Voucher Number and Date:
Assign a unique document number and date to the sales return transaction. These identifiers serve as internal references for tracking, reporting, and maintaining an audit trail within the financial system.
- Order Number and Date:
Provide the sales order or delivery note number and date related to the original transaction. This ensures that the return is clearly tied to the prior fulfillment and supports validation of the items being returned.
- Reference Invoice Number and Date:
Enter the original sales invoice number and date. This is critical for correctly reversing the revenue, updating the customer’s receivables balance, and ensuring accurate credit issuance or refund processing.
- Material Details:
List the details of the returned items, including item codes, descriptions, quantities, unit prices, and applicable tax rates. This supports accurate inventory restocking, financial adjustments, and ensures that cost of goods sold (COGS) and revenue are appropriately updated.
- Attachments:
Upload relevant documents linked to the sales return such as return request forms, customer correspondence, delivery confirmation of returned goods, or quality inspection reports. These serve as evidence of the return and support regulatory compliance and internal controls.
- Narrations:
Provide a brief description or explanation of the sales return transaction. This may include details about the reason for the return, condition of the returned items, or any other pertinent information for documentation and reference.
- Tax Breakup:
Break down the tax components associated with the purchase return, including any applicable taxes such as sales tax or value-added tax (VAT). This ensures accurate tax reporting and compliance with tax regulations.
By following these steps in the receivable sales return process, organizations can effectively manage returned items, maintain accurate financial records, and ensure compliance with accounting and tax requirements.
Receivable Credit Note
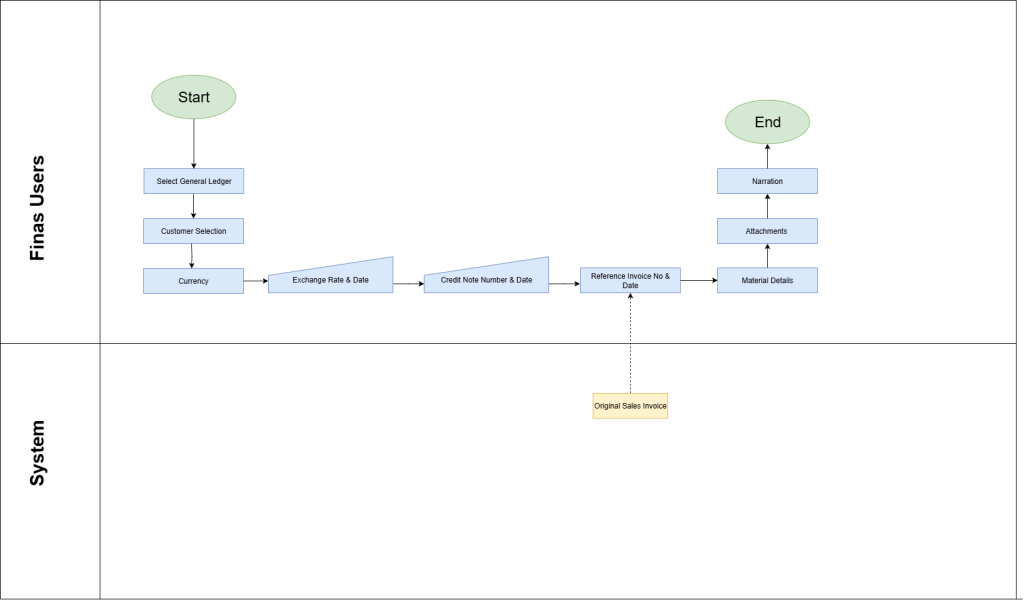
A Receivable Credit Note is issued to a customer to formally acknowledge the reversal of a previously issued sales invoice — either fully or partially. It serves as a financial document used to reduce the amount the customer owes, due to reasons like returned goods, discounts, pricing errors, or cancellations.
The Sales Credit Note process ensures that the financial impact of such reversals is properly accounted for in the Accounts Receivable (AR), revenue, tax, and inventory records.
- Select GL account
The user selects the appropriate Revenue Reversal GL account to categorize the nature of the credit transaction. This step is crucial to ensure that the original revenue recognized from the sale is correctly reversed in the appropriate accounting head, maintaining accuracy in financial reports, budget tracking, and compliance with statutory requirements.
- Customer Selection:
The user selects the appropriate customer from the master customer list to whom the sales credit note is being issued. This links the credit note to the correct Accounts Receivable (AR) record, ensuring accurate reversal of outstanding amounts and proper adjustment of the customer’s balance.
- Currency:
If the original sale was conducted in a foreign currency, the user must specify or confirm the appropriate currency when issuing the sales credit note. This ensures accurate reversal of revenue in the correct currency, supports proper multi-currency accounting, and enables the system to calculate any associated foreign exchange gain or loss
- Exchange Rate/Date:
The exchange rate reflects the value used to convert the foreign currency amount of the sales credit note into the base currency for accurate financial reporting. The exchange rate date indicates when this conversion is applicable.
- Credit Note Number and Date
The Credit Note Number is a system-generated unique identifier assigned to each sales credit note, ensuring traceability and preventing duplication.
The Credit Note Date is user-entered and marks the official date of issuance. Together, these elements serve as key references for internal controls, audit trails, customer communication, reconciliation processes, and regulatory reporting, ensuring that credit transactions are accurately recorded and properly documented.
- Reference Invoice Number and Date:
Enter the original sales invoice number and its date to which the credit note is related. This ensures proper linkage between the credit note and the initial transaction, enabling accurate reversal of revenue, audit traceability, and reconciliation in the customer’s account.
- Material/Service Details:
This section captures a comprehensive breakdown of the goods or services being credited, including item codes, descriptions, quantities, unit prices, discounts, and applicable taxes such as VAT or WHT. It may also include related cost centers or revenue dimensions. This information forms the foundation of the accounting entry, ensuring accurate reversal of revenue, correct tax adjustments, and proper inventory updates where physical goods are involved.
- Attachments:
The user can attach relevant supporting documents such as the original sales invoice, delivery notes, signed contracts, return authorization forms, or customer email approvals. These attachments provide a clear audit trail, support accurate reconciliation with the customer, and ensure compliance with internal documentation policies and external audit requirements.
- Narration
A brief narration or internal comment is included to provide context for the sales credit note—such as the reason for the return, nature of the adjustment, reference to specific agreements, or any relevant remarks. This note enhances clarity during internal reviews, audits, and facilitates quick understanding when addressing customer queries or regulatory inspections.
By following these steps in the Receivable Credit Note process, organizations can ensure accurate recording of sales transactions, maintain compliance with accounting standards, and facilitate effective financial reporting and analysis.
Receivable Allocation
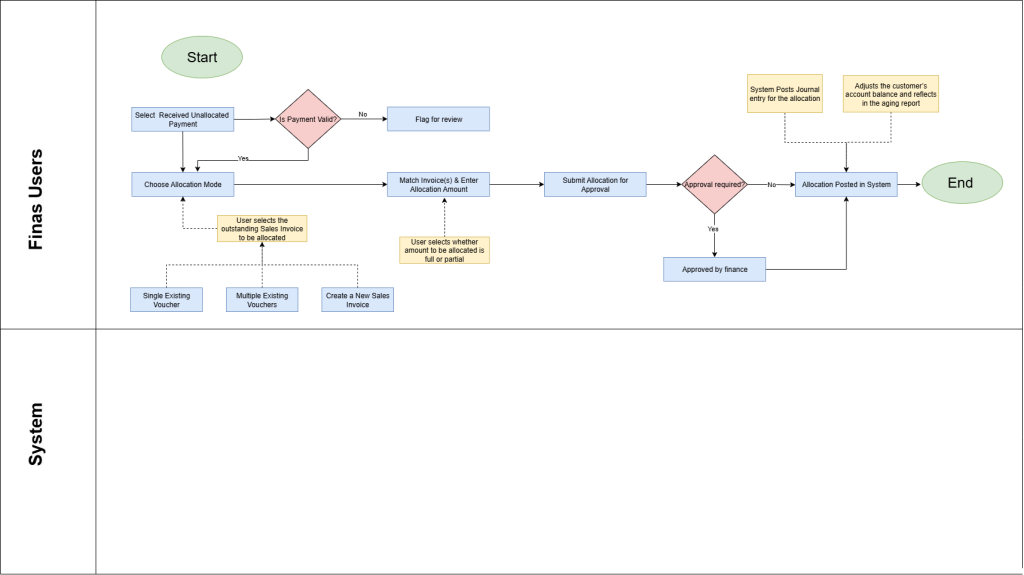
The Receivable Allocation process involves the systematic matching of incoming customer payments to corresponding outstanding sales invoices. This ensures that accounts receivable balances are accurately updated, customer ledgers are reconciled, and financial reports reflect true revenue realization and cash flow status. Below is a step-by-step explanation of each component in the receivable allocation workflow.
The process typically begins when the organization receives a payment from a customer — either as a bank deposit, cash payment, mobile money transfer, or other recognized receipt mode. Once the payment is posted into the financial system (FINAS), the user proceeds to allocate the amount against one or more open sales invoices. This action ensures proper reduction of outstanding receivables and maintains the integrity of customer account statements and aging reports.
- Select Received Unallocated Payment
The process begins by navigating to the Receivable allocation module and accessing the list of unallocated payments. These are payments received from customers that have not yet been mapped to any invoice. The user reviews & validates the payment details such as customer name, payment date, reference number, and amount to ensure the correct receipt is selected for allocation.
- Choose Allocation Mode:
After selecting the unallocated payment, the user proceeds to the “less” section where they choose the allocation mode. There are three options to allocate the payment against:
- A single existing voucher
- Multiple Existing voucher
- Create a new invoice directly from this point and immediately allocate the payment to it.
This flexibility supports various business scenarios, including advance payments or payments covering multiple orders.
- Match Invoice (s) and specify Allocation Amount:
Based on the selected mode, the system displays the list of open invoices for that customer. The user selects the relevant invoice(s) and enters the amount to allocate against each. This can be a full allocation (where the payment exactly matches the invoice) or a partial allocation (where the payment covers only part of the invoice). The system checks for over-allocation and currency consistency, prompting for exchange rate inputs if the invoice is in a foreign currency.
- Submit Allocation for Approval:
Once the invoice(s) and allocation amounts are reviewed and confirmed, the user submits the allocation request. If the organization’s workflow settings include an approval hierarchy, this submission will route the transaction to a designated finance approver or manager. The approver reviews the allocation details, confirms correctness, and either approves or rejects the transaction. All actions are logged for audit purposes.
- Allocation Posted in System
Upon approval and posting of the allocation, the system posts the accounting journal entries. It debits the unallocated receipts account and credits the customer’s Accounts Receivable based on the selected invoices. The payment status changes from “Unallocated” to “Allocated,” and the system updates the invoice status to reflect whether it has been fully or partially settled.
By following these steps in the Receivable Allocation process, organizations can ensure accurate application of customer payments to outstanding invoices, uphold the integrity of accounts receivable balances, and maintain clear and auditable customer account records. This process enhances financial transparency, improves cash flow tracking, supports timely reconciliation, and facilitates effective financial reporting and decision-making.