My Pre Expense
Introduction/Purpose:
The Pre Expense Claim module is designed to streamline the process of managing expense claims of employees within an organization.The purpose of the Pre Expense Claim module is to automate and simplify the expense claim by the employee to improve efficiency, accuracy, and transparency.
How to navigate:
- Click on My Pre Expense Icon it will take you the all the list of the pre expese clain by the employee itself and employee .
My Request: This filter enables the user to view pre-expenses specifically requested by themselves. By choosing this option, the user can view their own submitted expense claims requests, and user can filter their pre-expense requests based on the following categories:
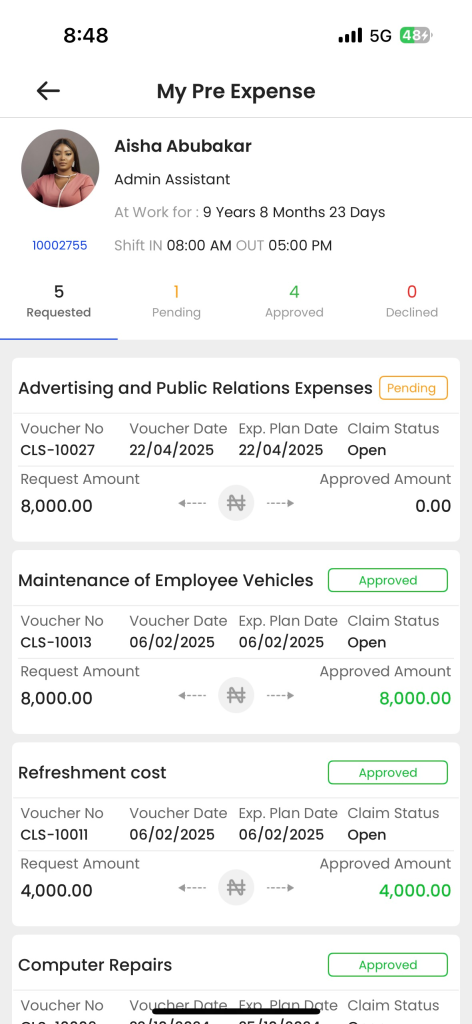
- Requested: This filter allows users to view their pre-expense claim requests that have been submitted. By selecting this option, users can easily identify and track the status of their pending pre-expense claims, ensuring transparency and visibility throughout the approval process.
- Pending: This filter enables users to narrow down the list of Pre-expense claims that are currently under review by senior or the finance department. By selecting this filter, users can quickly identify which claims are still waiting for a decision.
- Approved: This filter allows users to view pre-expense claims that have been successfully approved. By selecting this option, users can easily access the details of approved pre-expense claims, including the approved amount, and proceed with the reimbursement process.
- Declined: This filter helps users identify pre-expense claims that have been declined. By selecting this filter, users can review the reasons for the declined claims and take appropriate action, such as making corrections, providing additional information, or resubmitting the claim for reconsideration
Add Pre Expense Request
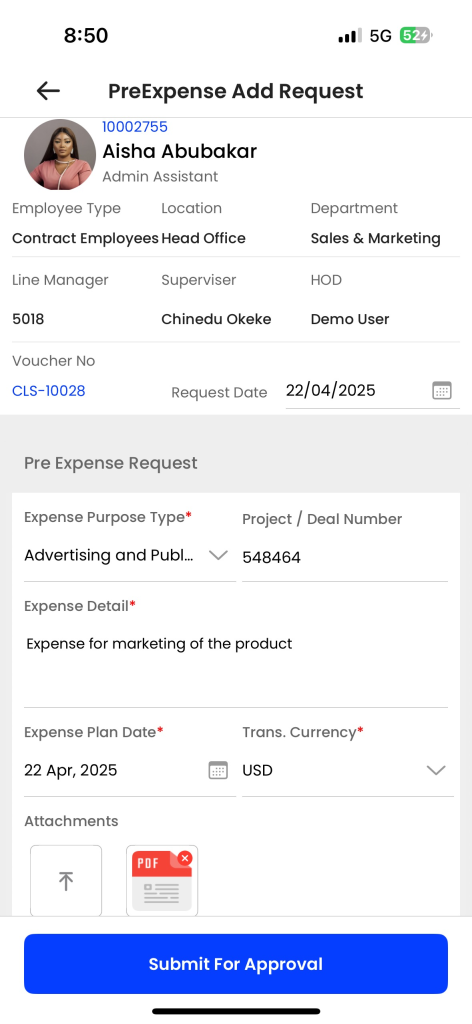
- Expense purpose type: This field allows you to select the purpose or category of your expense, such as travel, accommodation, meals, etc.
- Project / Deal Number: This field is used to enter the project or deal number associated with the expense. It is helpful for tracking expenses related to specific projects or deals within the organization.
- Expense details: This field allows you to provide a brief description or information about the specific expense you are claiming
- Expense Plan Date: This field indicates the date when the user plans to spend their pre- expense money.
- Trans. Currency*: This field is used to specify the currency in which the expense was incurred.
- Attachment: This field allows the user to attach the document related to the my retirement.
- Add Requisition Details:
- Expense Head: This field refers to the main category or type of expense for which the request is being made. Examples include “travel,” “meals and entertainment,” “office supplies,” or “training.”
- Sub Expense Head: This field is used to further specify the expense category selected in the Expense Head field. It allows for more detailed classification within the main expense category.
- Description: In this field, you should provide a clear and concise explanation of the expense being requested. It should include relevant details and the purpose of the expenditure.
- Requested Amount: This field requires you to enter the total amount of money being requested for the expense. Ensure that the amount is accurate and aligns with the expense description.
- Advance Payment: This check needs to be selected if employees need advance payment.
- Advance Details
- Payment Mode: This field will have a drop down whether the payment should be disbursed in cash or online methods.
- Proposed Date: This field will show the proposed date on which date the amount should be disbursed.
- Bank Account No: If the amount payment mode is online or bank transaction for that purpose employees need to mention the bank account number.
- Proposed Amount: In this field employees need to mention how much the proposed amount or any advance amount is required by the employee.
- Notes: This field helps the user to add some notes on the expense request.
- Submit for approval: This option allows the user to submit the request for approval. The user will submit the information, and it will be sent for approval.
Team Expense Request:
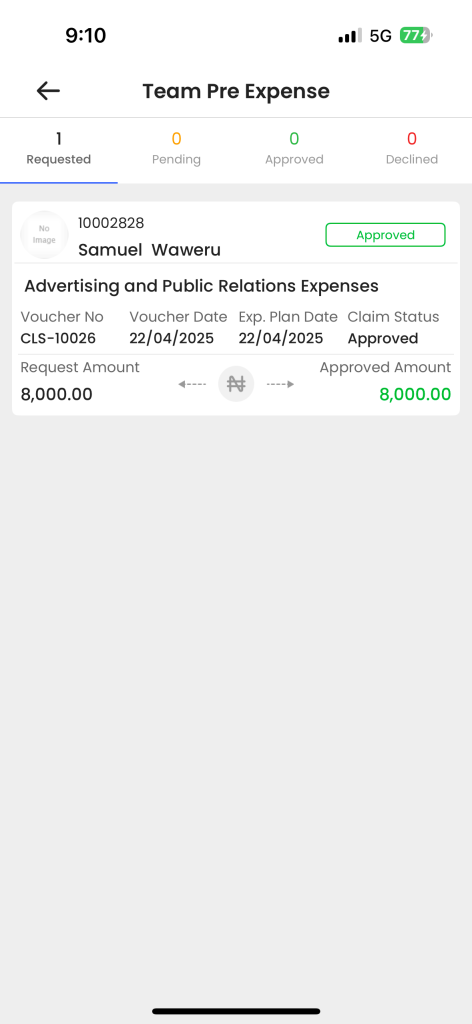
In this user to view the pre expenses that have been requested by their team members. By selecting this option, the user can view the pre-expense requests submitted by their team members. The user can accept or reject the team requests, and the user can filter the team requests based on the following categories:
- All: It includes all the pre-expense requests created by the team members.
- Pending: The user can view all the pending team members’ pre-requests, which has to be approved or rejected by the user.
- Approved: The user can view all the approved team members pre-expense requests.
- Declined: The user can view all the declined team members’ pre-expense requests.
Monthly Pre Expense Summary (YTD):
This is the graphical representation of the monthly expense claim by the employee with a number of counts
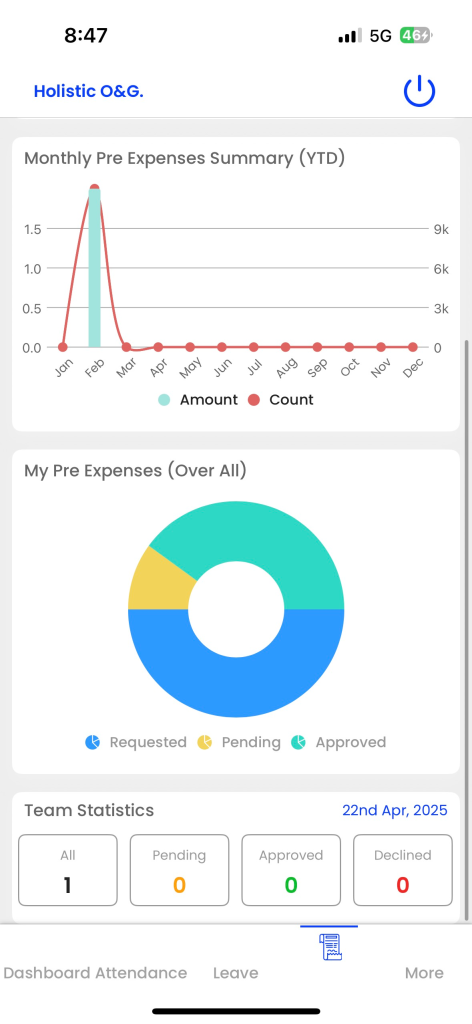
My Pre Expense (Over all):
This is a Pie chart representation of the employee expense status with color differentiation.
Team Statistics :
It will show the statistics value of the employee’s team member pre expense whether they are pending ,approved and declined.